How to run AI queries using SQL
In this article, you'll learn how to set up an AI-powered SQL chatbot that allows you to manage SQL databases using just your words—no coding or SQL knowledge required. By following step-by-step instructions, you'll download and organize the necessary model from Hugging Face, configure the chatbot in Ozeki AI Server, and connect it to a MySQL database. You’ll also set up a chat interface where you can interact with the bot, making database management as simple as asking questions in natural language.
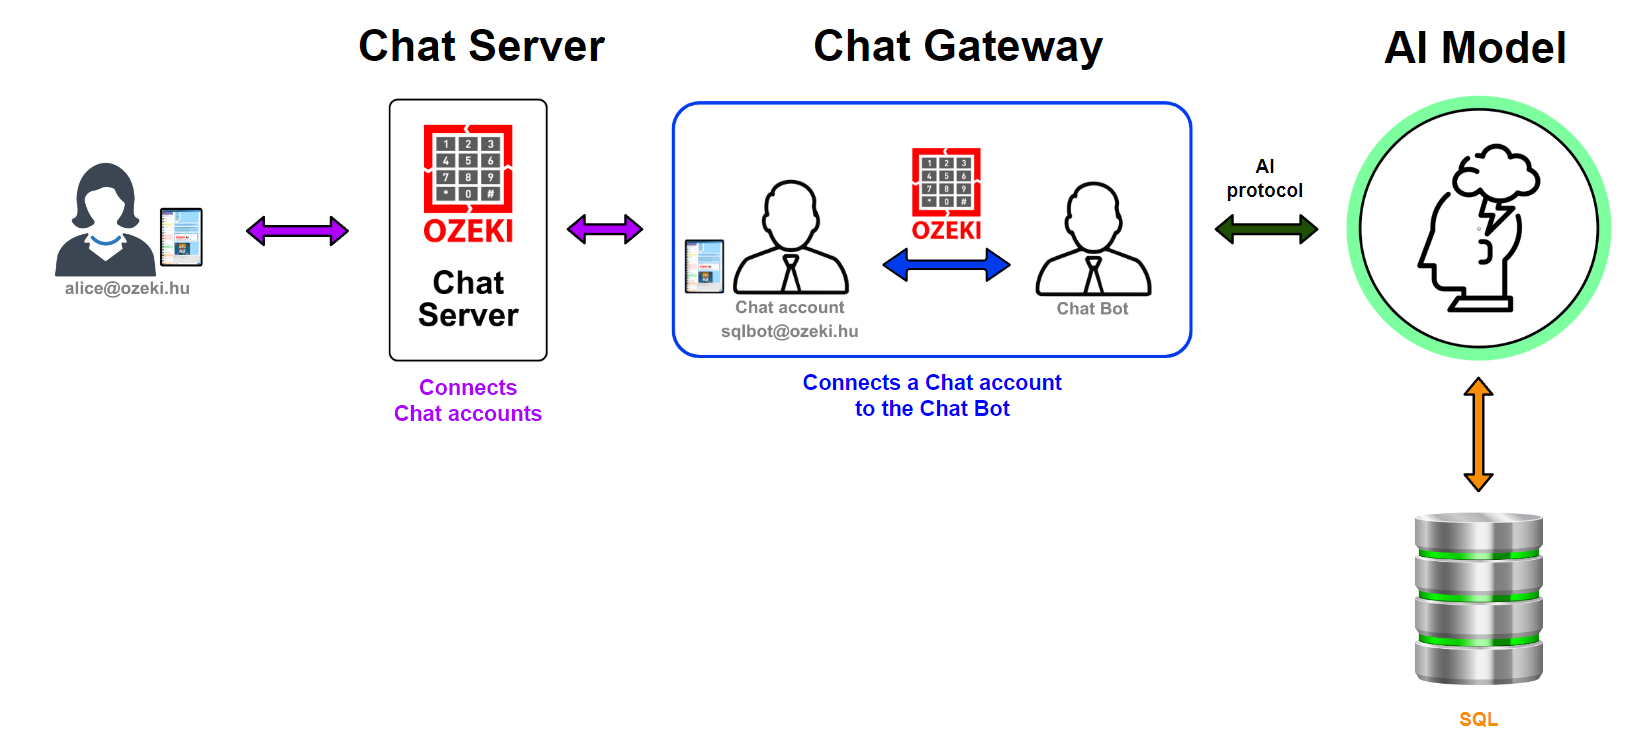
What is Ozeki AI Server?
Ozeki AI Server is the software you need if you want to build a Local AI system. To run AI models locally or to use remote AI services efficiently, you need the AI server functionality offered by Ozeki AI server software. This software allows you to build great AI solutions without the need of hiring software developers. With Ozeki AI server you can optimize costs, and stay up to date, because switching models under solutions is very easy with this system.
What is SQL?
SQL (Structured Query Language) is the standard programming language for managing and manipulating relational databases. It’s used to create tables, insert data, run queries, and retrieve information. Traditionally, SQL requires precise syntax and technical knowledge, but with AI integration, users can perform SQL operations using simple natural language commands.
Prepare the database (Quick Steps)
- Open your MySQL management tool
- Create database tables
- Insert sample data
Download the model (Quick Steps)
- Access the Hugging Face model page
- Navigate to Files and download the GGUF file
- Create local model directory
- Move the model file to the AIModels folder
Ozeki AI Server configurations (Quick Steps)
- Launch Ozeki AI Server
- Create a new GGUF model
- Select and configure the model file
- Create new AI SQL chatbot
- Choose SQL database type
- Enter database connection details
- Add create table statements
- Activate chatbot and test
Run AI queries using SQL (Quick Steps)
- Open the Chat Gateway
- Add myozeki.com chat account
- Set the account online
- Log in to the MyOzeki chat interface
- Send natural language question to chatbot
- Check AI-generated database response
- View chatbot logs
Prepare the database (Video tutorial)
This tutorial shows how to set up a MySQL database for use with the AI SQL chatbot. You'll begin by creating tables and inserting sample data.
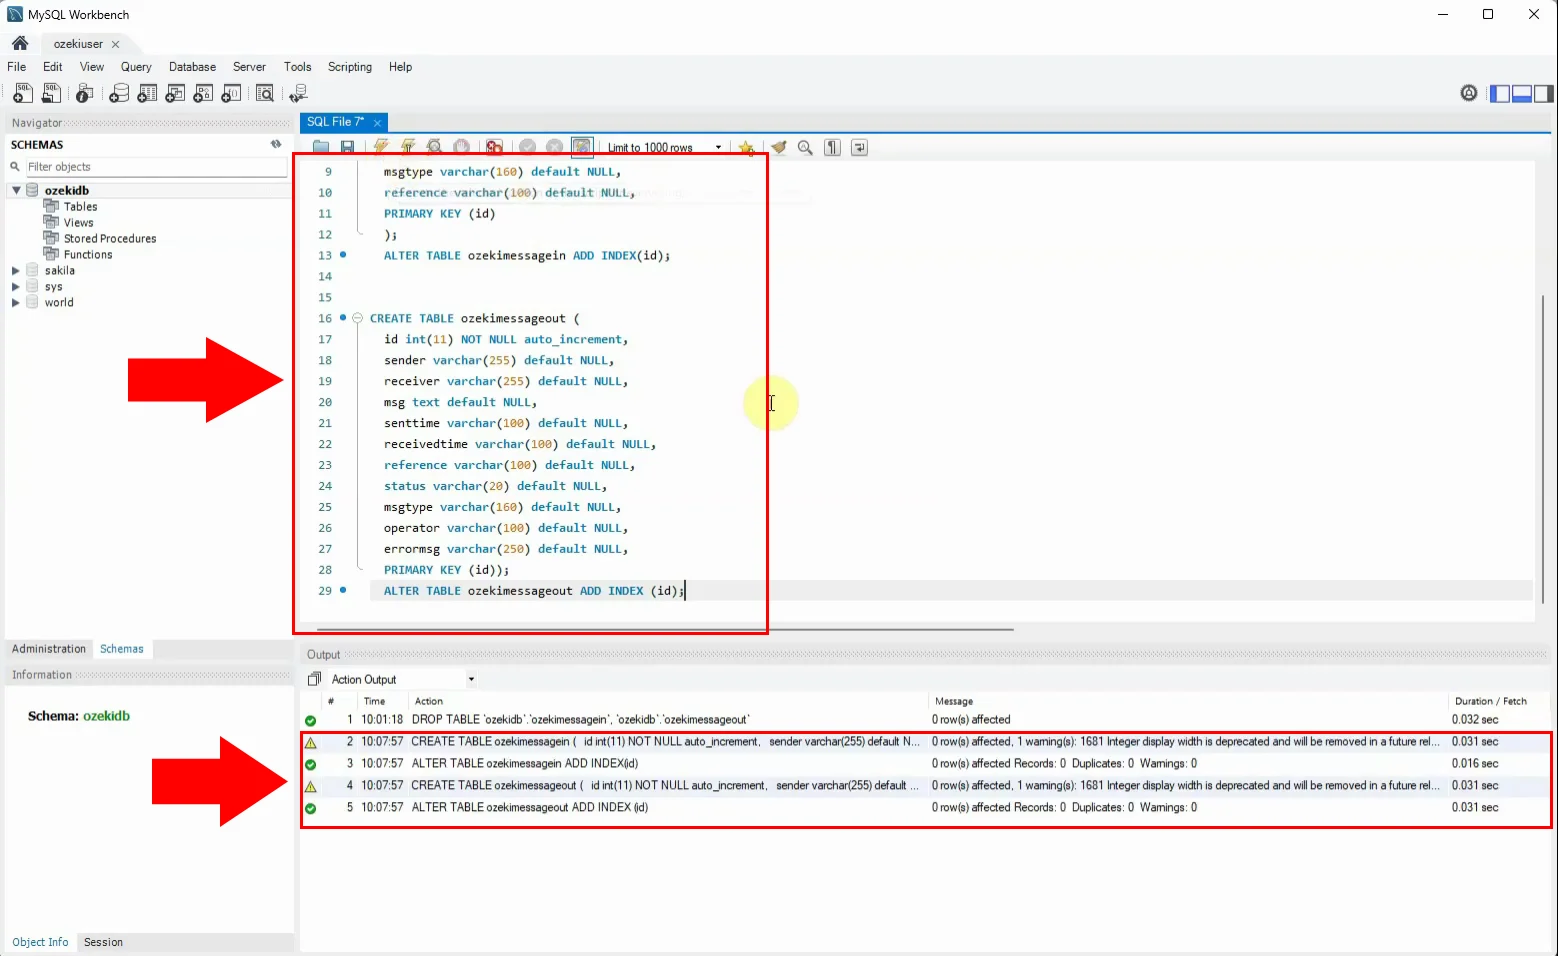
Step 1 - Create database tables
Use your MySQL interface to create tables required for your use case. This provides the structure the AI bot will query (Figure 2).
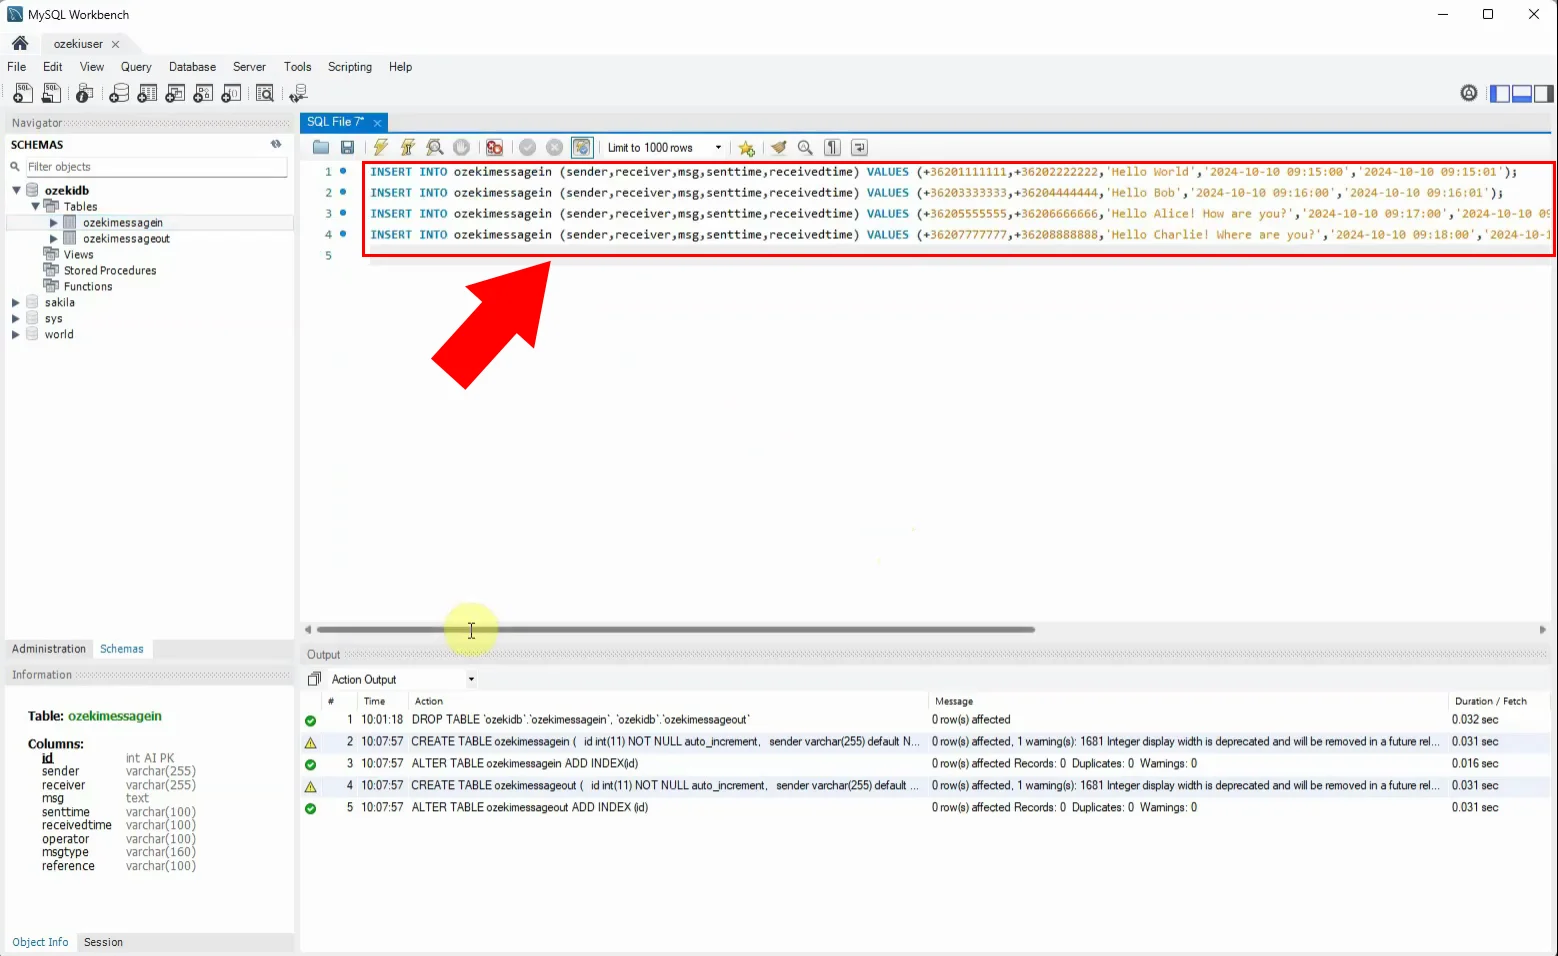
Step 2 - Insert data into tables
Add sample records into the tables. This helps you test and verify that the chatbot is querying correct information (Figure 3).
Download the model (Video tutorial)
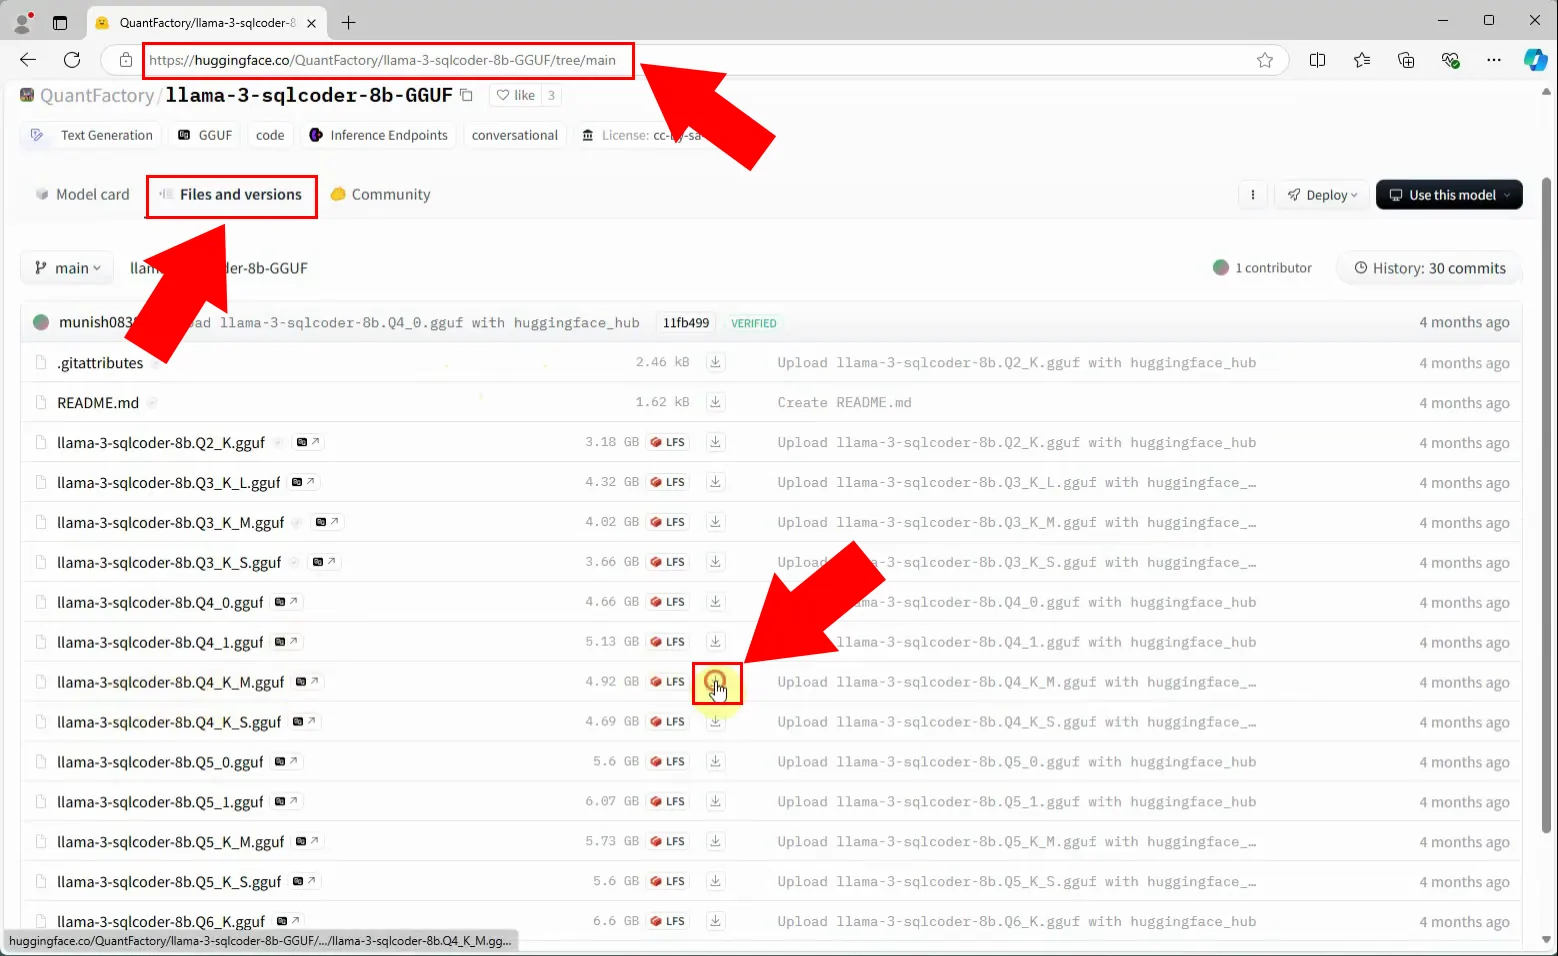
The video provides a step-by-step guide for downloading a specific AI model from Hugging Face and saving it to your local machine. It begins by navigating to the model page on Hugging Face's website. From there, the tutorial shows how to access the "Files and versions" tab to download the correct file (llama-3-sqlcoder-8b-Q4_K_M.gguf). Once the download starts, viewers are instructed to wait for it to complete. After that, the video explains how to create a new folder, C:\AIModels, on your computer, where the downloaded file will be placed for easy access.
Step 3 - Download model GGUF file
Go to HuggingFace and download the model: llama-3-sqlcoder-8b-Q4_K_M.gguf. This model is optimized for SQL-style prompting and understanding (Figure 4).
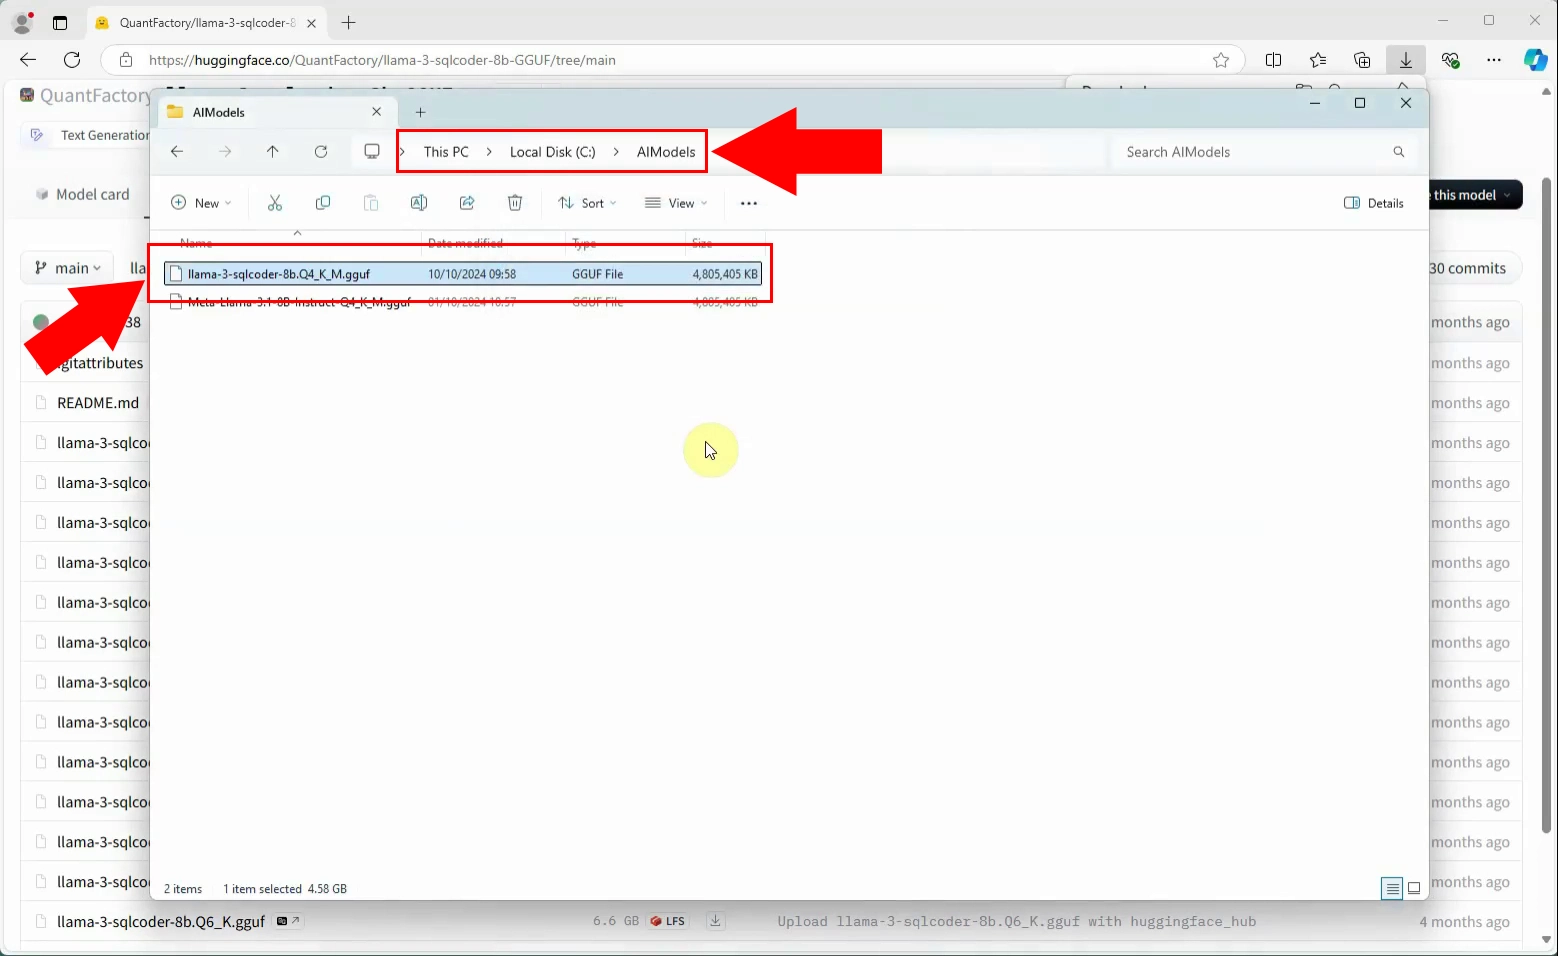
Step 4 - Copy model file to C:\AIModels
Once you have downloaded the model file, move it to the C:\AIModels folder. This directory serves as the standard storage location for all AI models to ensure proper integration with the Ozeki AI Server (Figure 5).
Ozeki AI Server configurations (Video tutorial)
This video walks through the process of setting up an AI-powered SQL chatbot and testing it with a prompt. It starts in Ozeki AI Server, guiding you to create a new AI model by selecting the GGUF format and choosing the llama-3-sqlcoder-8b model file. Afterward, the video shows how to create a new chatbot by selecting AI SQL and configuring it for a MySQL database. You'll see how to set up the connection, create tables using SQL commands, and activate the chatbot. Finally, the video demonstrates sending a database-related query to the bot and verifying its response, followed by checking the chat logs under the Events tab.
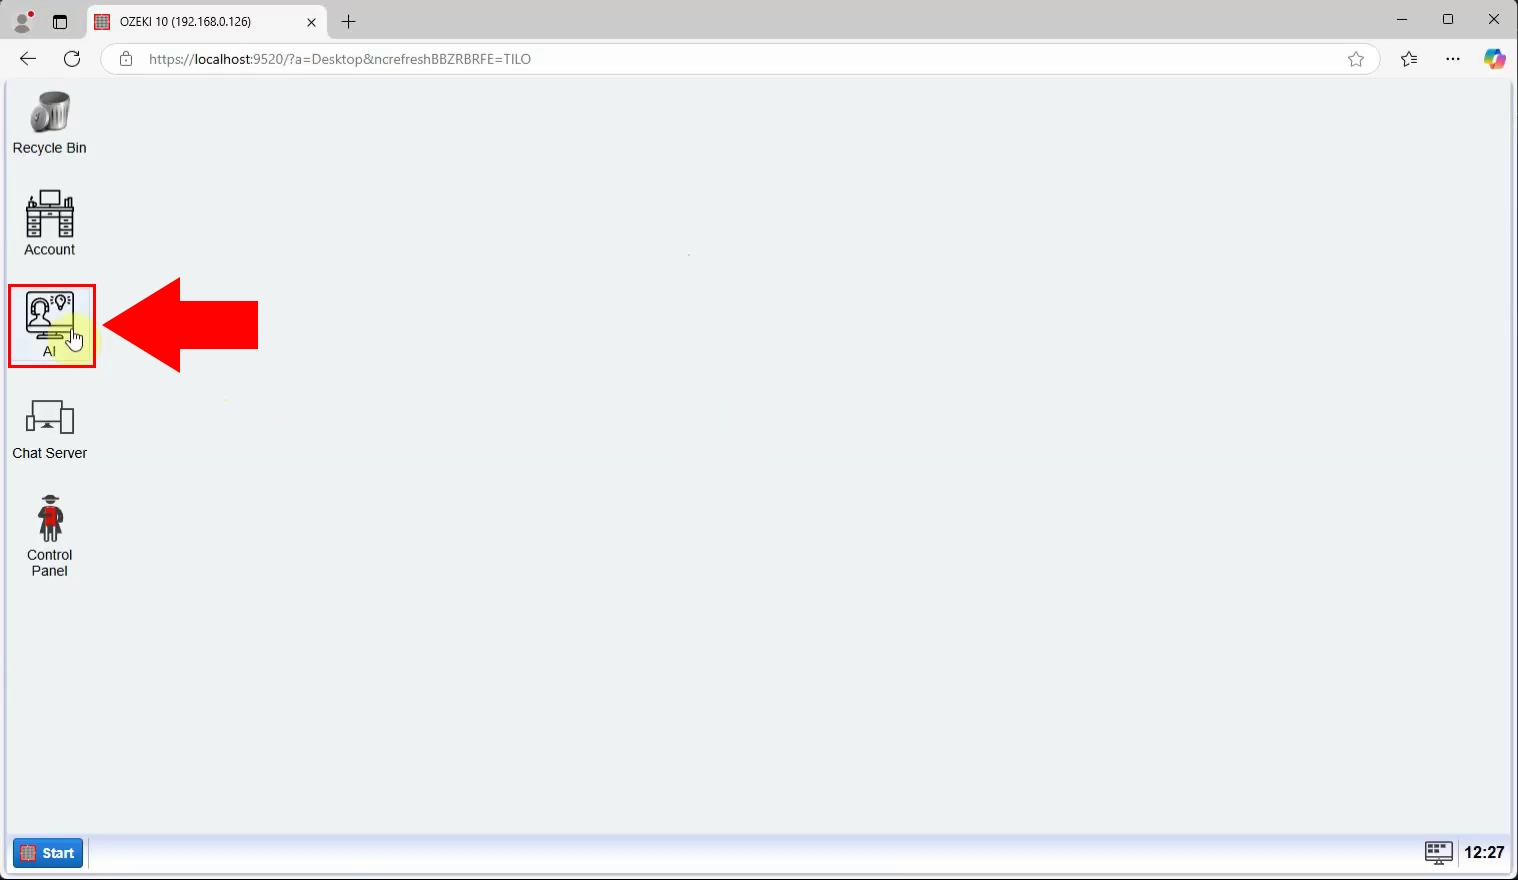
Step 5 - Open Ozeki AI Server
Start the Ozeki AI Server within the Ozeki 10 platform. This is your central interface for managing models and bots (Figure 6).
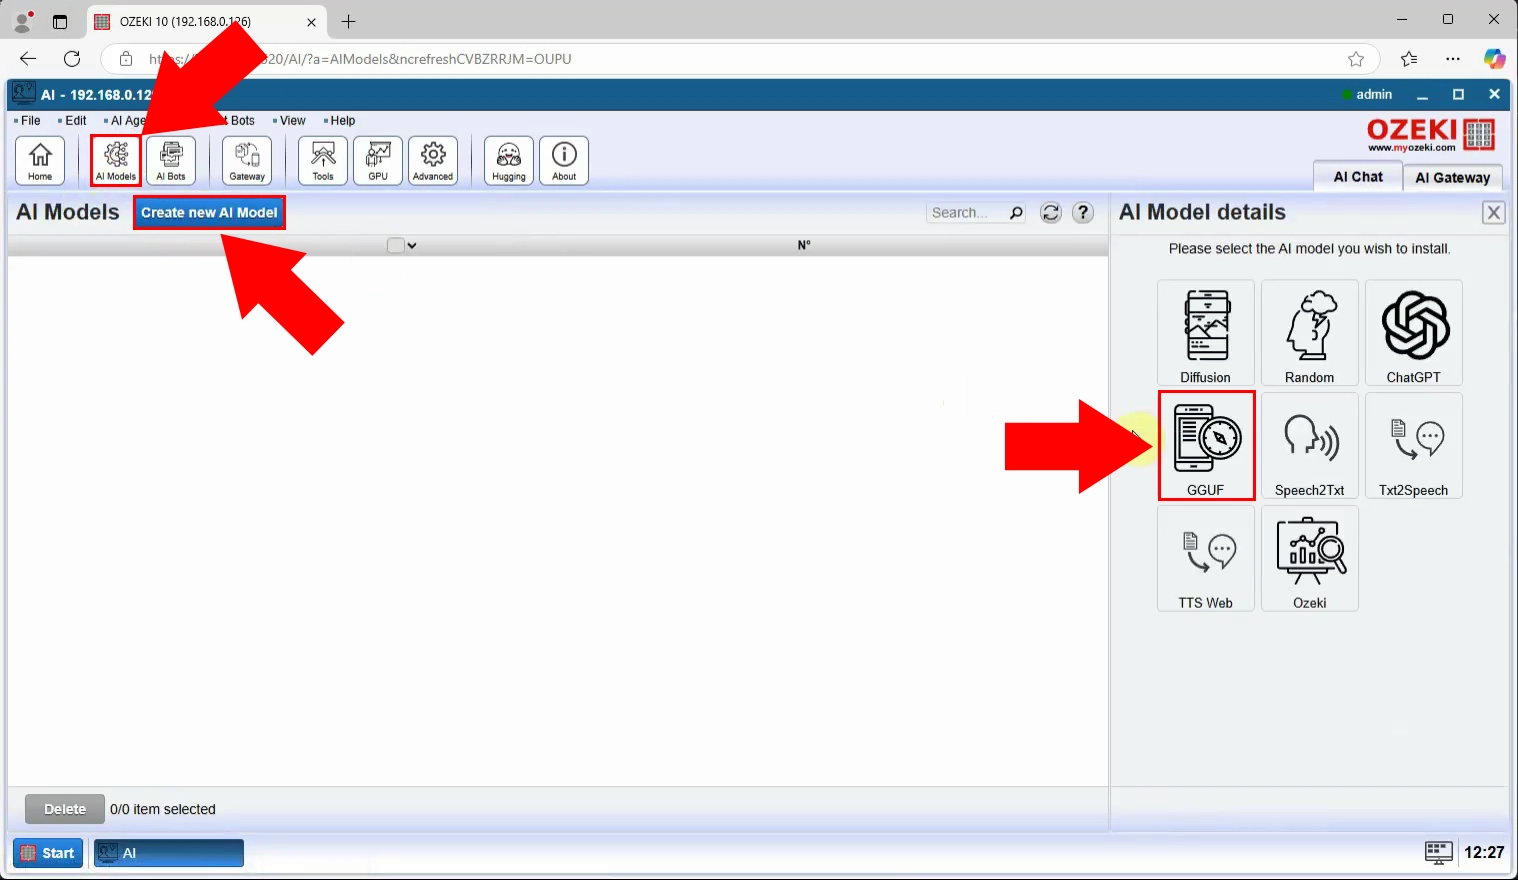
Step 6 - Create new GGUF model
The Ozeki AI Server interface is now visible on the screen. To create a new GGUF model, start by clicking on "AI Models" at the top of the screen. Next, click the blue button labeled "Create a new AI Model". On the right side of the interface, you will see various options, select the "GGUF" menu (Figure 7).
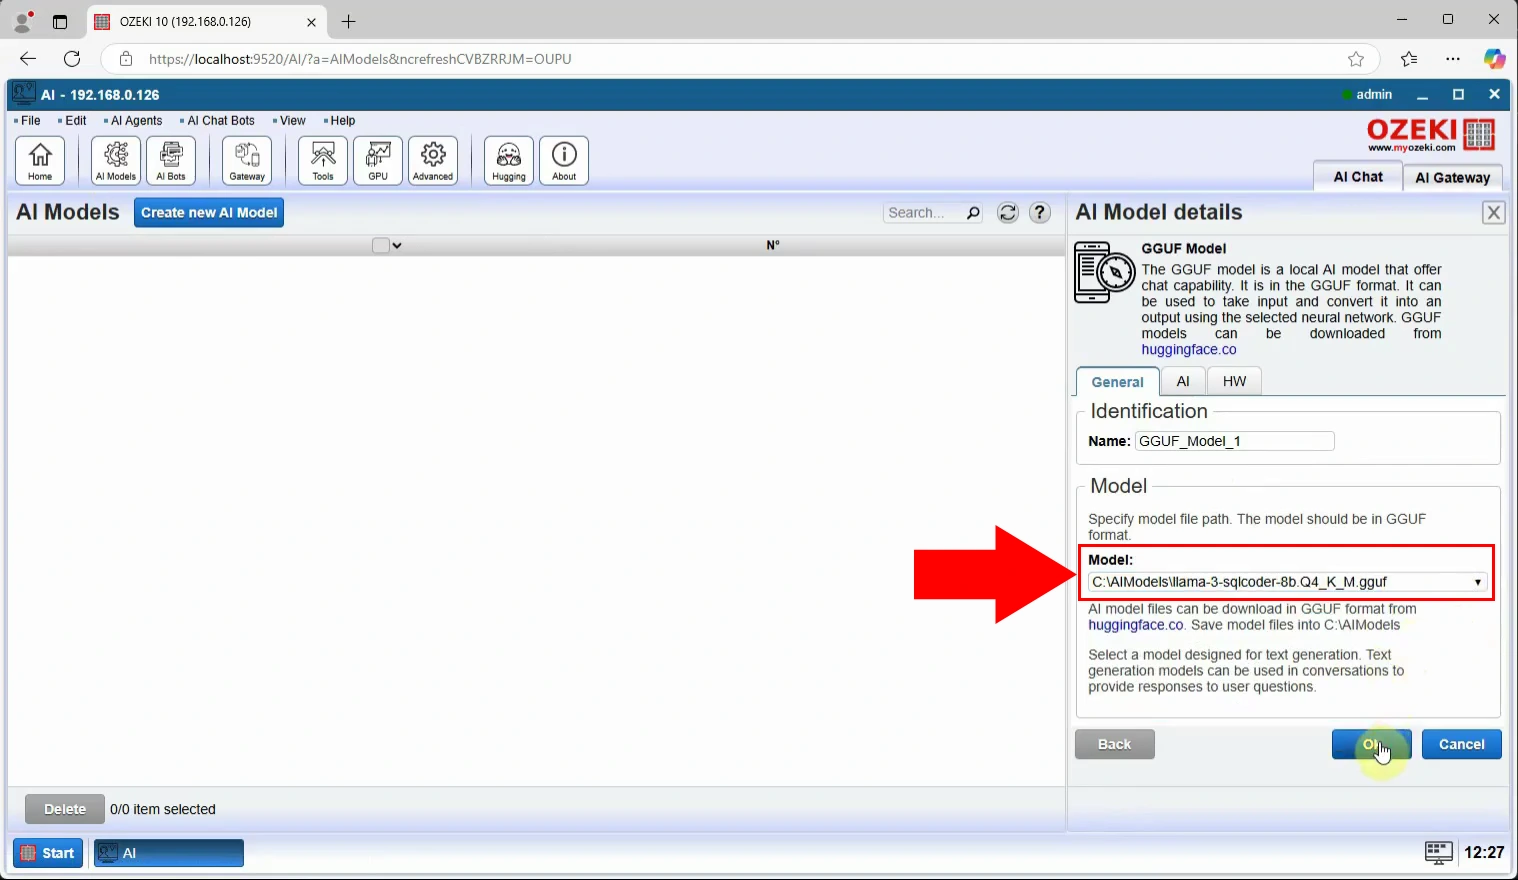
Step 7 - Select downloaded model
Select the model file you've downloaded from the dropdown list and press Ok (Figure 8).
Important: set the temperature (creativity) of this model to 0. The reason why is that this way, the model's answers will be completely deterministic, which is ideal for SQL-related tasks.
To do that, click on your newly created model. In the right panel, navigate to the HW tab. Scroll down, until you get to the Creativity section. Tick the box next to Enable temperature customization, and change the value next to Creativity from (by default) 1 to 0.
Step 8 - Create new AI SQL chatbot
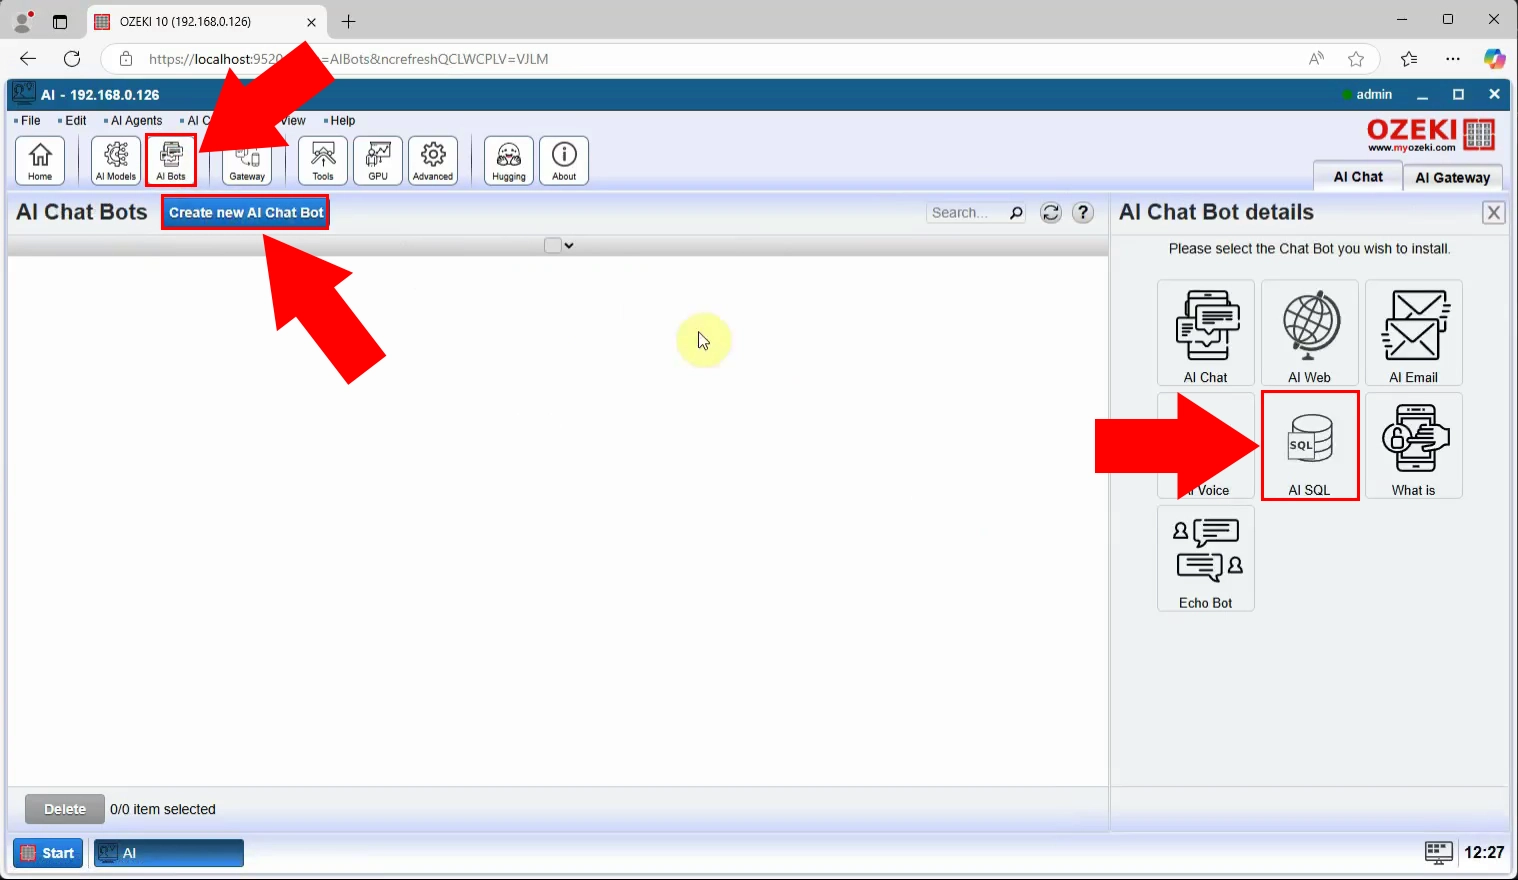
Click Chat bots, then Create new Chat bot. Select AI SQL from the options in the right panel (Figure 9).
Step 9 - Select SQL database type
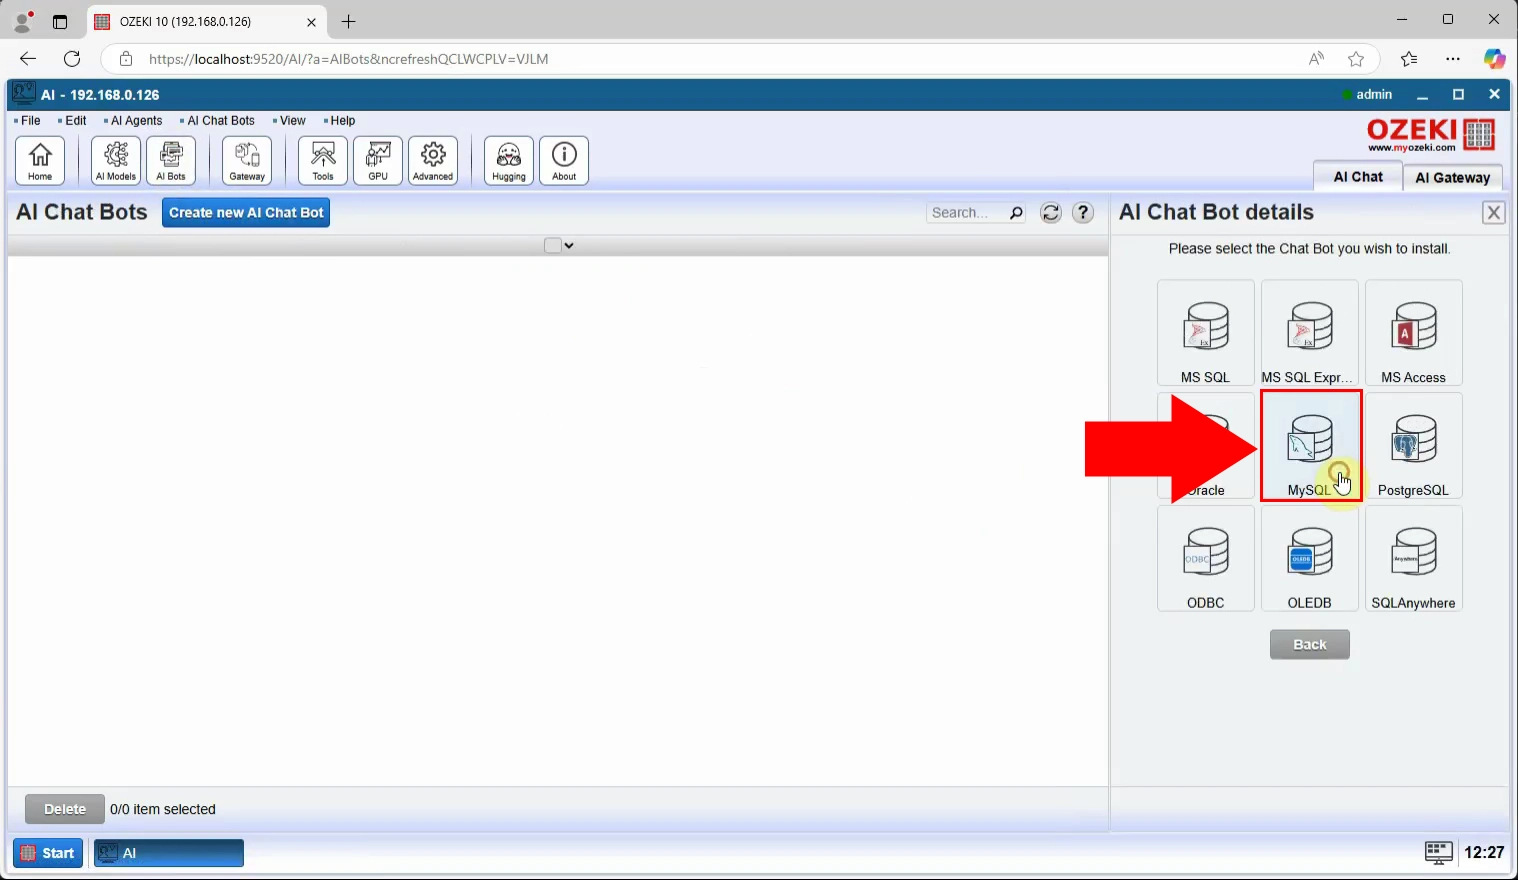
Select your desired SQL database type. For today's tutorial, we'll go with MySQL (Figure 10).
Step 10 - Configure database connection details
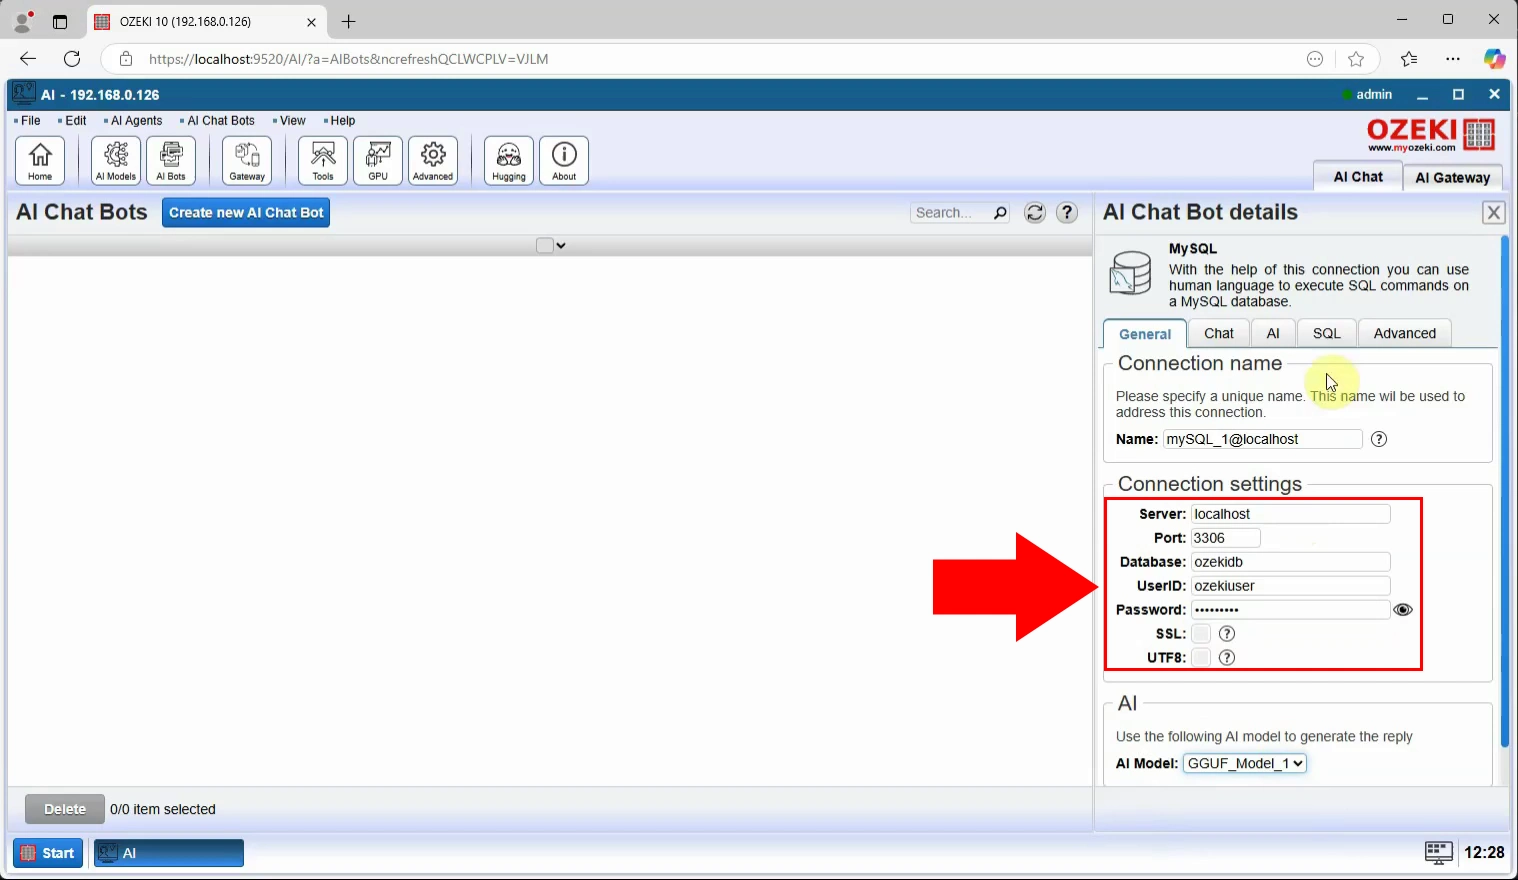
Enter the MySQL connection parameters, including Server, Port, Database, UserID, Password, SSL, UTF8 (Figure 11).
Step 11 - Insert create table statements
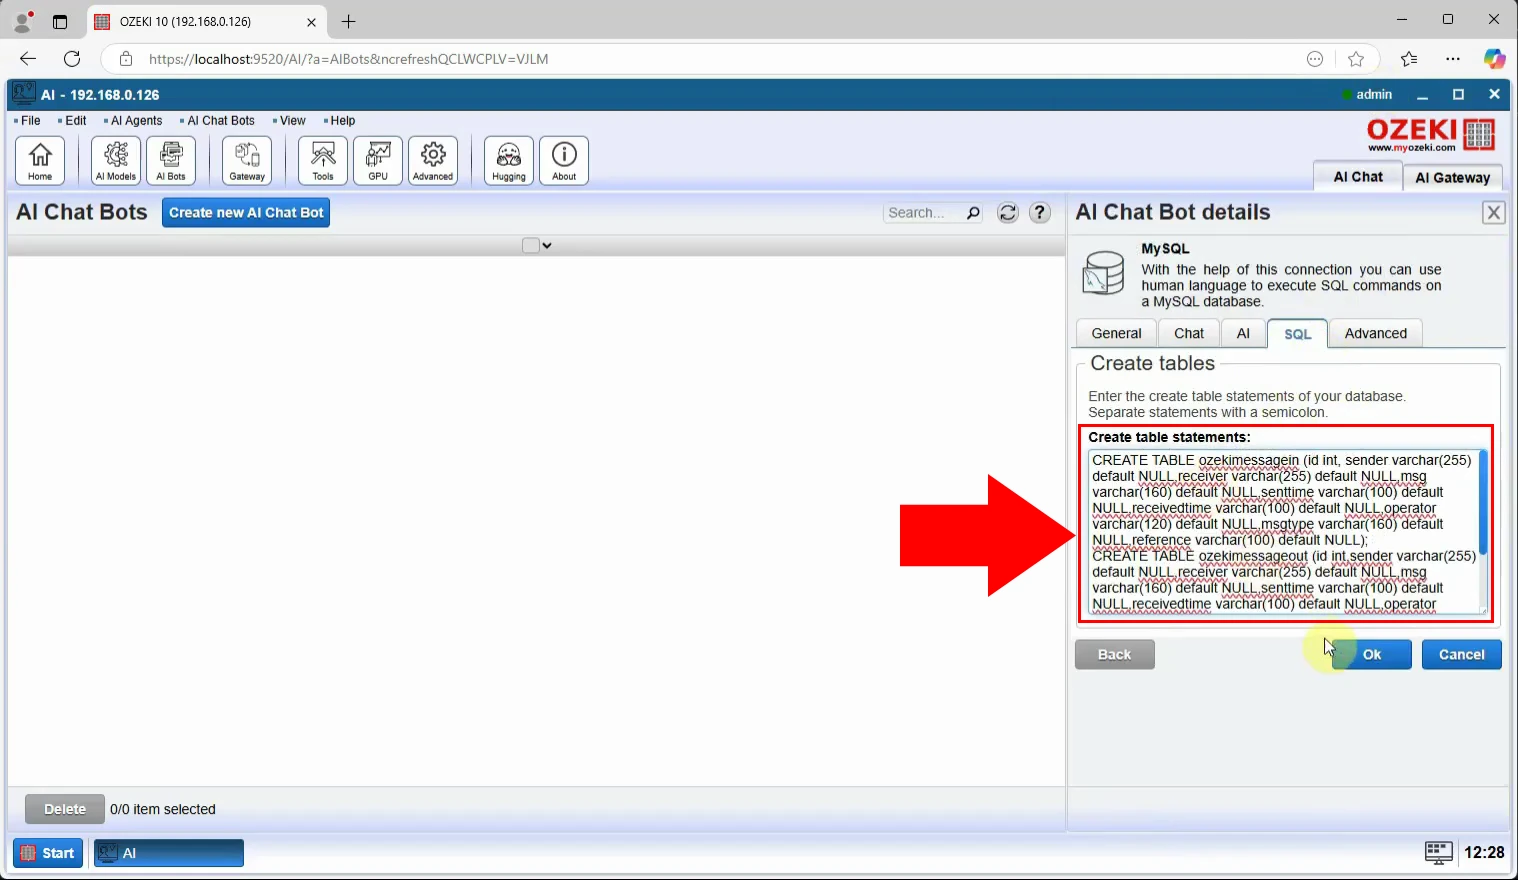
Open the SQL tab, and insert your create table statements, highlighted by a red frame in Figure 12, then click Ok.
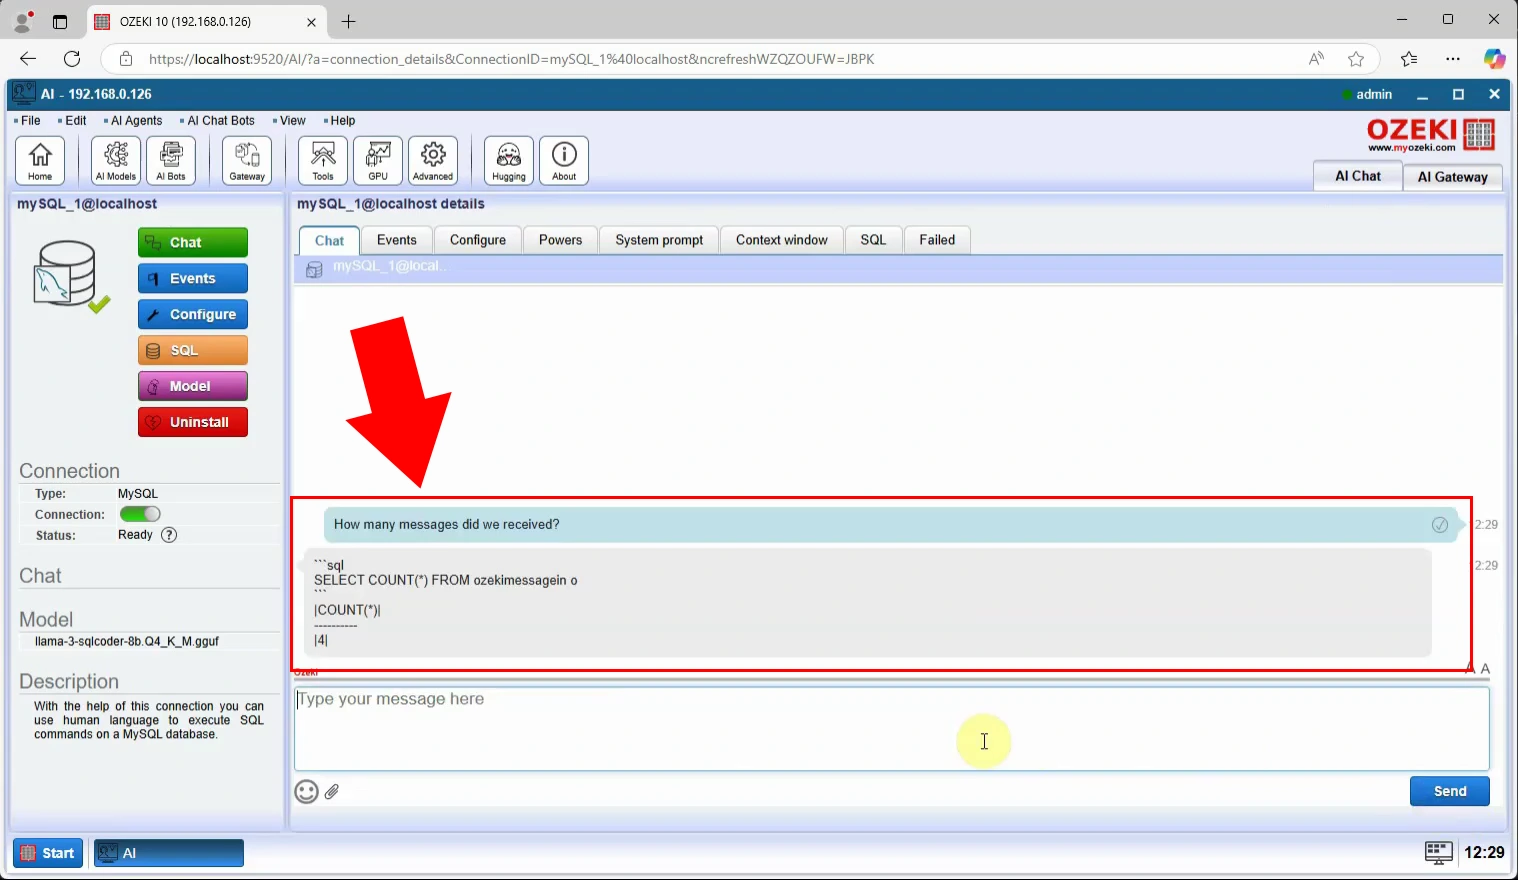
Step 12 - Chat with AI
Start the chatbot by toggling it online. Ask a natural language question like "Which product has the highest price?" and the bot will return SQL-based results (Figure 13).
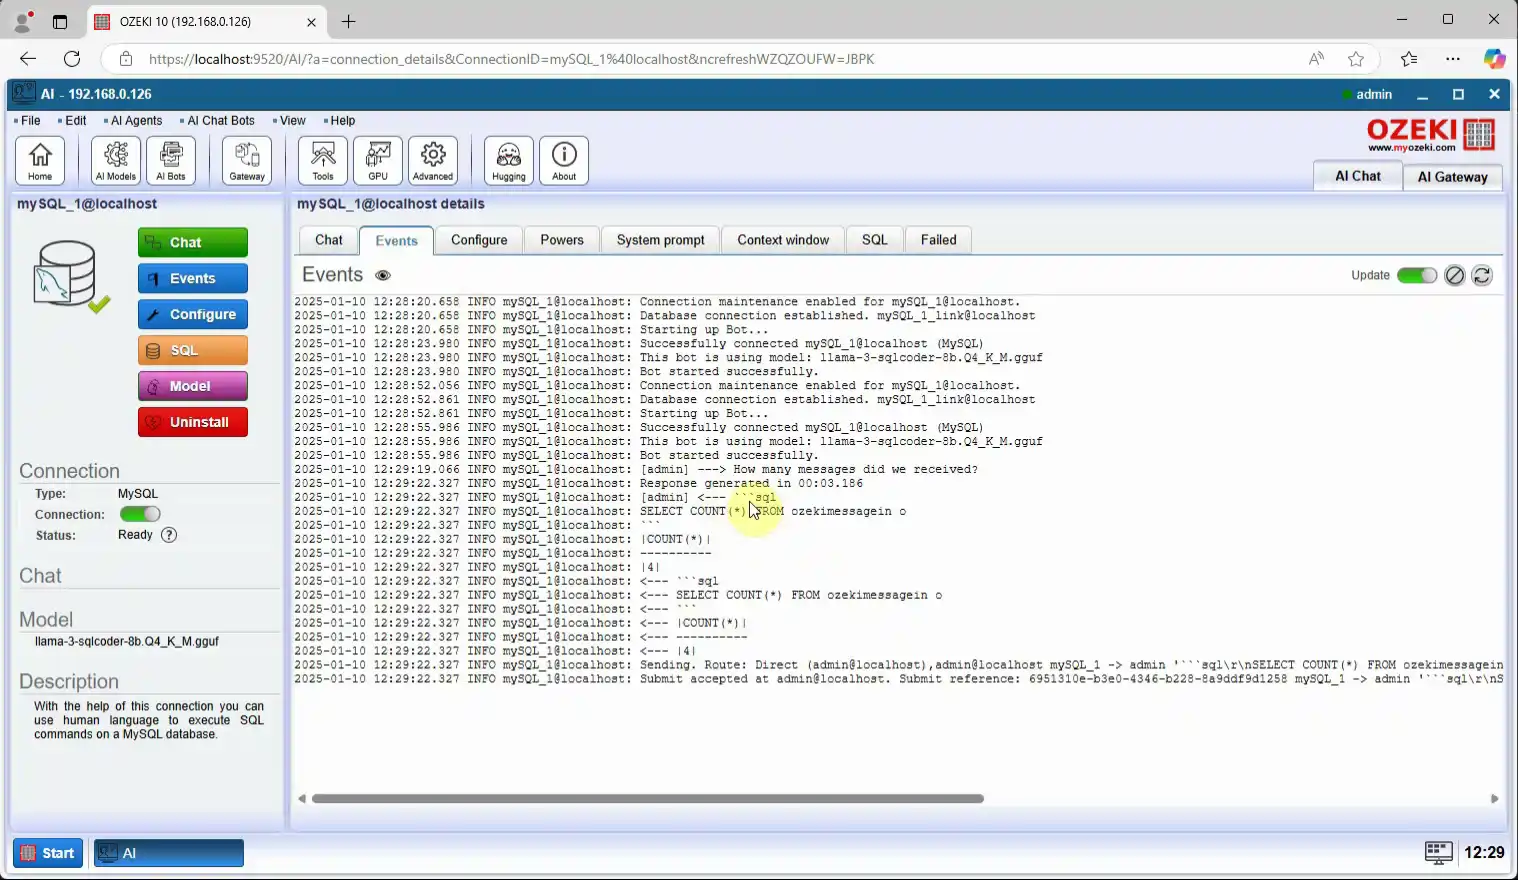
Step 13 - AI chat log
Go to the Events tab of your chatbot to monitor and log the chat history and bot responses for debugging or review (Figure 14).
Run AI queries using SQL (Video tutorial)
This video demonstrates how to set up a myozeki.com account for an AI chatbot using Ozeki's Chat Gateway, create routing rules for incoming and outgoing messages, and test the connection. It begins by opening the Chat Gateway within OZEKI 10, where you'll add a new chat account by installing the "Ozeki chat account" option and entering the bot's login credentials. After setting the account to online, the video walks through creating routing rules for both incoming and outgoing messages. Once the setup is complete, you'll log into the myozeki.com chat interface, send a test message to the chatbot, and verify the connection by checking the bot's event logs for activity.
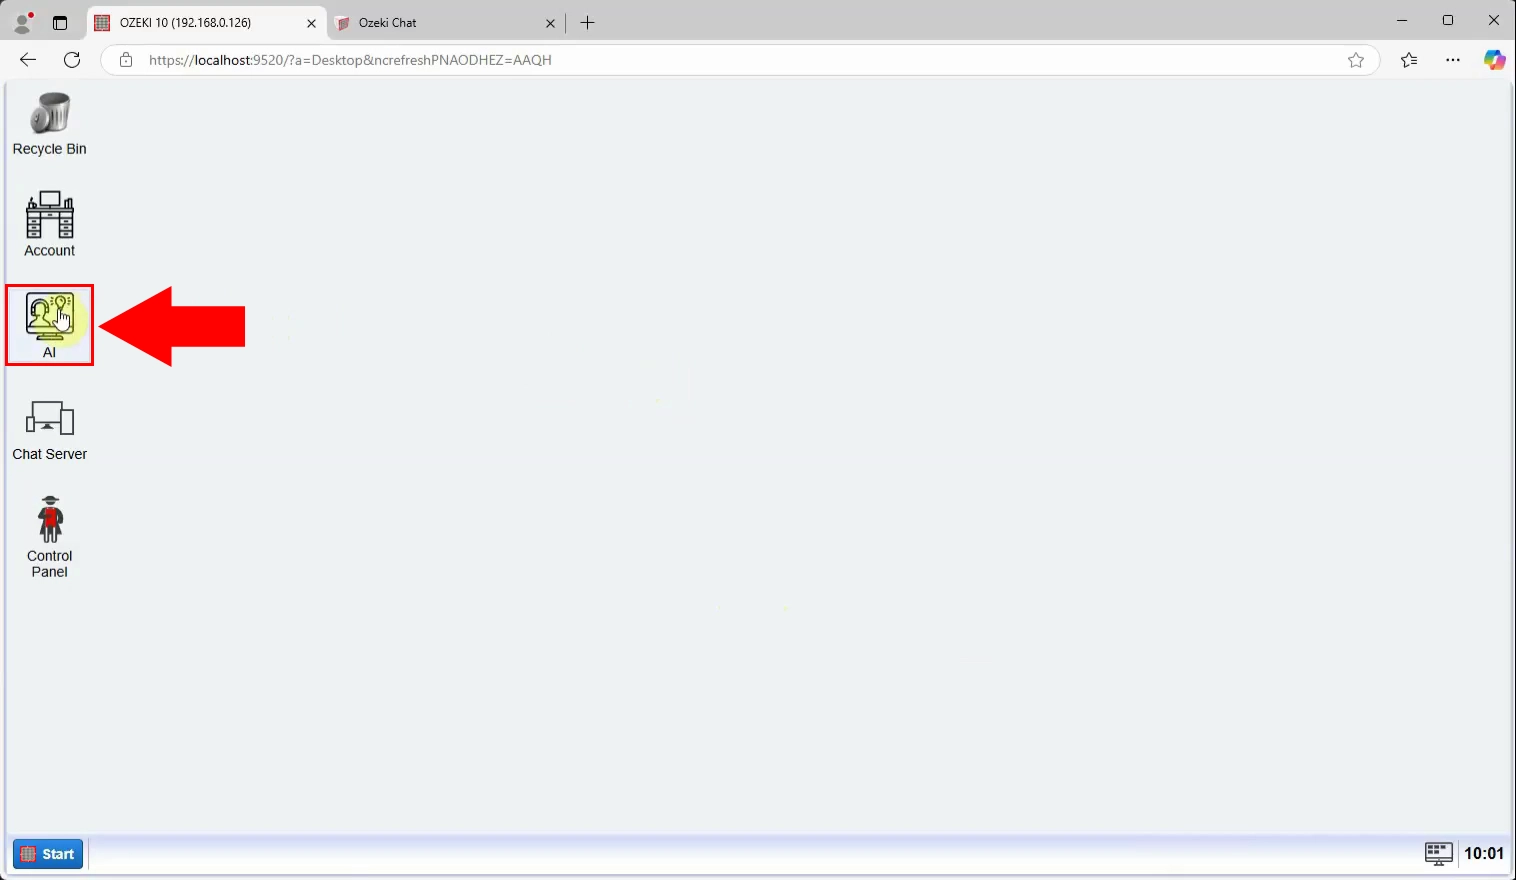
Step 14 - Open AI Server
Launch the Ozeki AI Server application to start the configuration process (Figure 15).
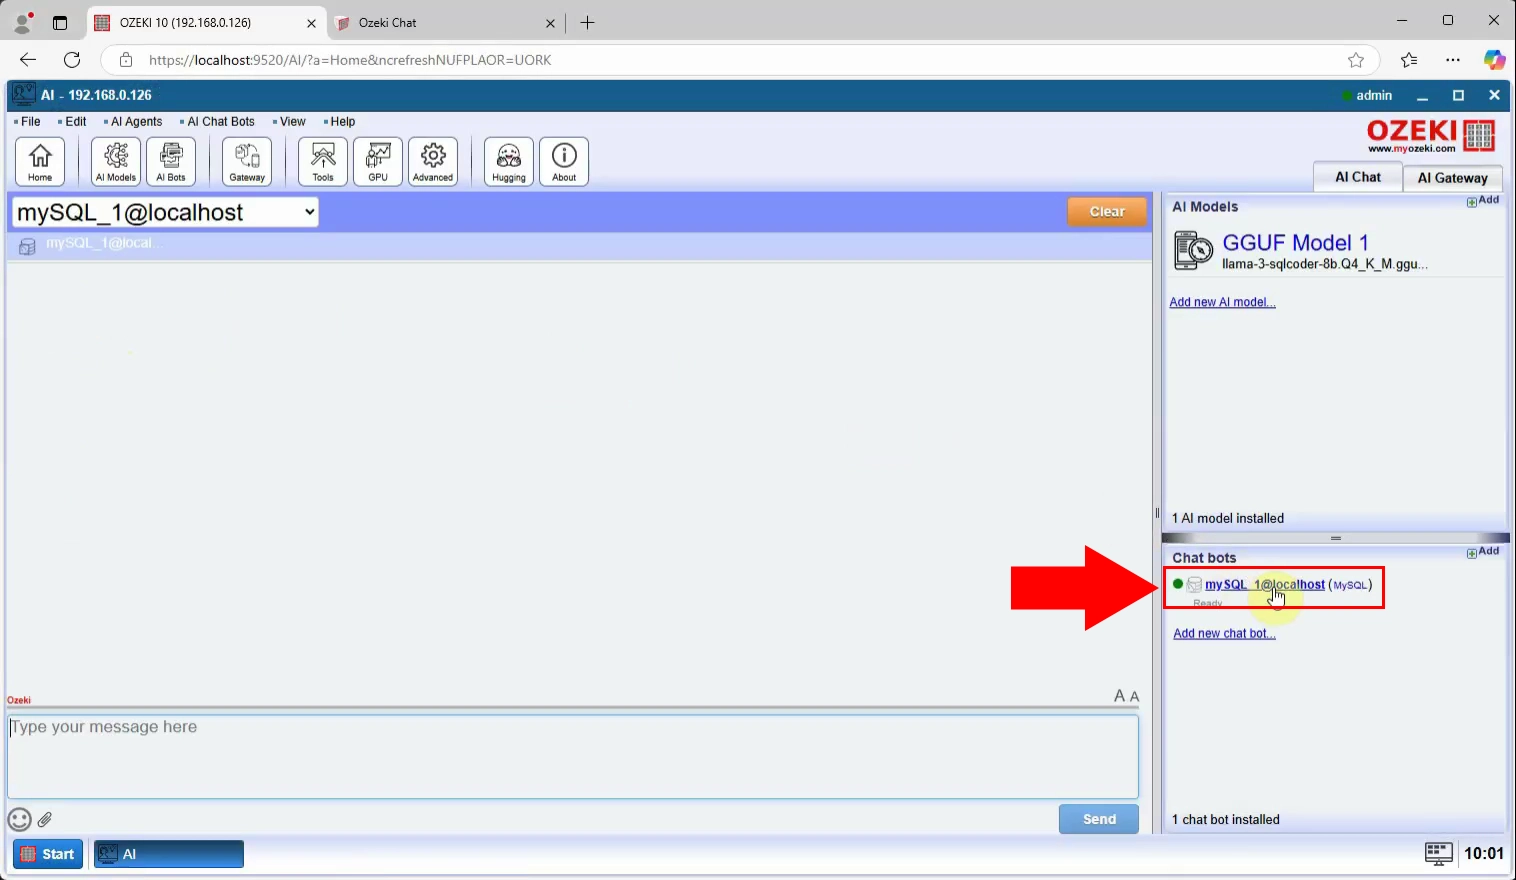
Step 15 - Select Chat Bot
In the home menu, on the right hand side under the "Chat bots" section, select the "mySQL_1" bot you created and click on it (Figure 16).
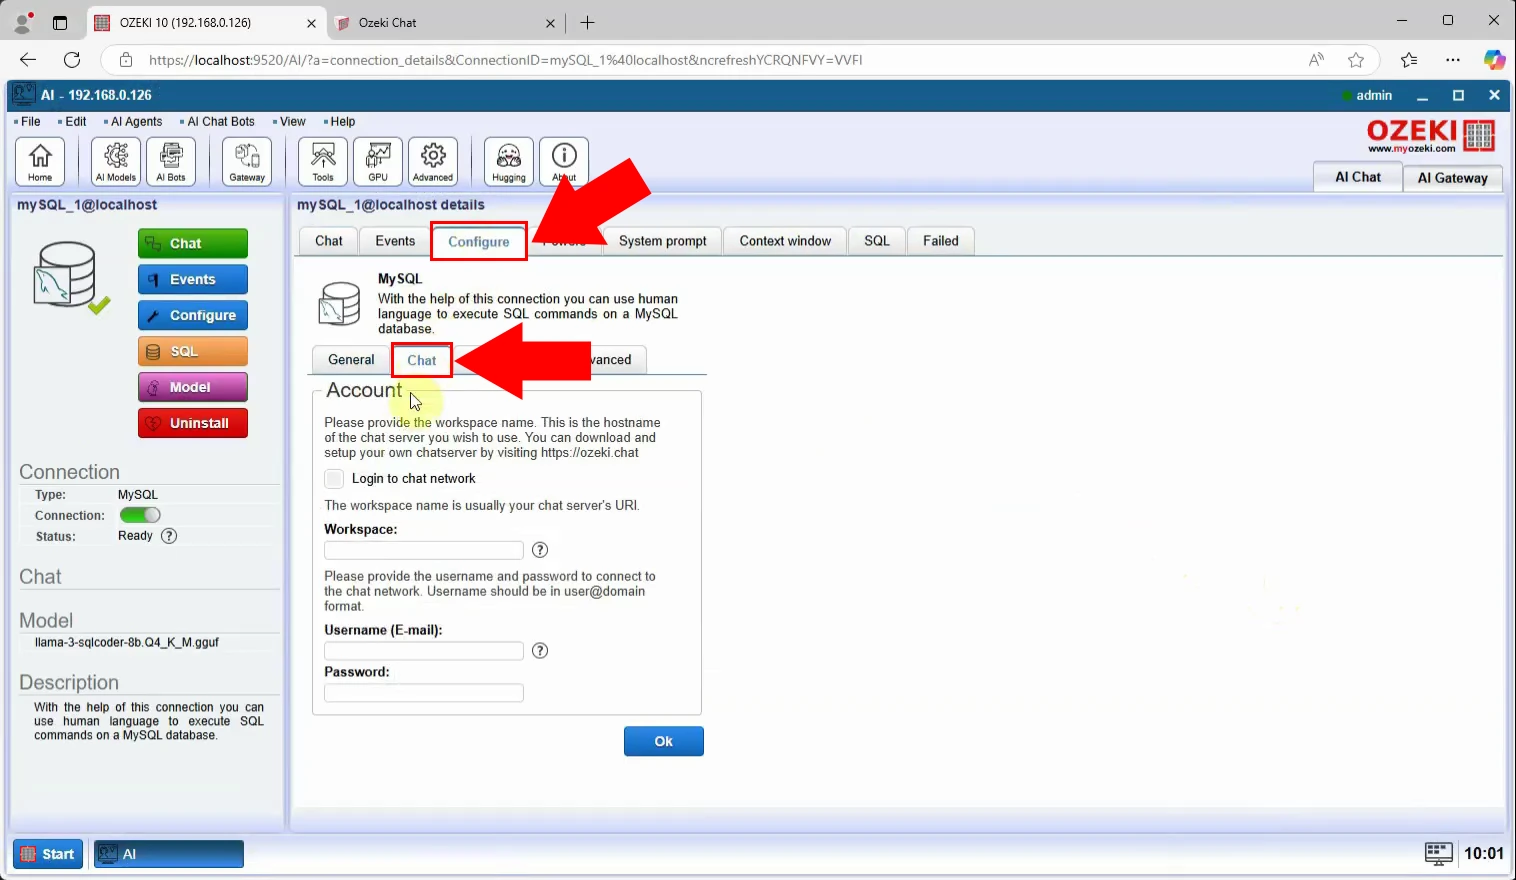
Step 16 - Open chat confiugration tab
To configure the bot, first select the "Configure" tab, then the "Chat" tab to access the chat configuration (Figure 17).
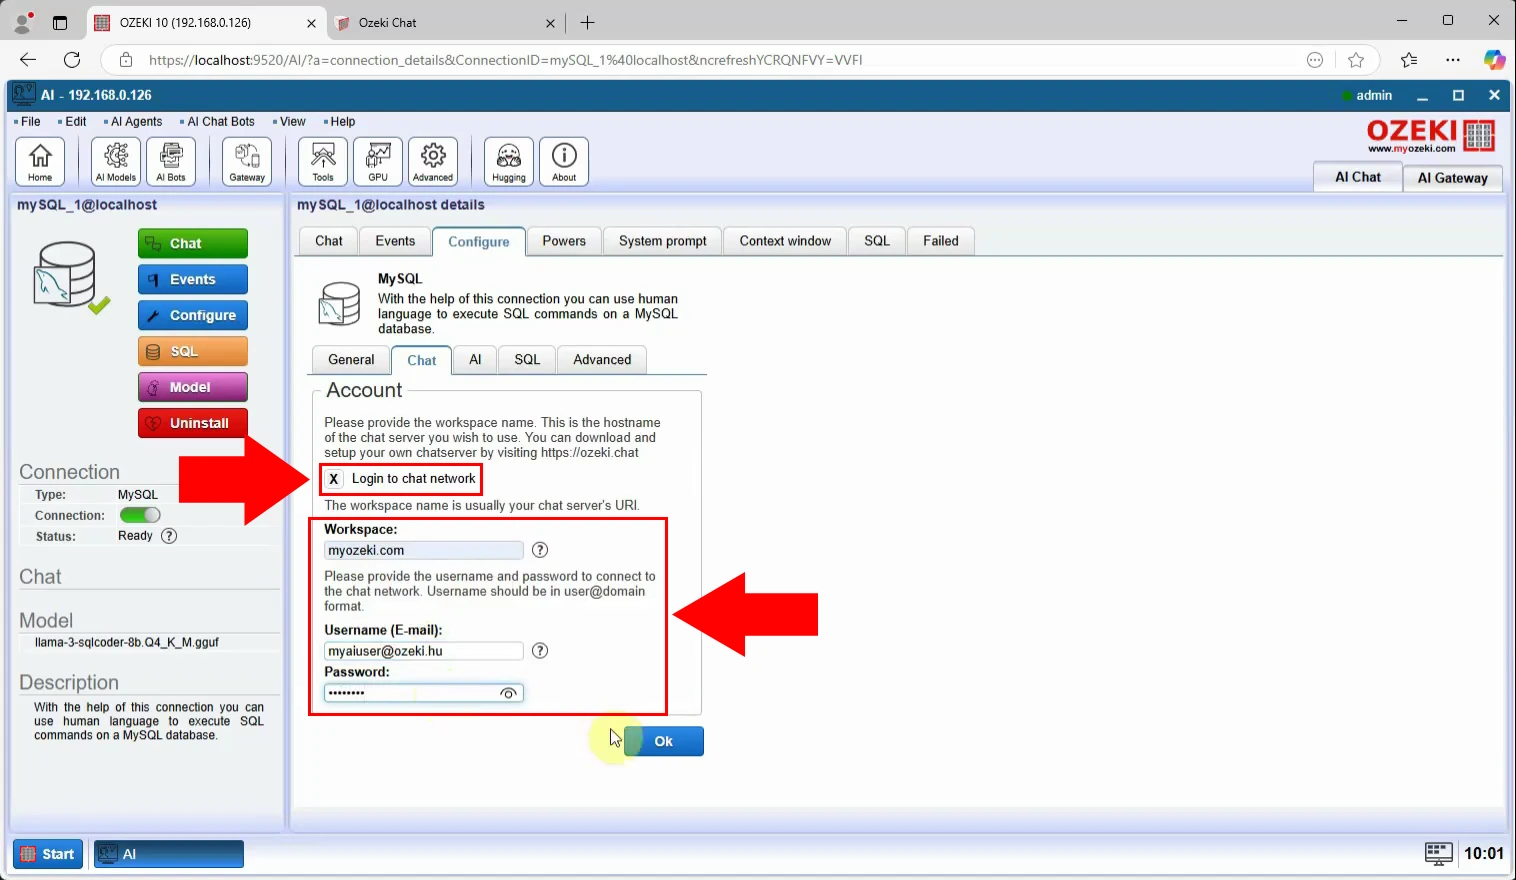
Step 17 - Configure myozeki user account
To configure, tick "Login to chat network", then set "Workspace" and "Username", "Password" and press "Ok" (Figure 18).
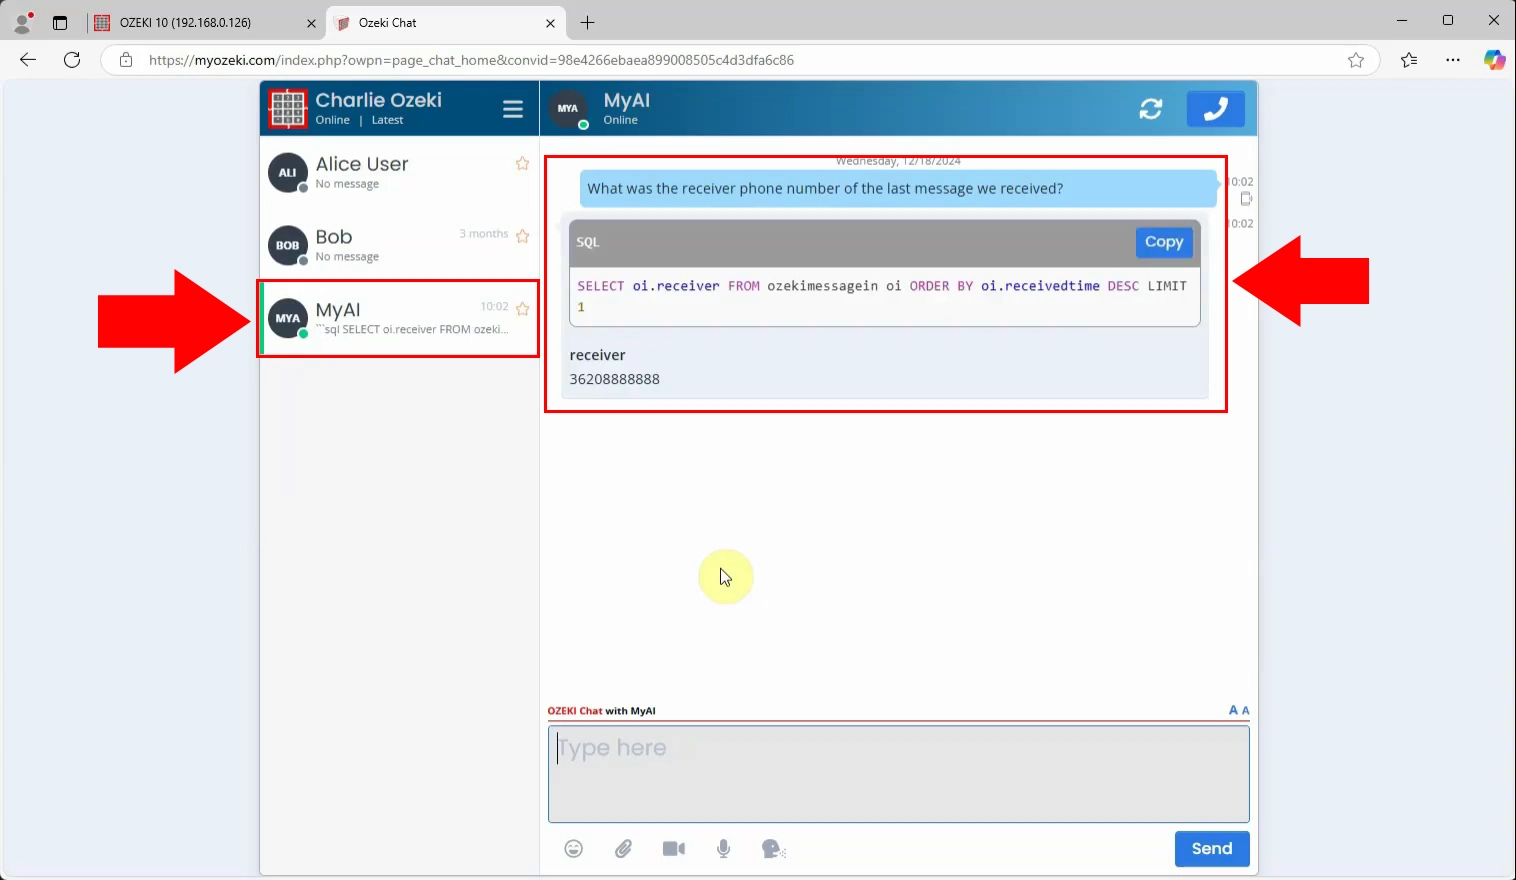
Step 18 - Chat with SQL AI
Log in to your MyOzeki chat interface, send a message, and the SQL bot will reply with data fetched from your database using AI (Figure 19).
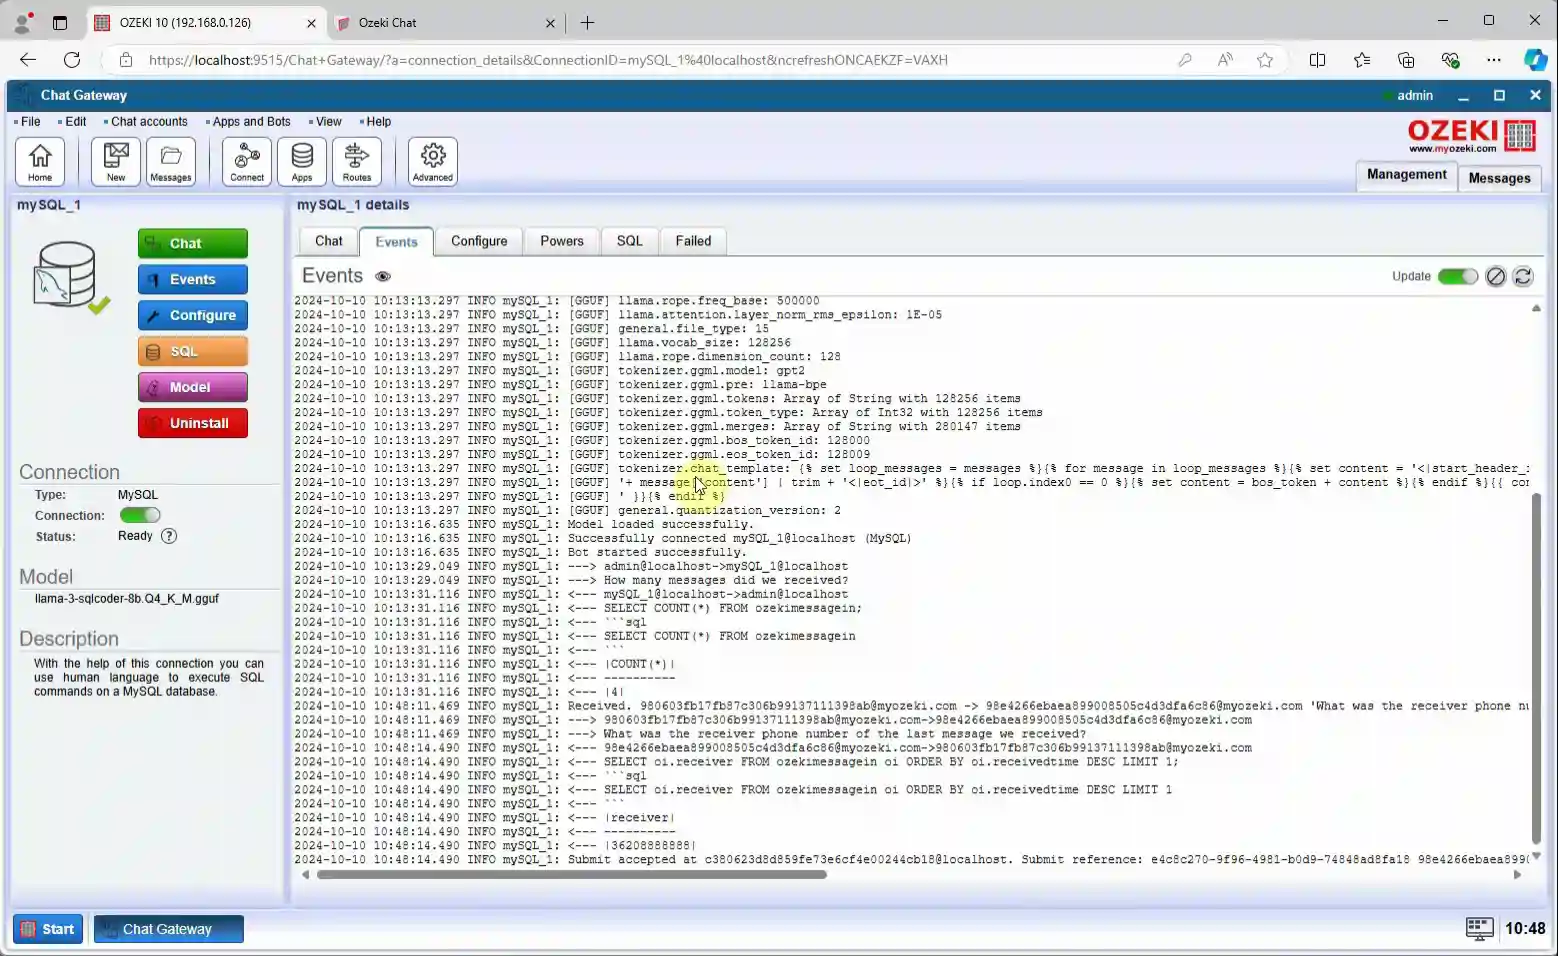
Step 19 - AI chat log
Check the AI bot’s log in the Events tab to verify the request, response, and SQL query that was run behind the scenes (Figure 20).
Conclusion
By the end of this guide, you've learned how to harness the power of AI to manage SQL databases with ease, even without prior coding or SQL expertise. You successfully downloaded and installed the necessary AI model, created and configured an SQL chatbot in Ozeki AI Server, and linked it to a MySQL database. After setting up chat routing in Ozeki’s Chat Gateway, you tested the connection and sent queries to the chatbot, all in natural language. Now, managing your SQL databases is as simple as chatting with the AI—making complex database tasks more accessible than ever.

