How to answer phone calls with AI
Business AI phone chat assistants enable customer service to handle incoming calls efficiently. Powered by advanced natural language processing, these intelligent phone systems greet callers, answer frequently asked questions, manage sales or support calls, and ultimately send summaries in the corporate chat system, finally notify the relevant department via email or in SMS. Tudnak-e routolni? kérdésd megválaszolni.
What is Speech to Text?
Speech to Text is a technology that allows spoken words to be converted into written text. It is used because it enables real-time transcription, enhancing communication efficiency.
What is Text to Speech?
Text to Speech is a technology that converts written text into spoken words. It is used to provide a natural, audible response for interactive systems.
Download an AI model for speech to text
You can use the following Speech to Text model
https://huggingface.co/ggerganov/whisper.cpp
How to answer phone calls with AI (Easy to follow intructions)
- Download Speech to Text model
- Setup AI models and chat bot
- Create VoIP phone line
- Make a test phone calls
- Setup the phone assistant properly
Download Speech to Text model (Video tutorial)
In this video, you'll learn how to download the ggml-larve-v3-turbo.bin model from the Whisper.cpp repository and correctly place it in the C:\AIModels folder. This step is essential for enabling your AI assistant to transcribe spoken words into text seamlessly.
Download Speech to Text model
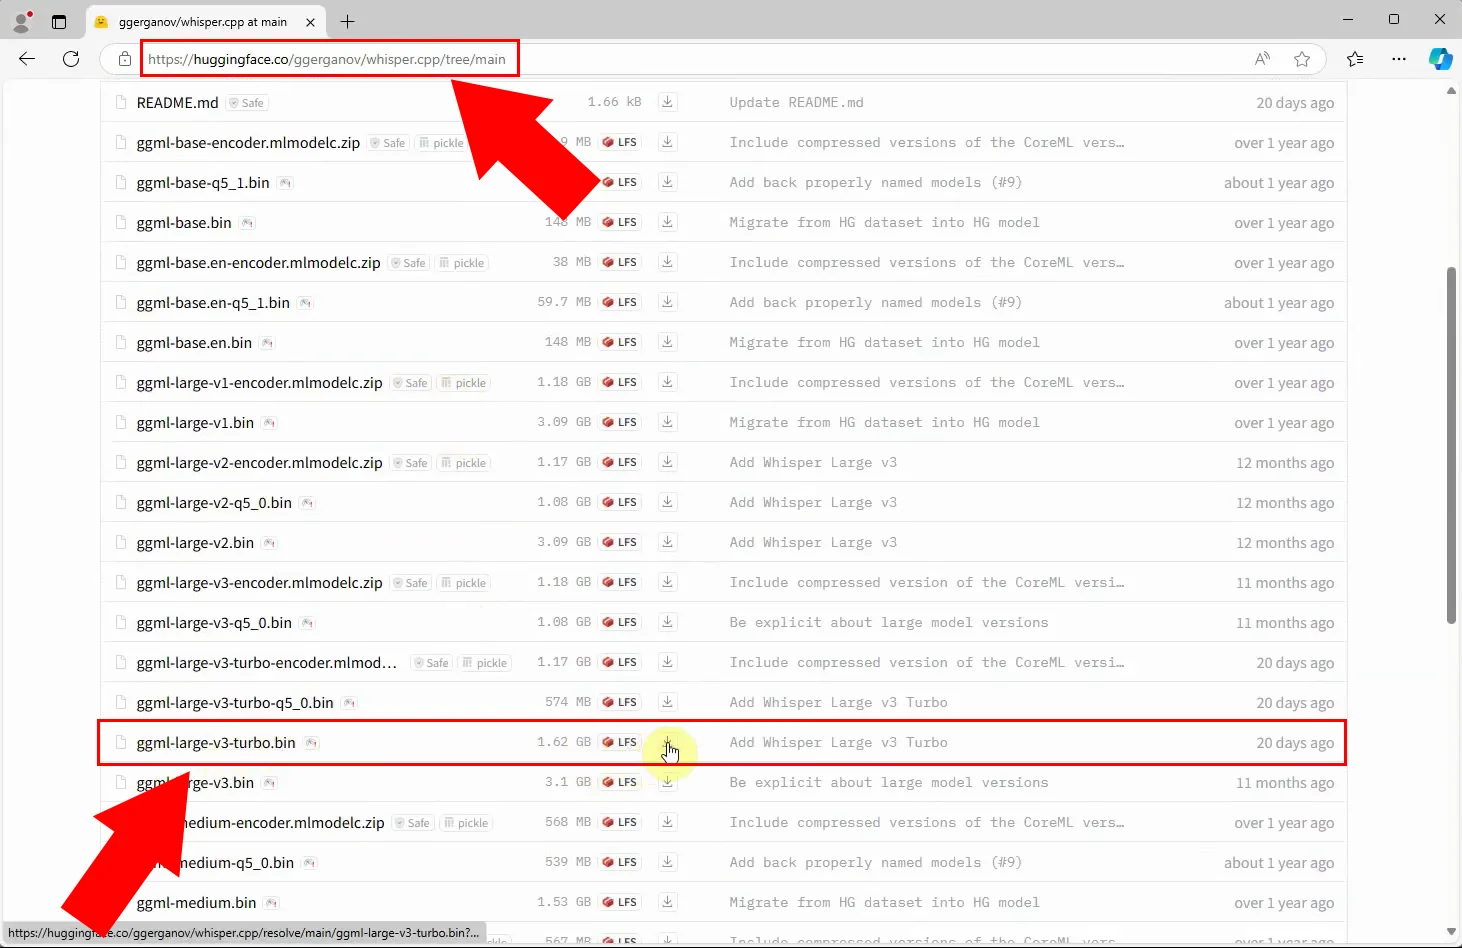
Navigate to the Whisper.cpp repository and locate the list of available model files. Identify and download the file named ggml-larve-v3-turbo.bin. This model is critical for enabling the AI to convert spoken words into text accurately. The page will display multiple files, so ensure you select the correct one. This step ensures the AI can process audio inputs seamlessly, providing a foundation for further configurations.
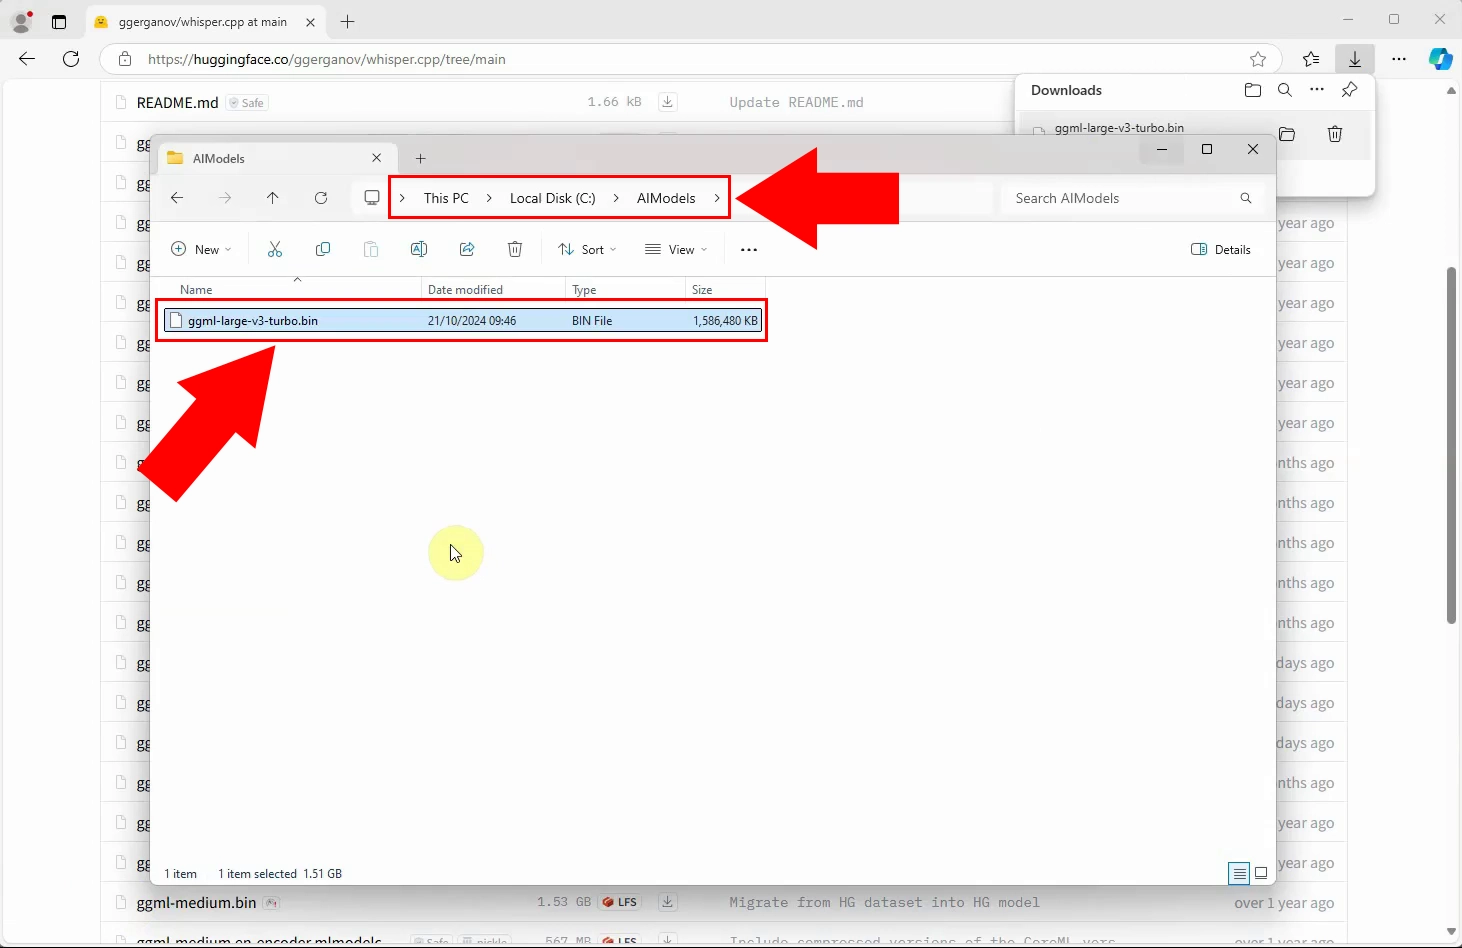
Open Windows File Explorer and navigate to the folder C:\AIModels. Copy the downloaded ggml-larve-v3-turbo.bin file into this folder. This location is essential as Ozeki AI Studio references this directory to access AI models during configuration.
Setup AI models and chat bot (Video tutorial)
This video tutorial demonstrates how to set up the Speech to Text, Text to Speech, and ChatGPT models in Ozeki AI Studio. You'll also learn how to create and configure an AI chatbot to manage conversations efficiently. By the end, your AI will be ready to understand and respond to calls.
Setup AI models and chat bot
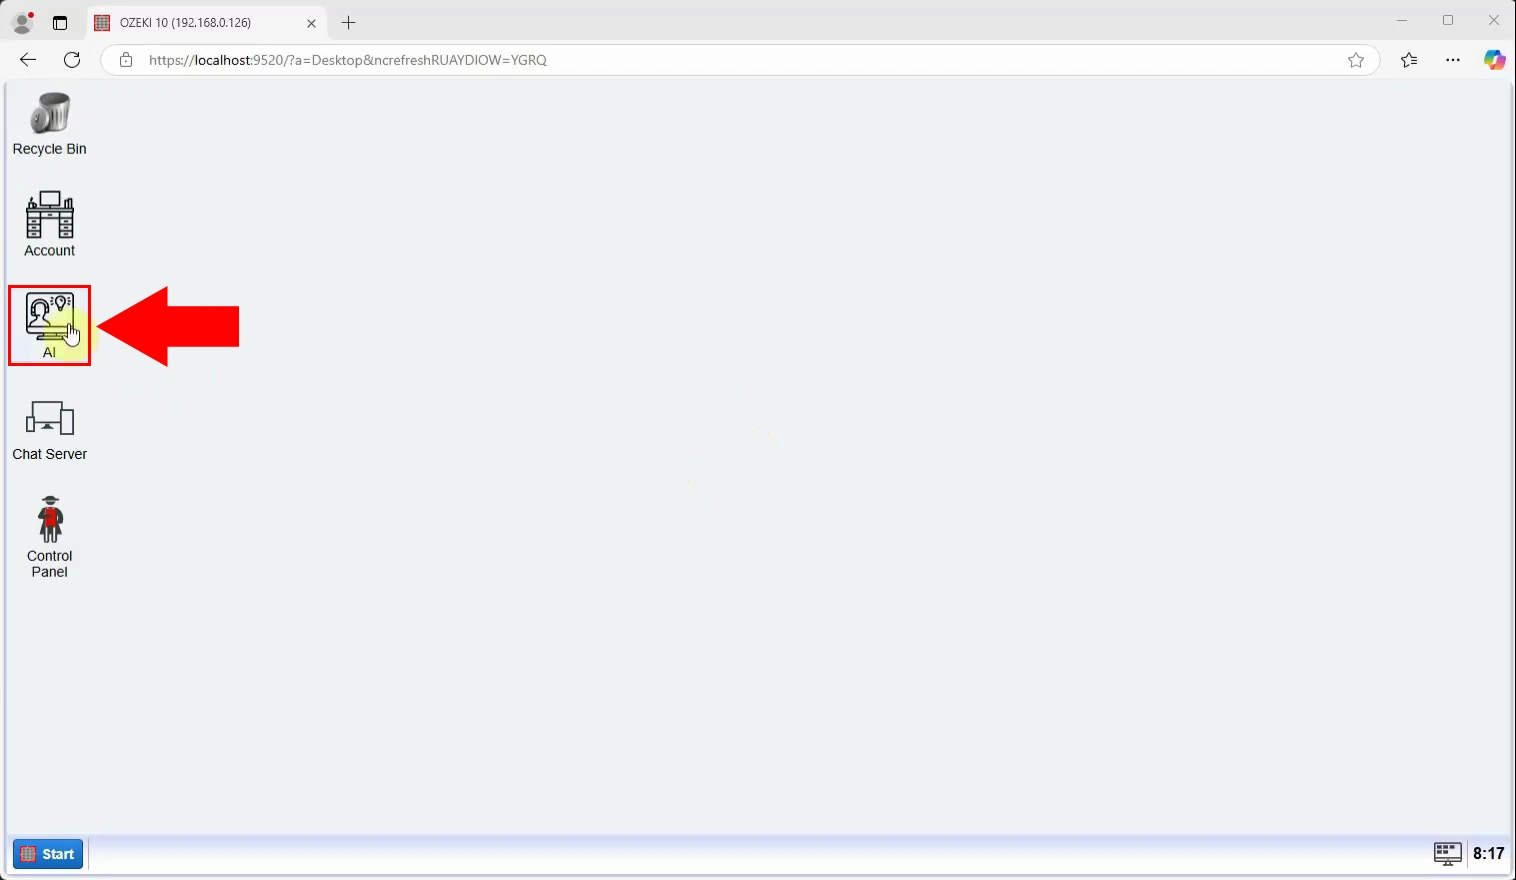
Access the Ozeki Desktop. Locate the AI Studio icon, highlighted with a red square and arrow in Figure 3. Clicking this icon will open the Ozeki AI Studio homepage, the primary interface for managing and configuring all AI-related tasks. This step provides access to the tools required to set up AI models and chatbots.
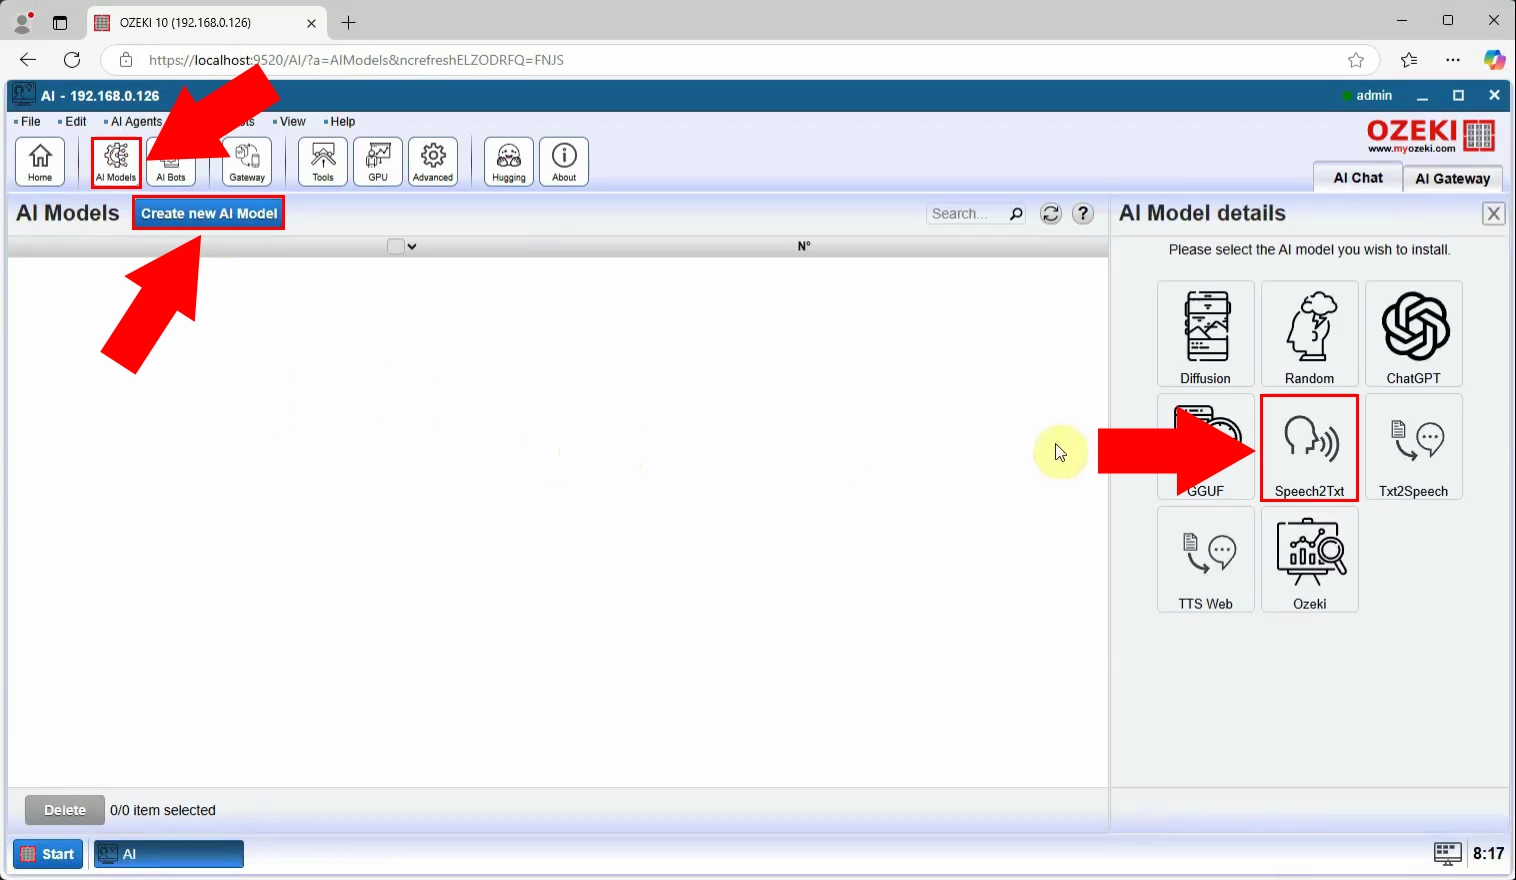
On the AI Studio homepage, click the AI Models toolbar icon, located prominently on the toolbar. This action opens the AI Models page. Here, click the blue Create new AI Model button below the toolbar, marked with a red rectangle in Figure 4. A side panel appears where you must select the Speech2Txt icon, also highlighted in the figure. This creates a new Speech to Text model, allowing your AI system to interpret and process spoken language.
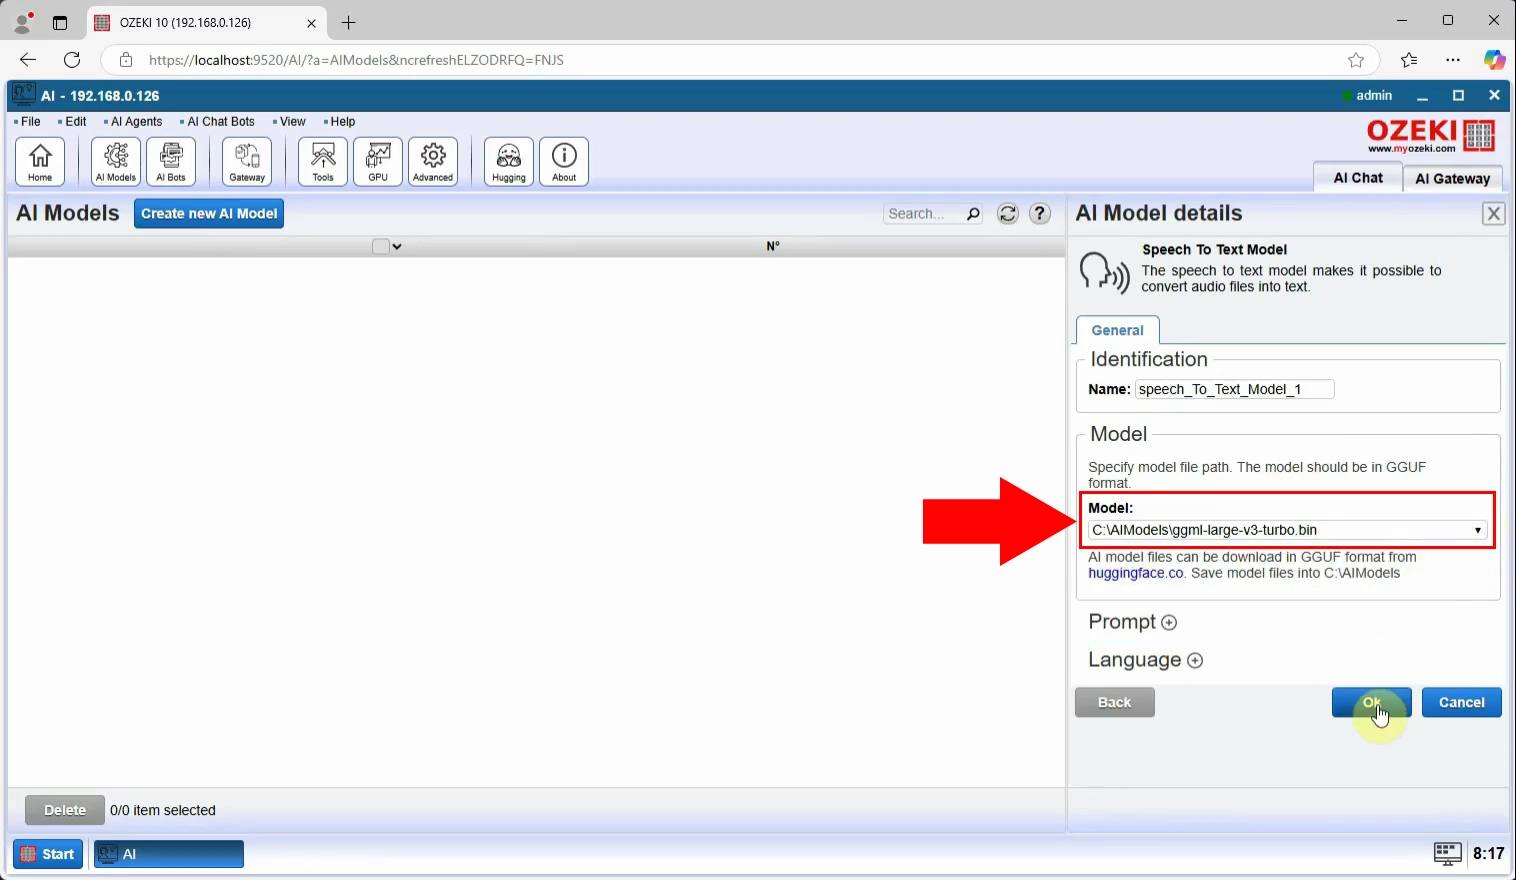
In the AI Model details panel, find the General tab and locate the Model groupbox. Use the input field in this section to specify the path to the ggml-larve-v3-turbo.bin file downloaded earlier. Click the OK button to save this configuration. Figure 5 shows the dropdown menu where this selection is made. This step integrates the Speech to Text model with your AI system, enabling accurate transcription of audio inputs.
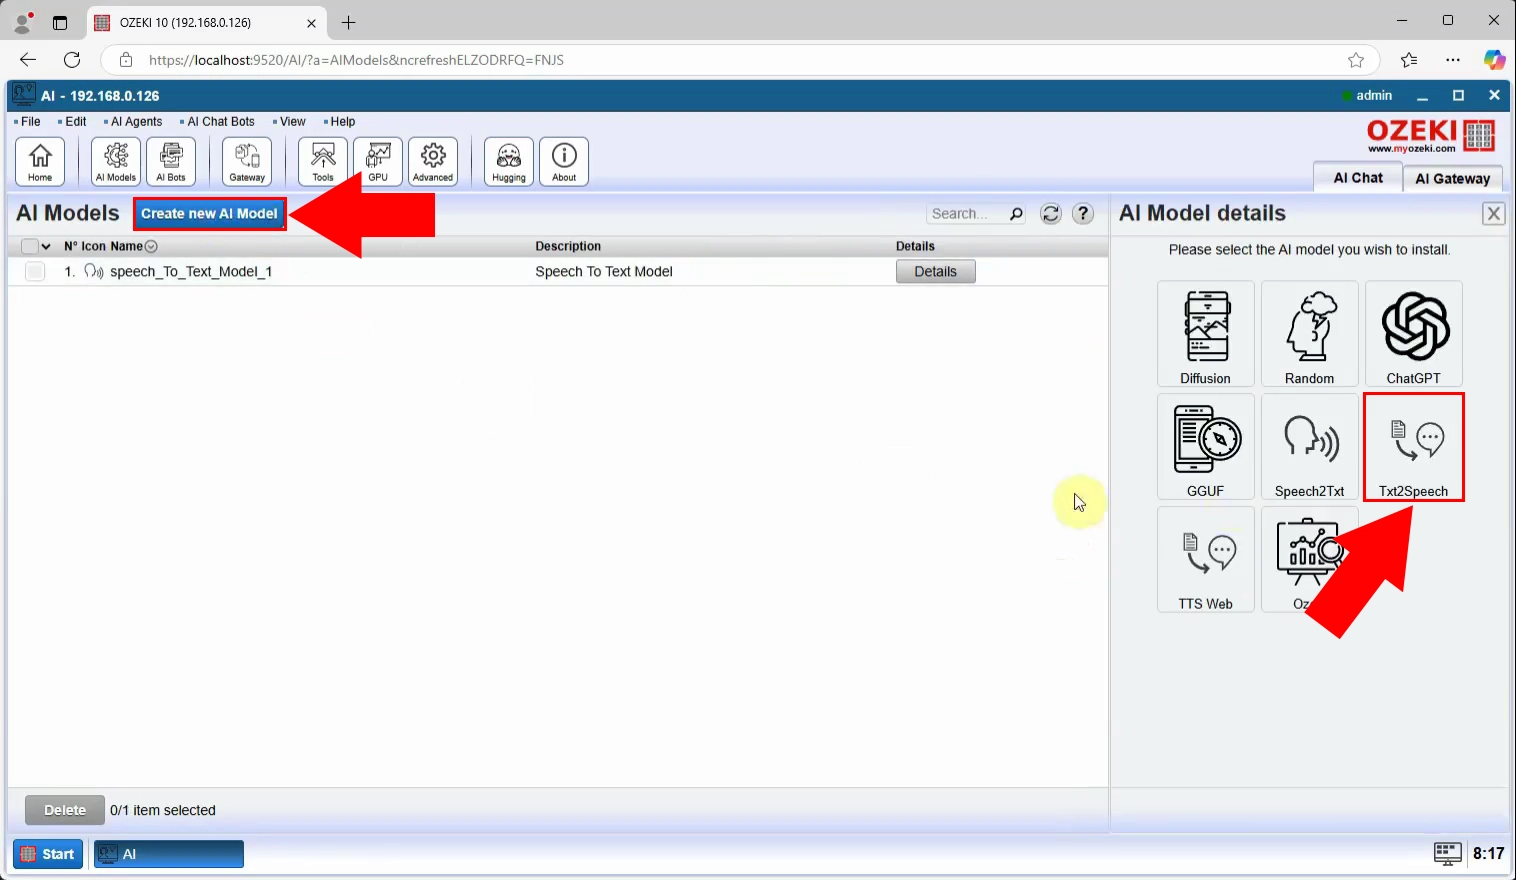
Return to the AI Models page and click the blue Create new AI Model button again. In the side panel that opens, select the Txt2Speech icon, which is highlighted in Figure 6. This action initiates the process of creating a Text to Speech model, which allows the AI to generate spoken responses.
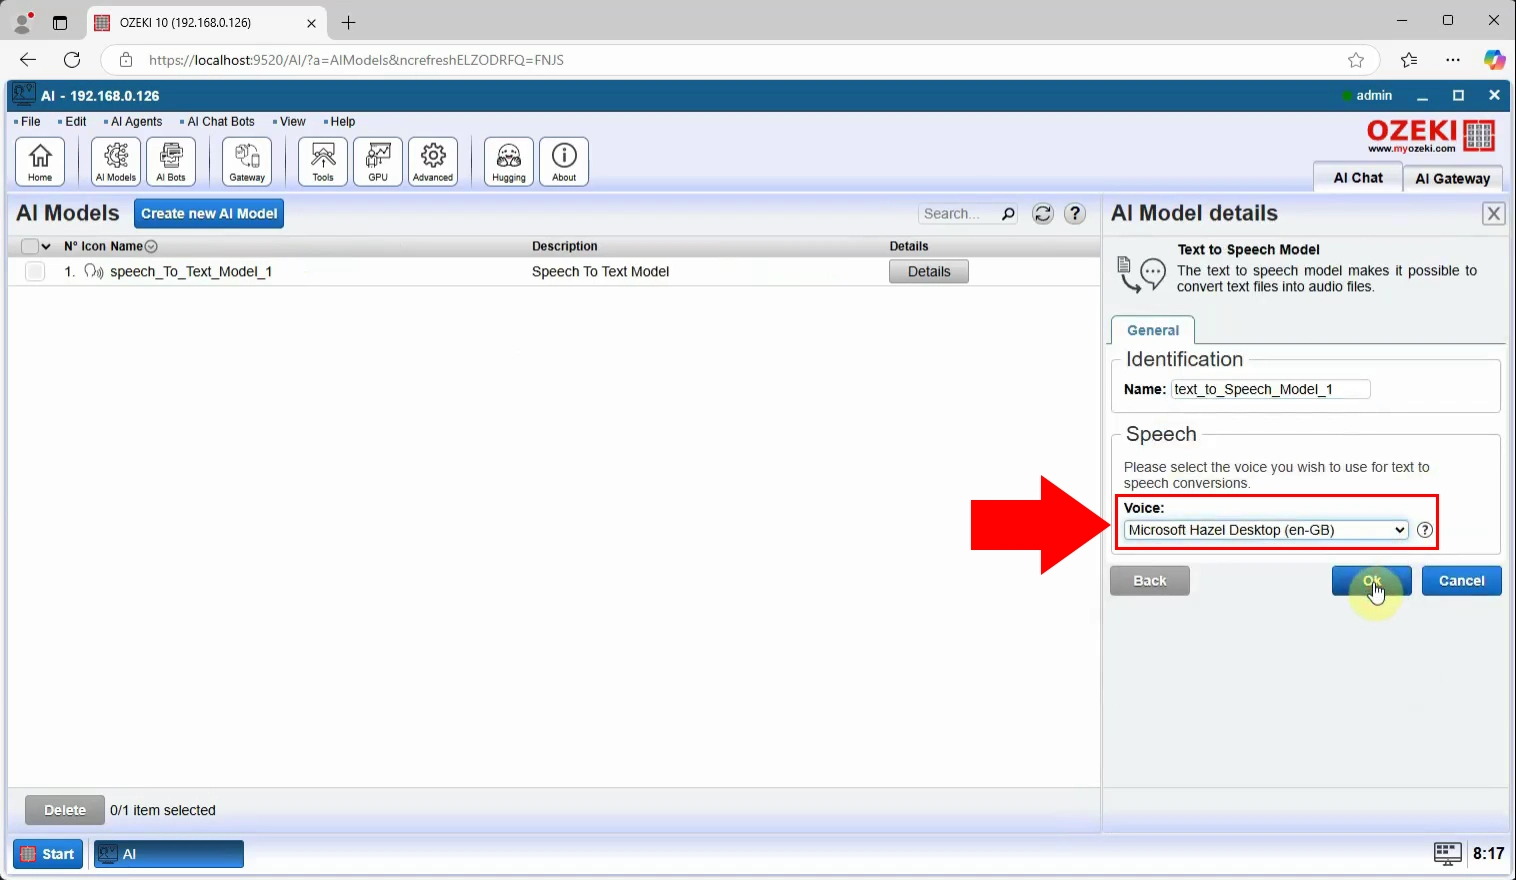
In the AI Model details panel, under the General tab, locate the Speech groupbox. Use the dropdown menu to choose a voice for the Text to Speech model. Options may include different accents, genders, and tones. Select your preferred voice and click OK. The figure demonstrates where these options are located.
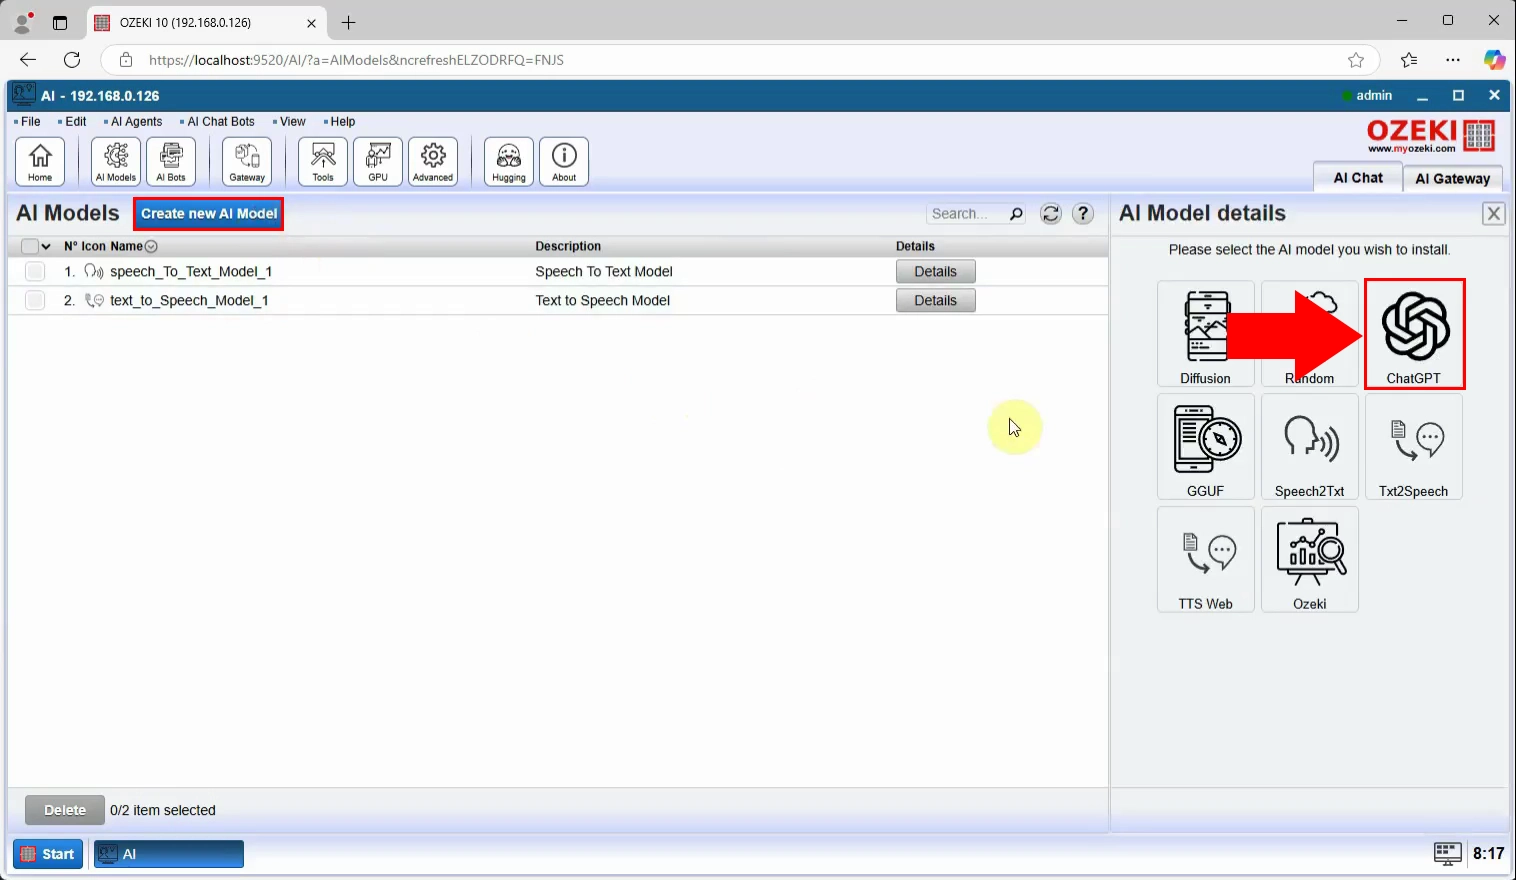
Click the Create new AI Model button to create another AI model. Select the ChatGPT icon in the side panel. This model will serve as the brain of your AI assistant, enabling intelligent and context-aware responses.
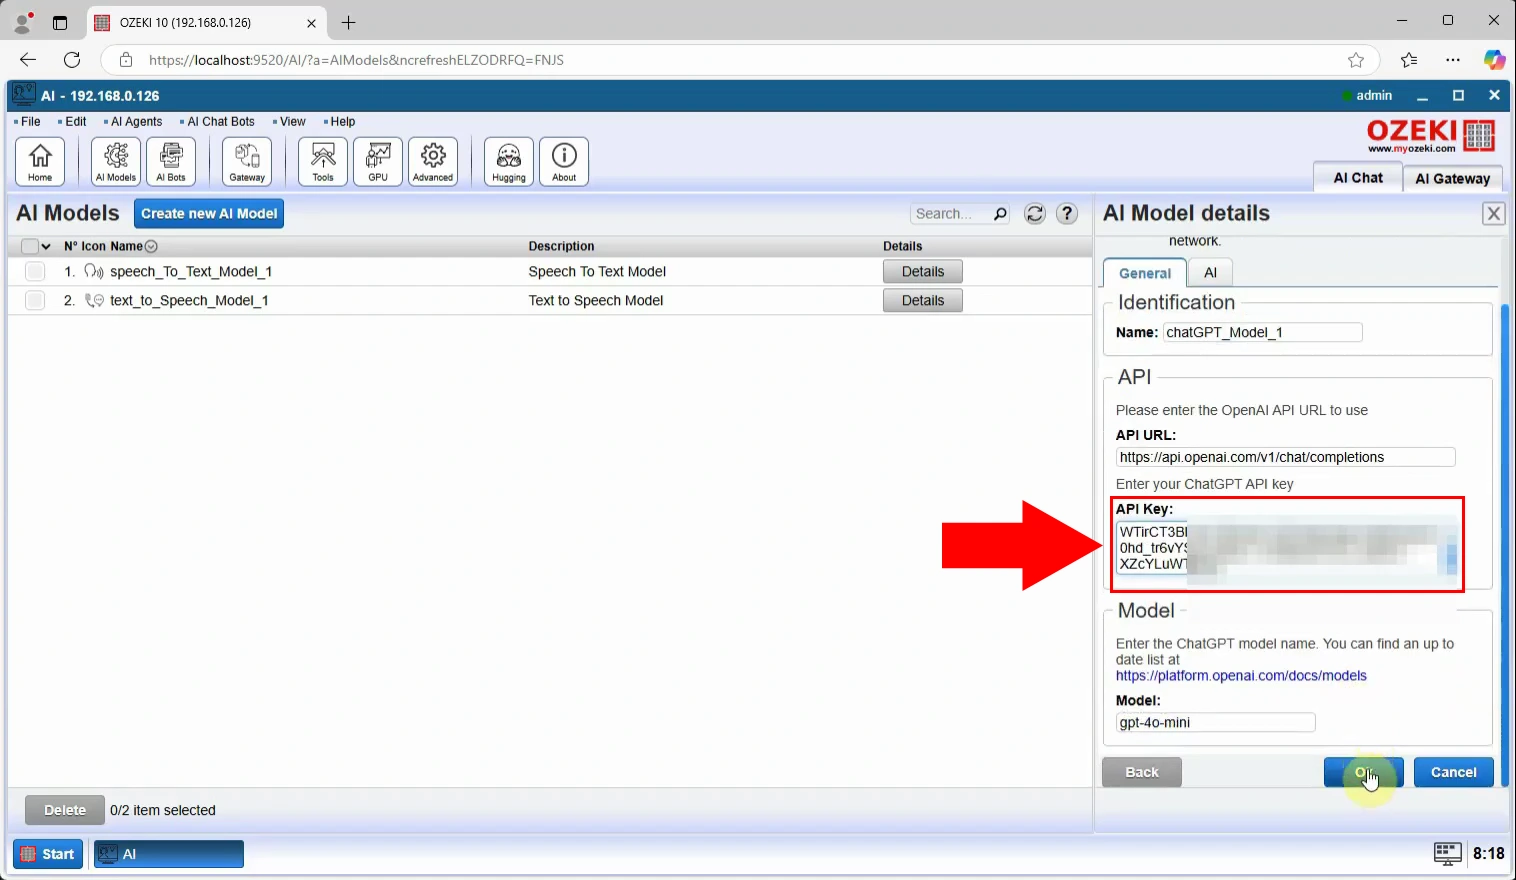
In the AI Model details panel, under the API groupbox, input your ChatGPT API key. The API key is critical for enabling communication with the ChatGPT service. After entering the key, click OK to save the settings. Figure 9 shows the precise location for entering the API key. This integration allows the AI assistant to generate responses based on advanced conversational AI algorithms.
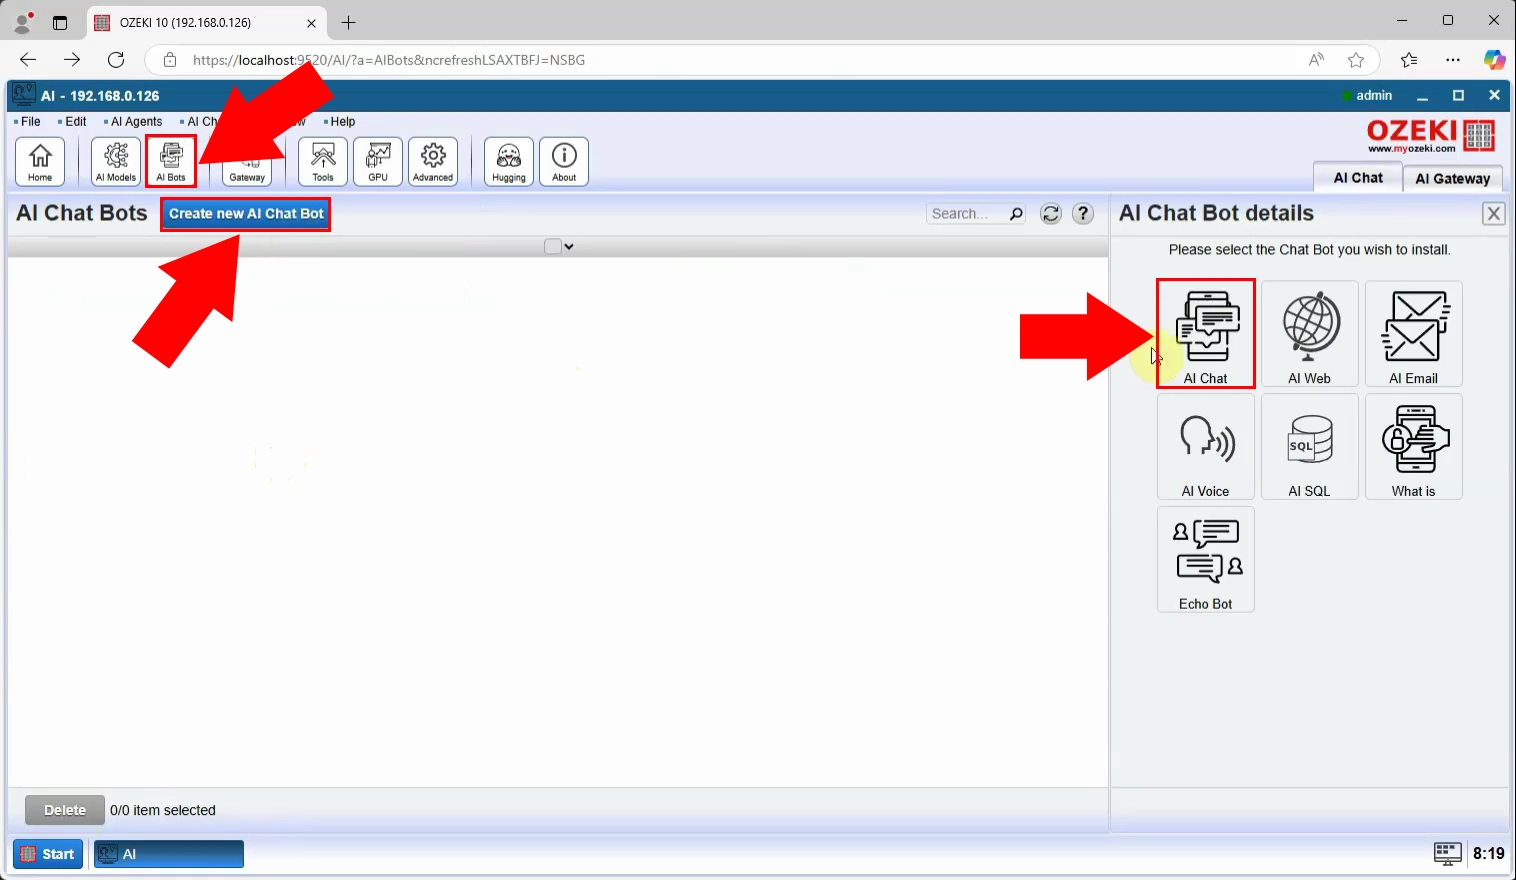
Navigate to the Chat Bots page via the toolbar and click the blue Create new Chat Bot button. In the side panel, select the AI Chat icon, highlighted in the figure. This action creates an AI chatbot, a crucial component of your phone assistant setup.
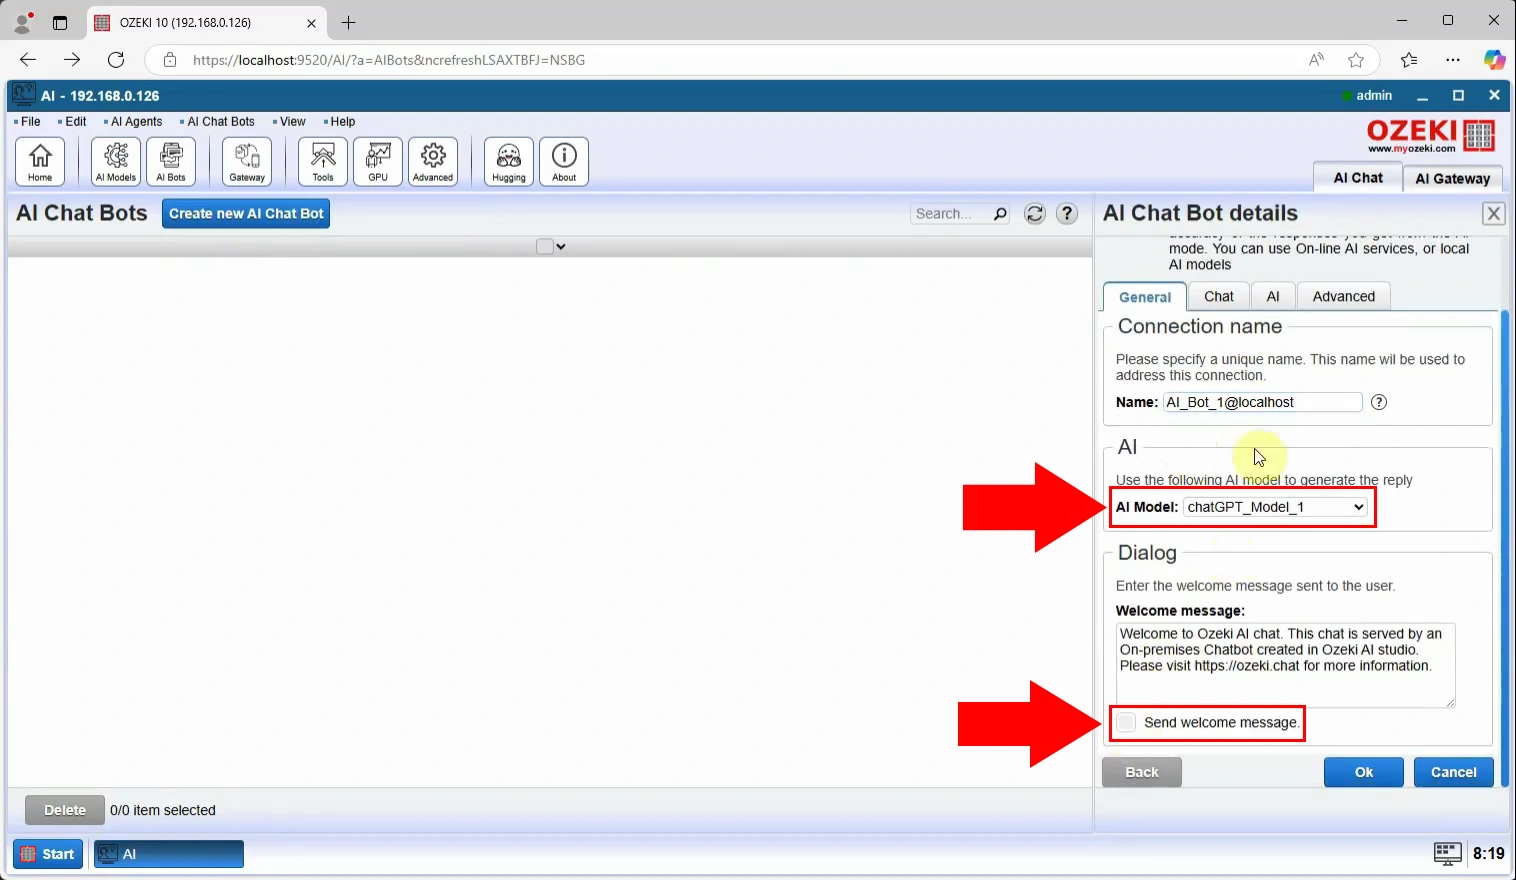
In the Chat Bot details panel, under the General tab and the AI groupbox, deselect the Send welcome message checkbox. This setting ensures the AI chatbot responds immediately to user input without sending unnecessary greetings. The figure illustrates the location of this checkbox.
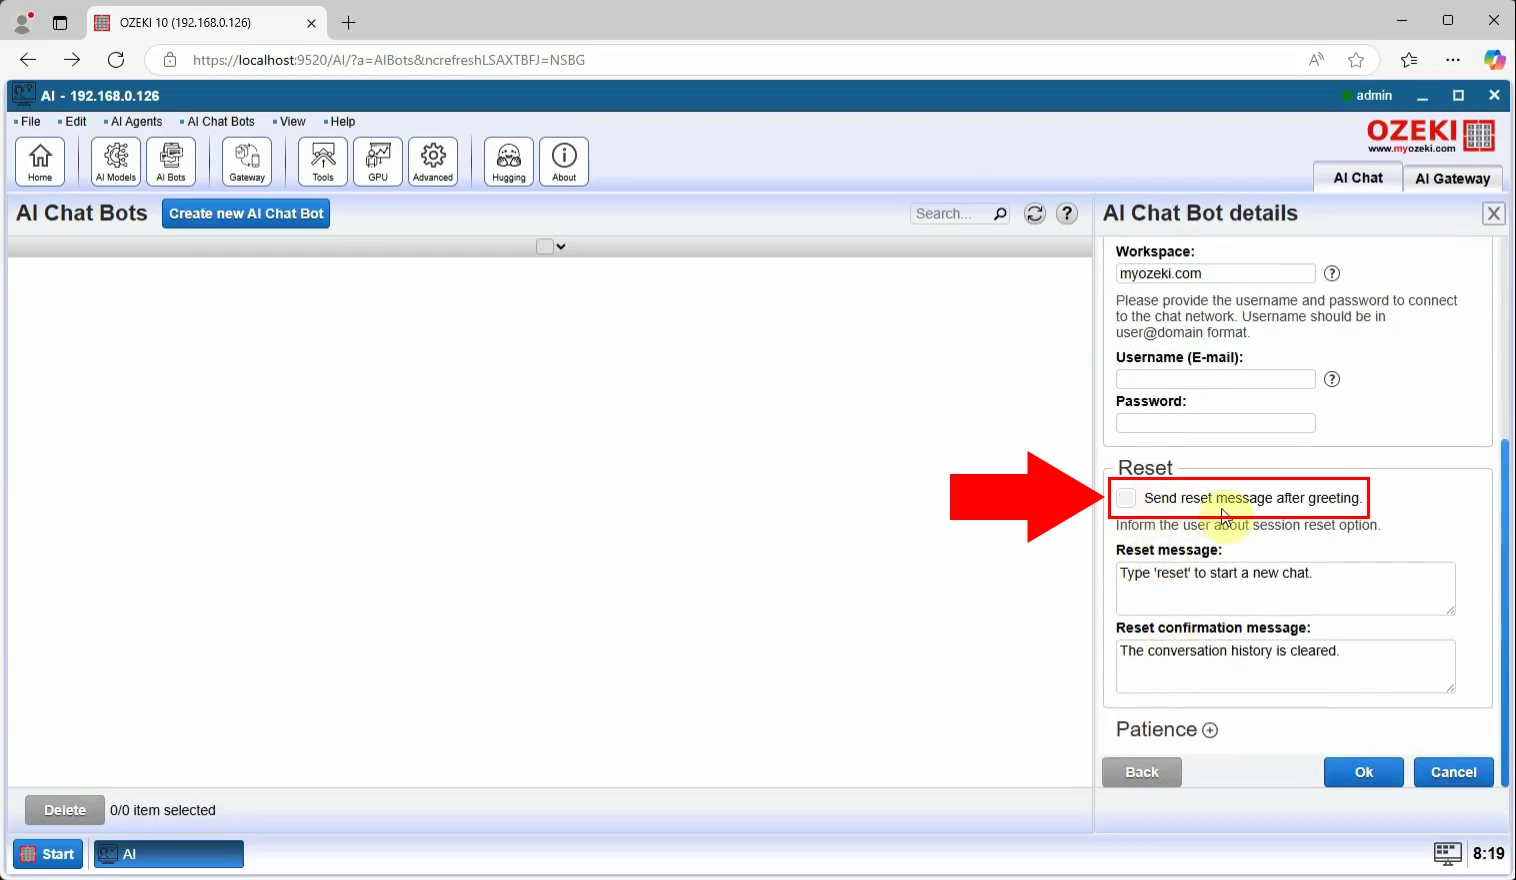
Under the Chat tab, locate the Reset groupbox and deselect the Send reset message after greeting checkbox. This adjustment ensures smoother interactions, eliminating interruptions caused by unnecessary reset messages. The figure highlights the location of this option.
Create VoIP phone line (Video tutorial)
Watch this video to see how to install and configure a VoIP phone line in Ozeki AI Studio. Learn how to assign AI models for voice processing and set up routing for seamless handling of incoming and outgoing calls.
Create VoIP phone line
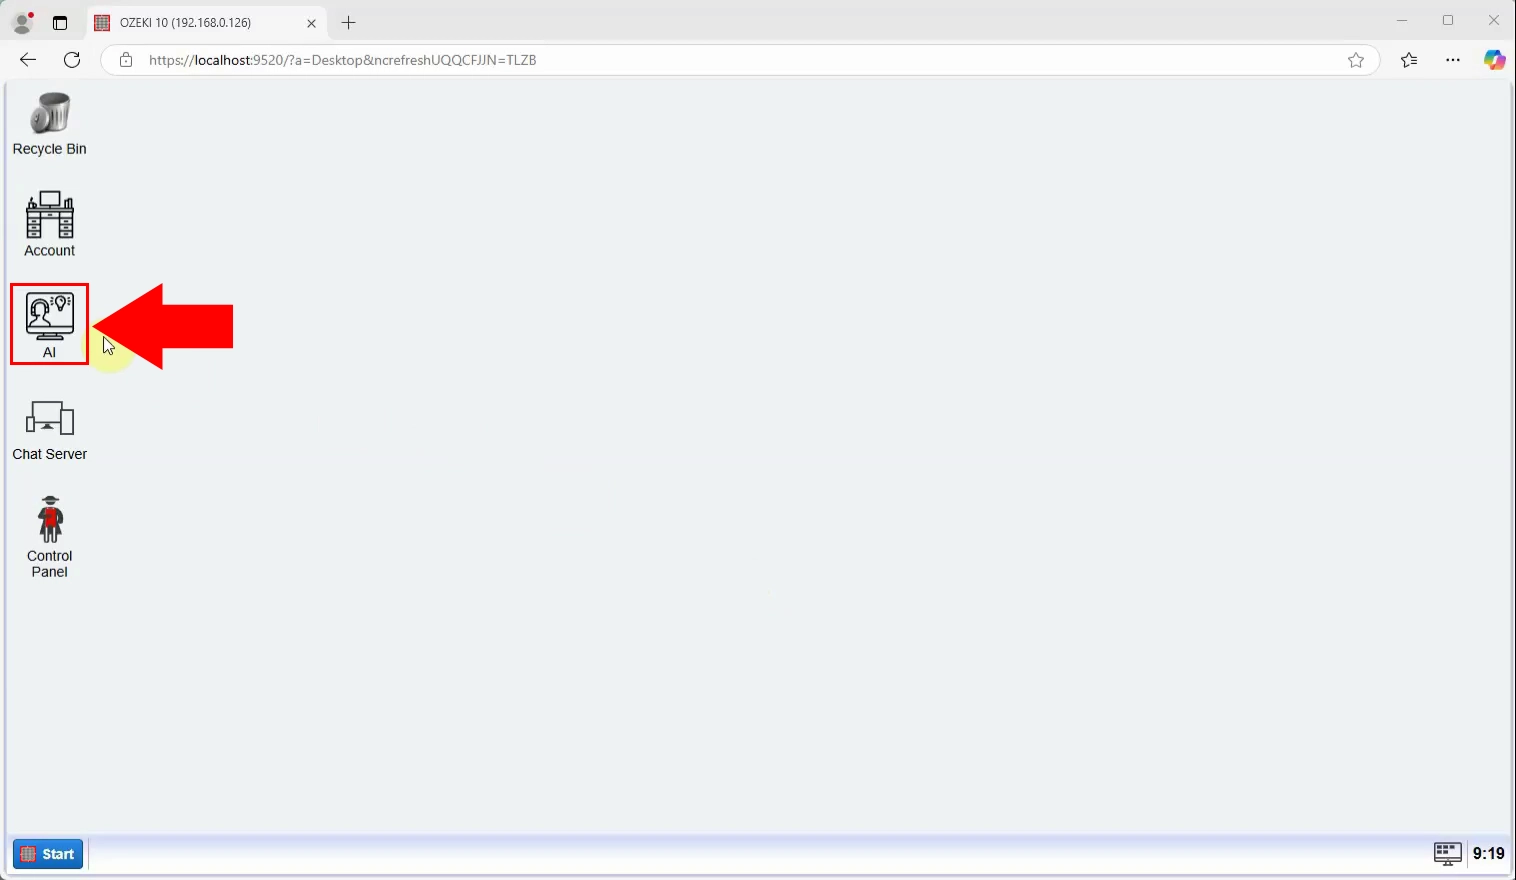
Launch AI Studio from the Ozeki Desktop by clicking the AI Studio icon, marked in Figure 13 with a red square and arrow. This action reopens the AI configuration dashboard.
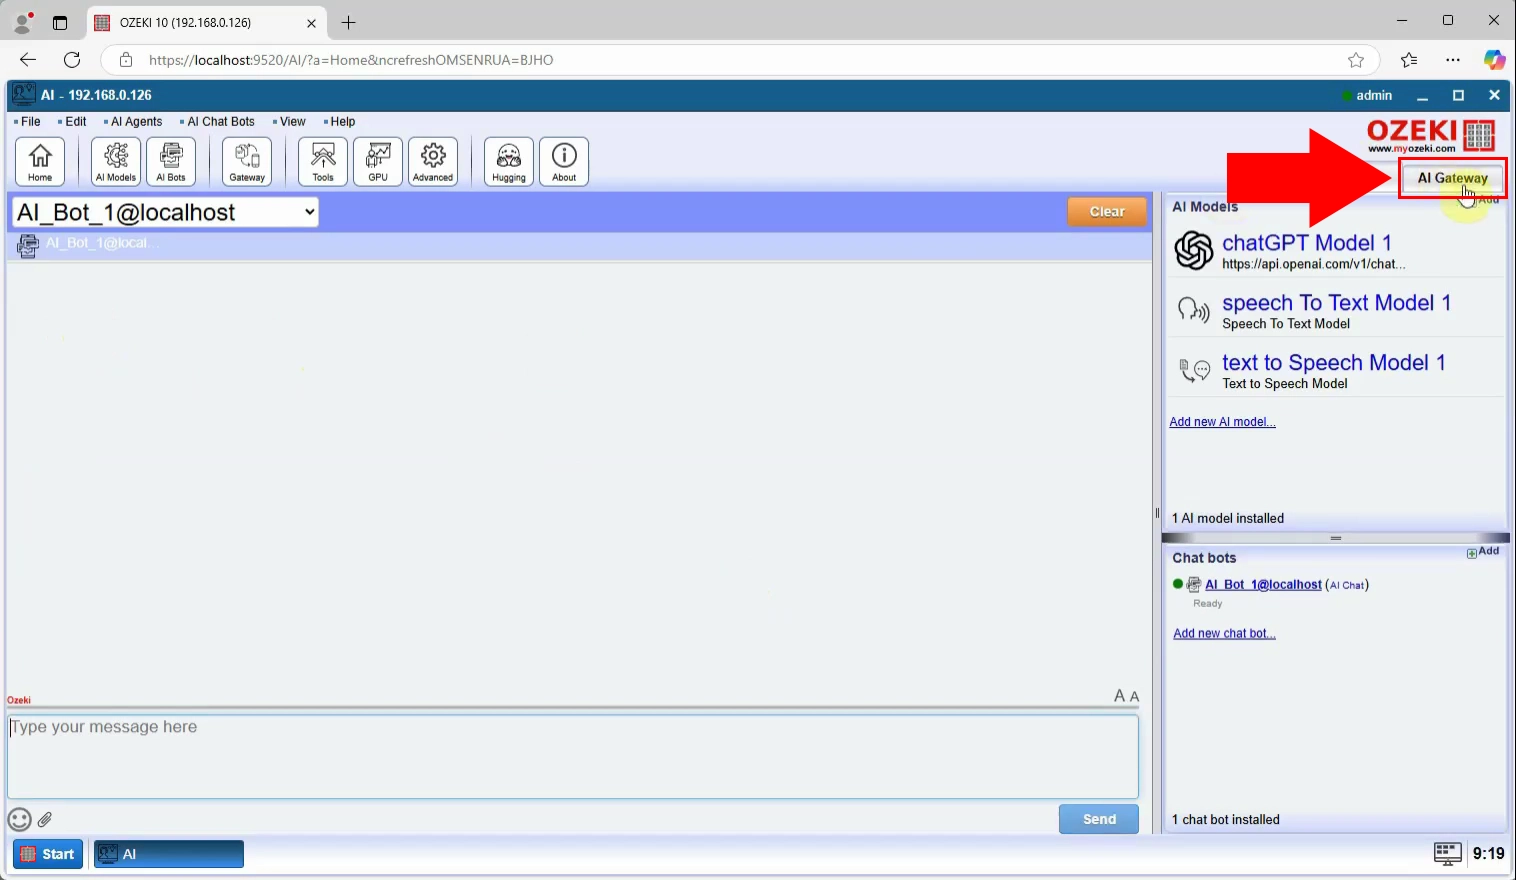
In the AI Studio Dashboard, click the AI Gateway tab at the top-right corner. This tab provides access to voice communication configurations.
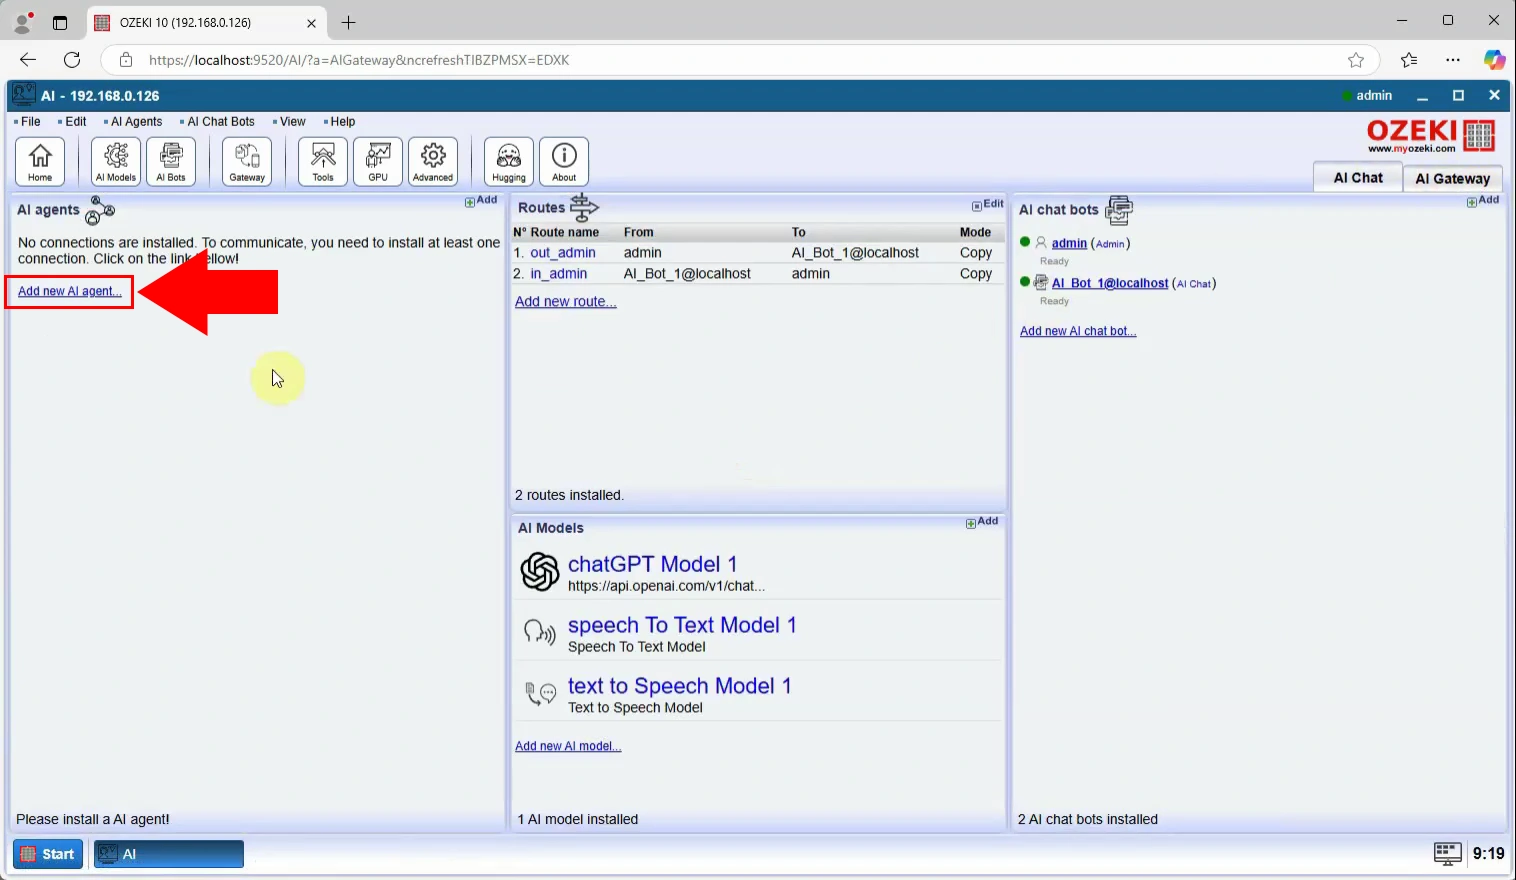
On the AI Gateway dashboard, click the Add new AI agent link located in the left panel. This action brings up the AI agent installation list.
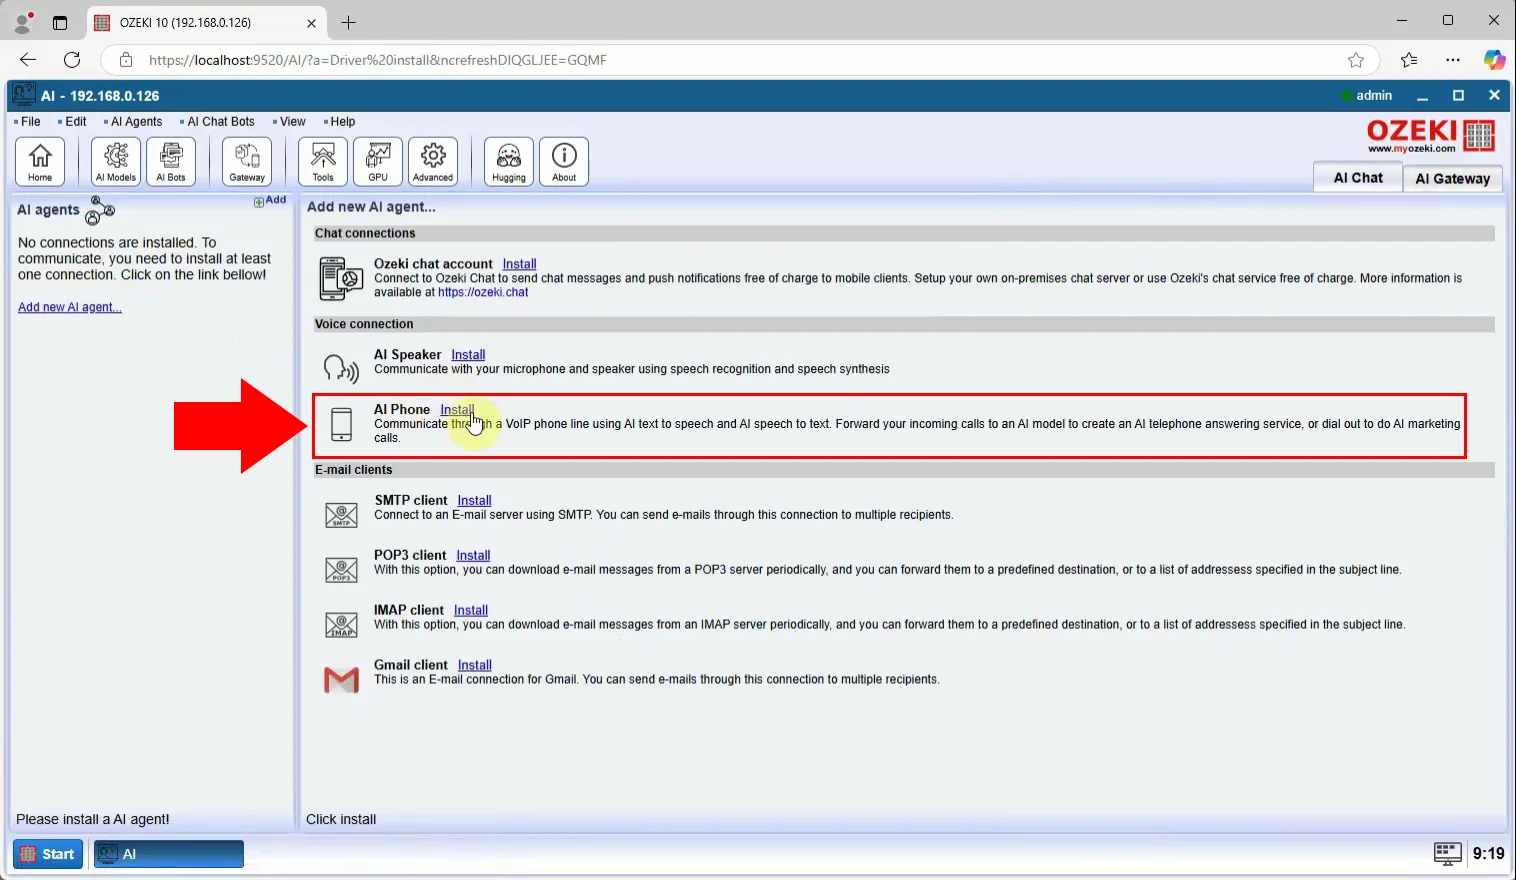
In the AI agent installation list, locate the AI Phone install item under the Voice Connection Install section. Click the Install link n ext to this item to initiate the installation of the VoIP connection.
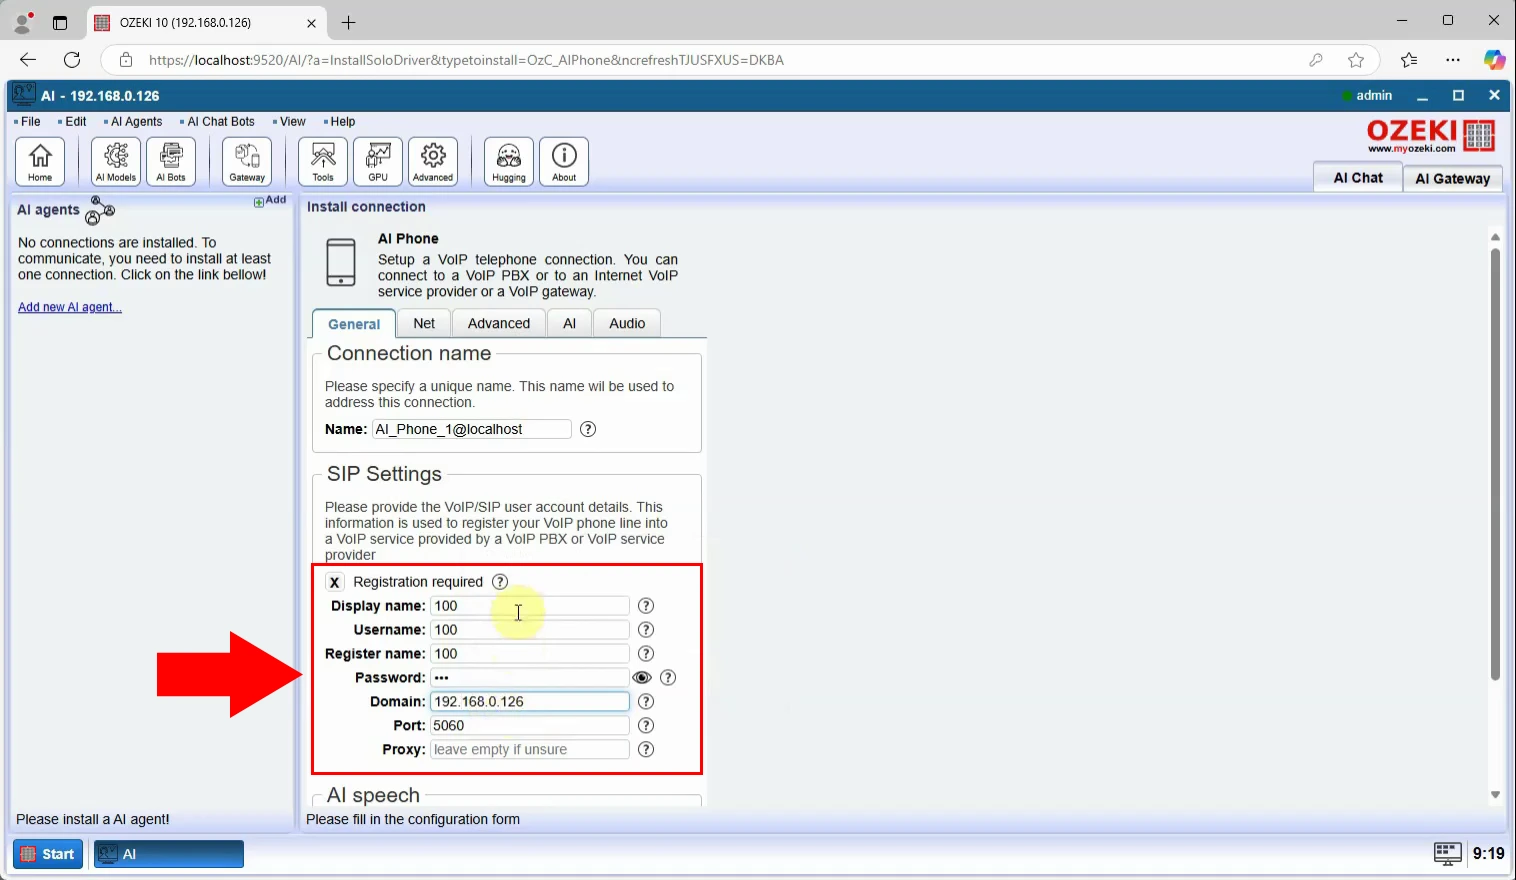
After installation, a form appears for configuring SIP Settings. Fill in your SIP credentials in the form located within the SIP Settings groupbox. These details enable your AI assistant to handle VoIP phone calls. Figure 17 highlights where to input these credentials.
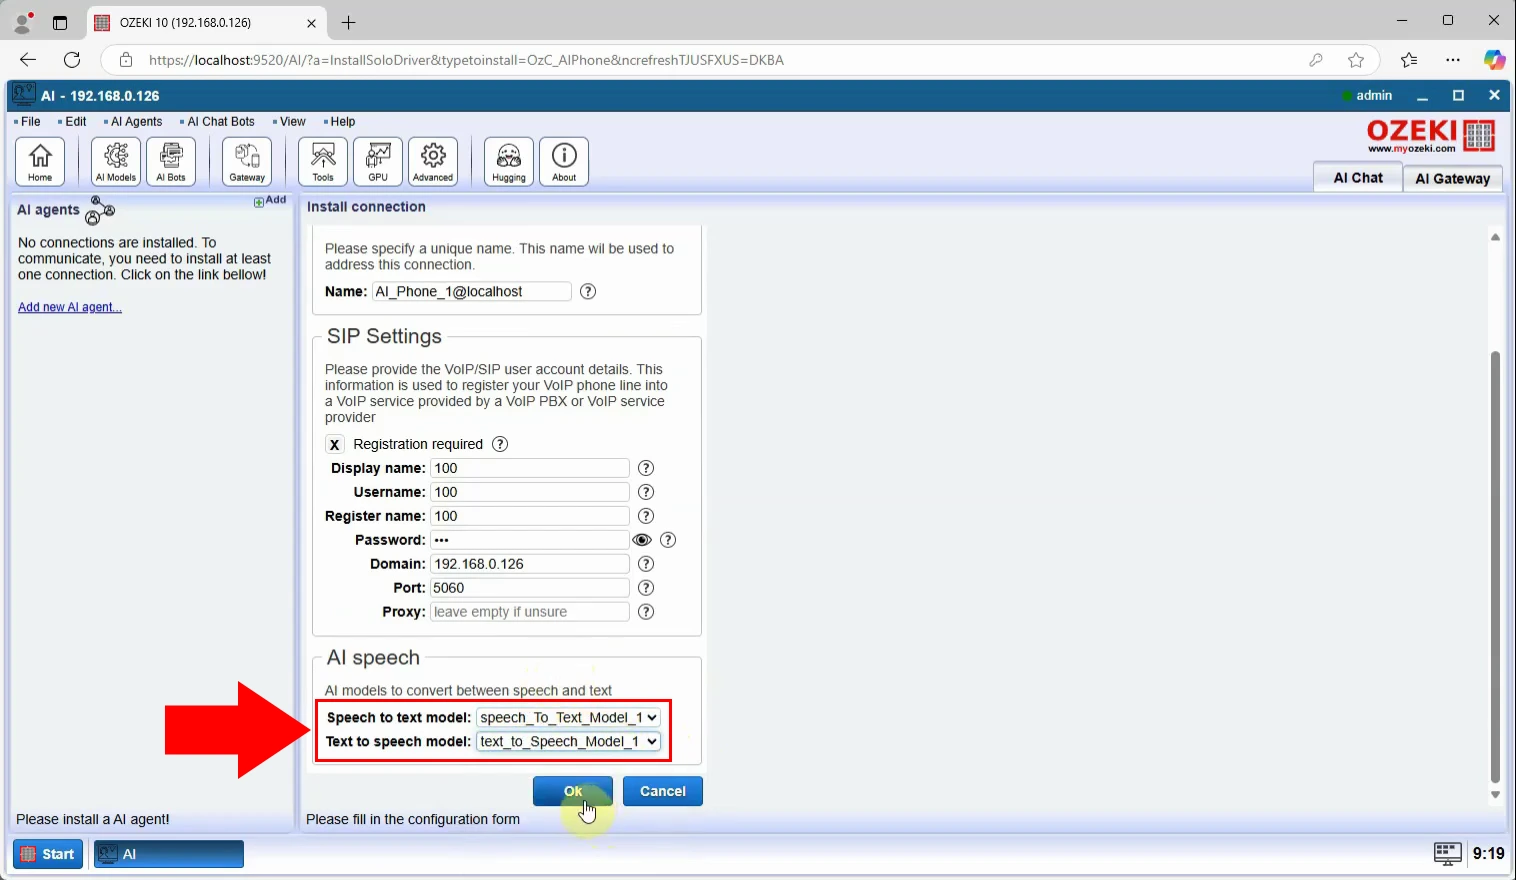
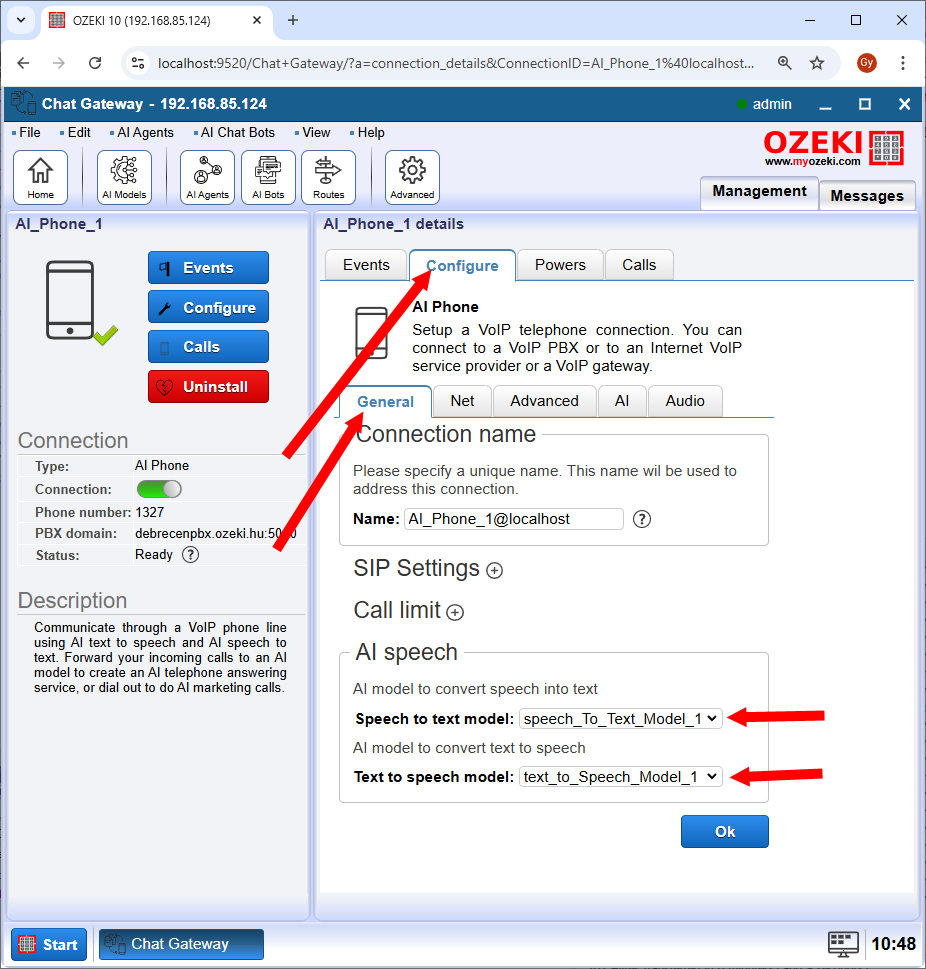
In the AI Speech groupbox, assign the Speech to Text and Text to Speech models using the respective dropdown menus. Select the models created earlier and click OK. Figure 18 shows the interface for these settings.
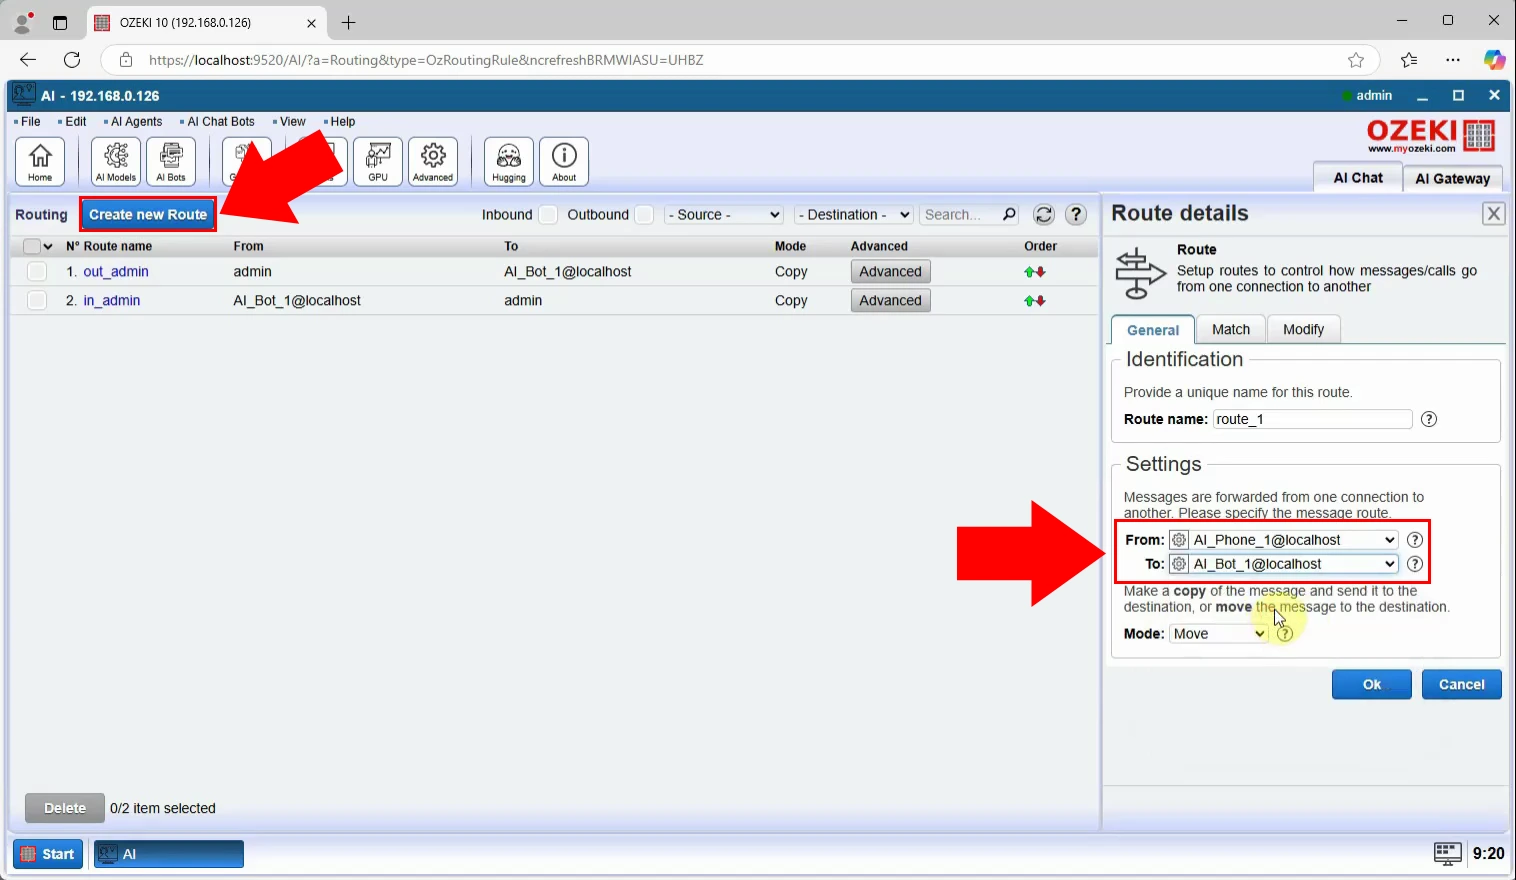
On the Routing page, click the blue Create new Route button below the toolbar. In the Route details panel, set the route From AI_phone To AI_bot using dropdown menus in the Settings groupbox under the General tab. Click OK to save. Figure 19 demonstrates these steps.
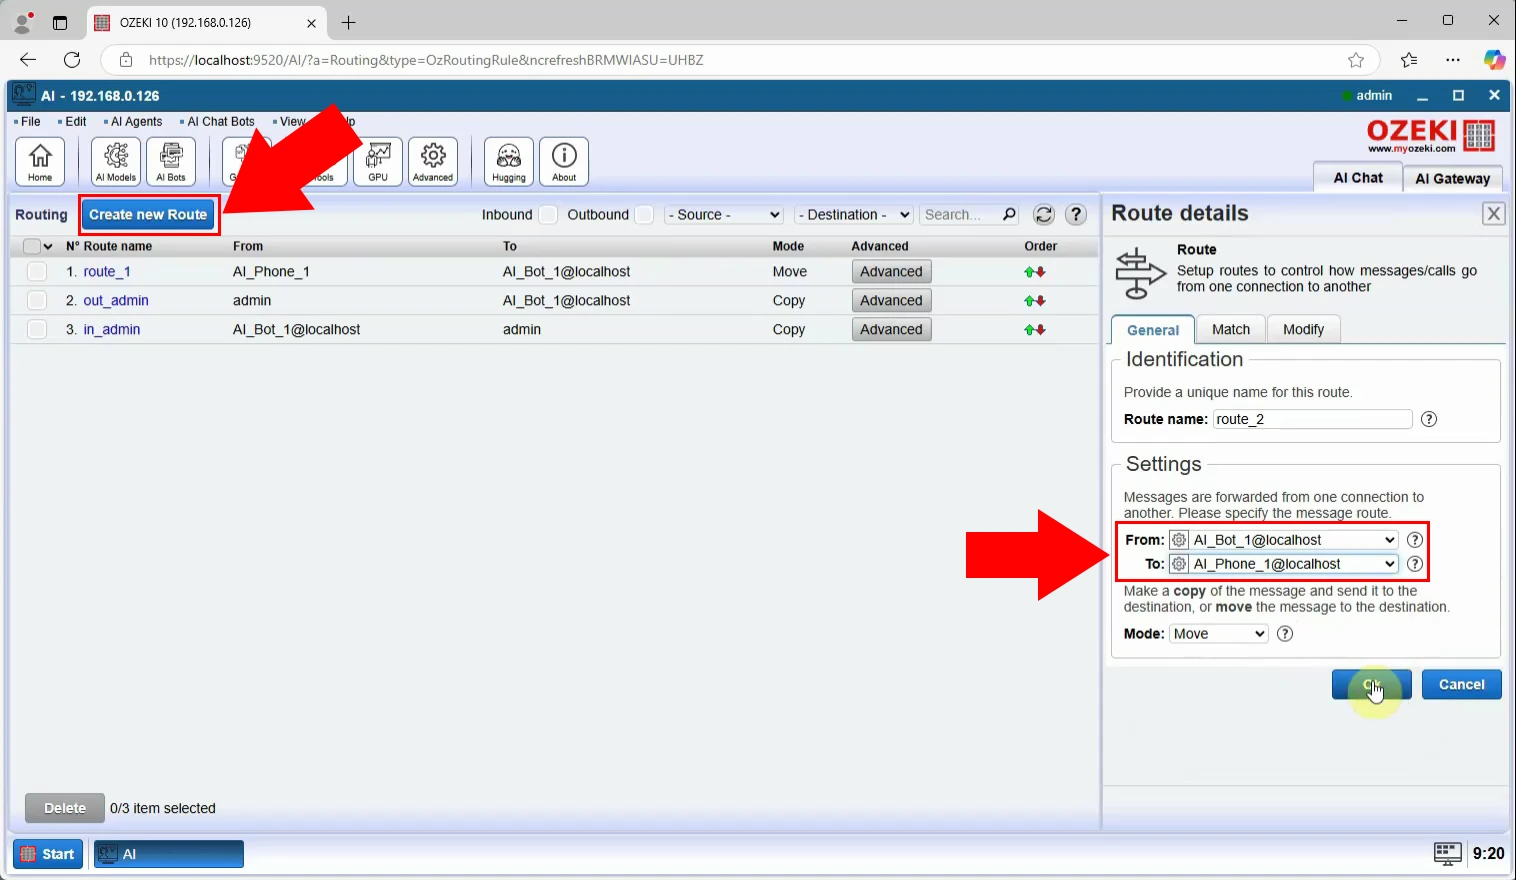
Similarly, create a route From AI_bot To AI_phone. Repeat the steps in the previous figure but reverse the routing directions. Save the configuration.
Make a test phone calls (Video tutorial)
In this video, we guide you through making test calls to verify your AI assistant's functionality. You'll see how to check transcription accuracy, listen to AI-generated responses, and ensure smooth phone interactions.
Make a test phone calls
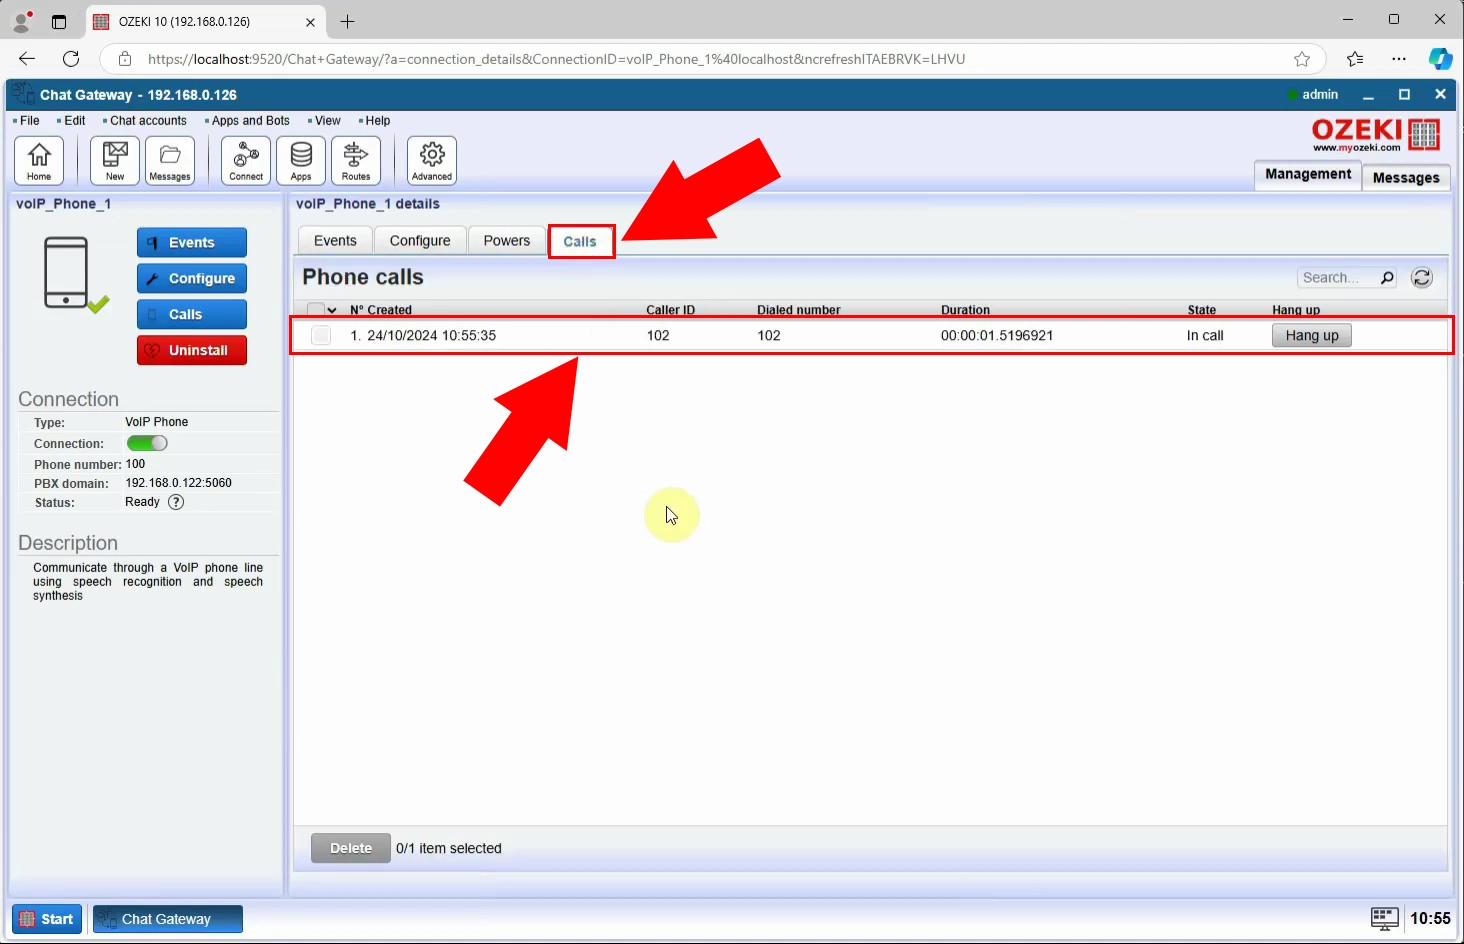
Initiate a test phone call to your chatbot. Navigate to the Chat Gateway and check the VoIP Phone details page. The Calls tab will display a new entry for the incoming cal. Figure 21 demonstrates where to locate this entry.
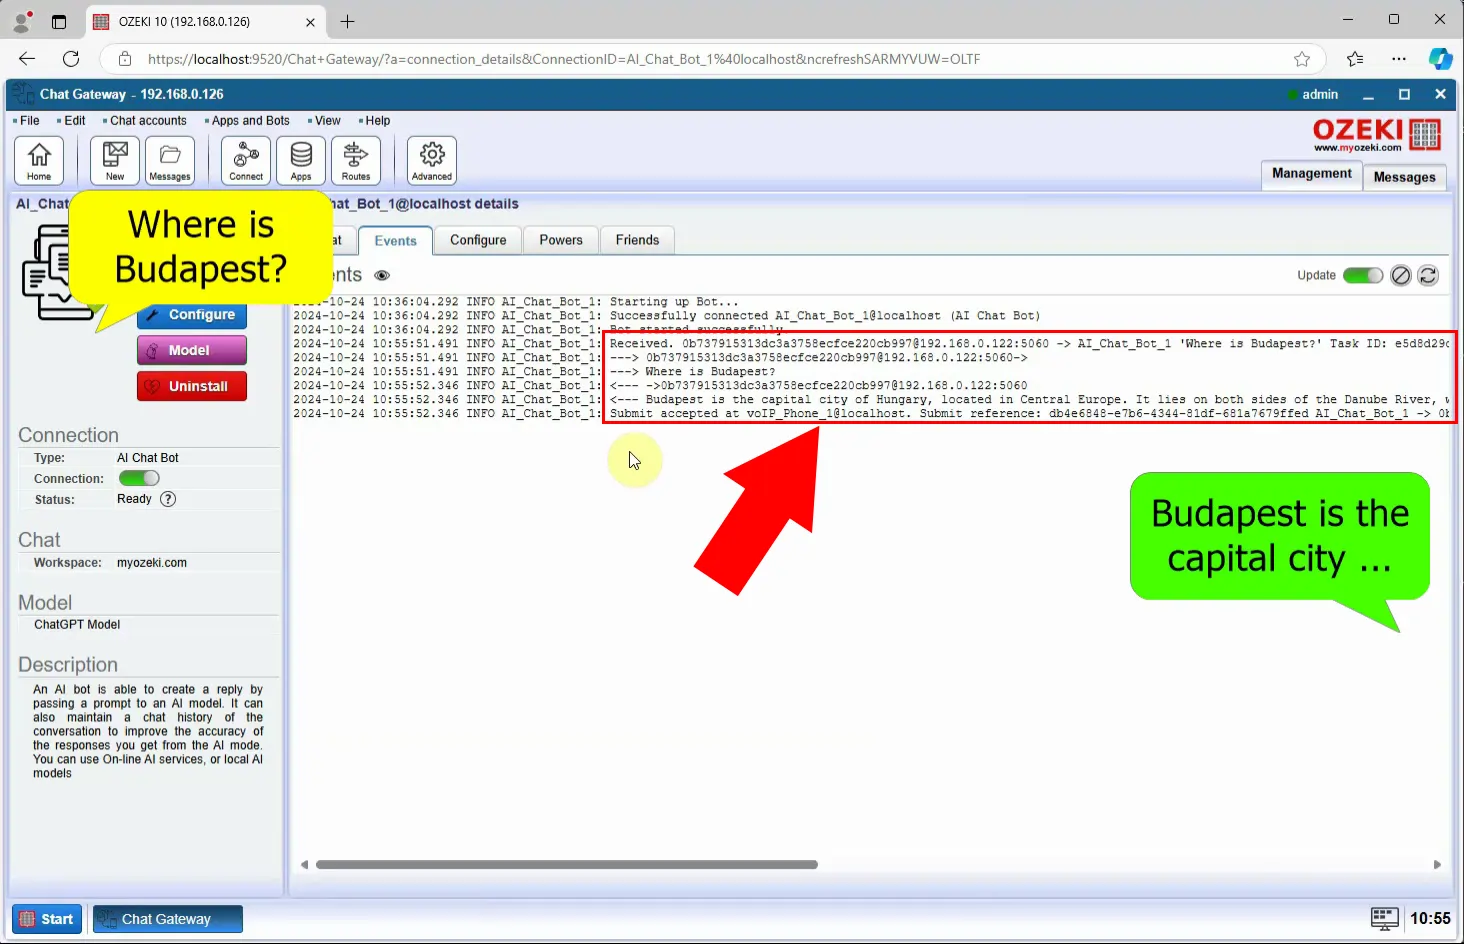
Ask a question during the call. The AI should process the question and provide an audible response. On the AI Chat Bot details page, under the Events tab, verify the transcription and response. This figure illustrates where to check the accuracy of the interaction.
Setup the phone assistant properly
Open the AI Phone details page and navigate to the Configure tab page and General tab. In the AI Speech groupbox, confirm that the Speech to Text and Text to Speech models are correctly assigned. Adjust if necessary.
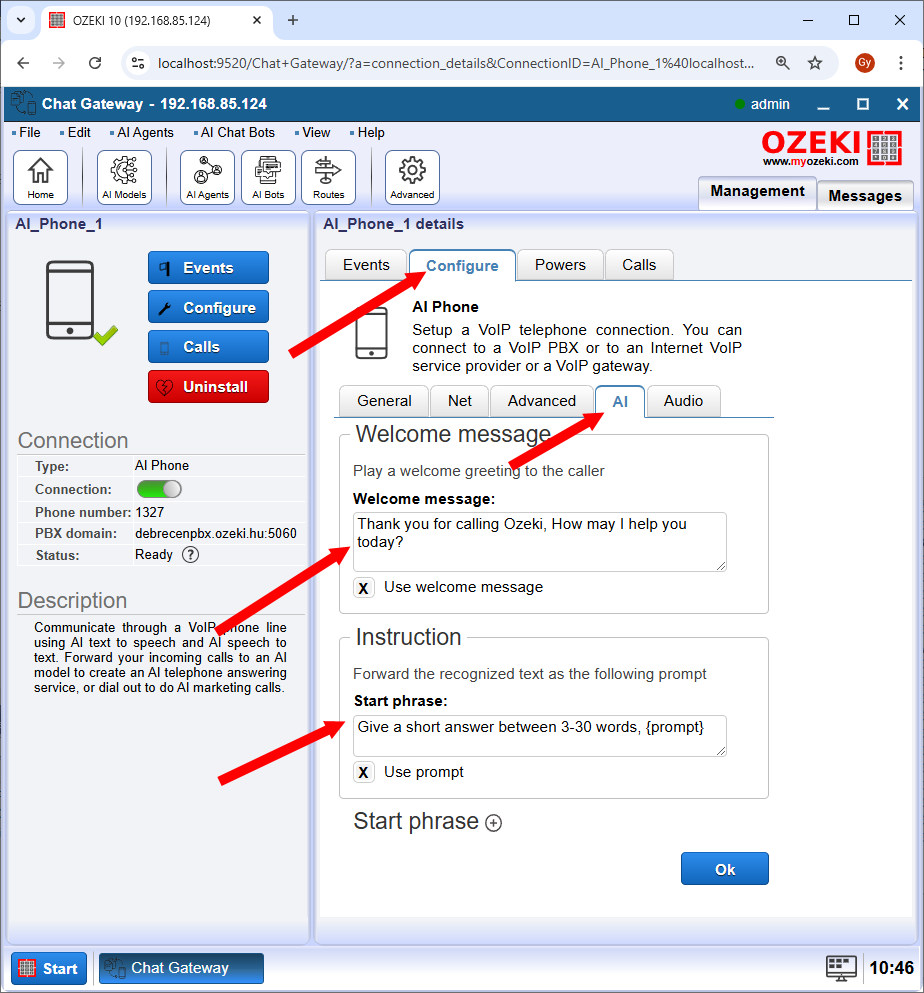
In the AI tab, create a friendly and professional welcome message. This message will play at the beginning of calls, leaving a positive impression on callers. You can set a start phrase as well, which improves the quality of the responses
On the AI Chat Bot details page, under the AI tab, craft a thoughtful system prompt. This defines the chatbot’s personality and guides its conversational style. A good system prompt ensures smooth and relevant interactions, enhancing user satisfaction.
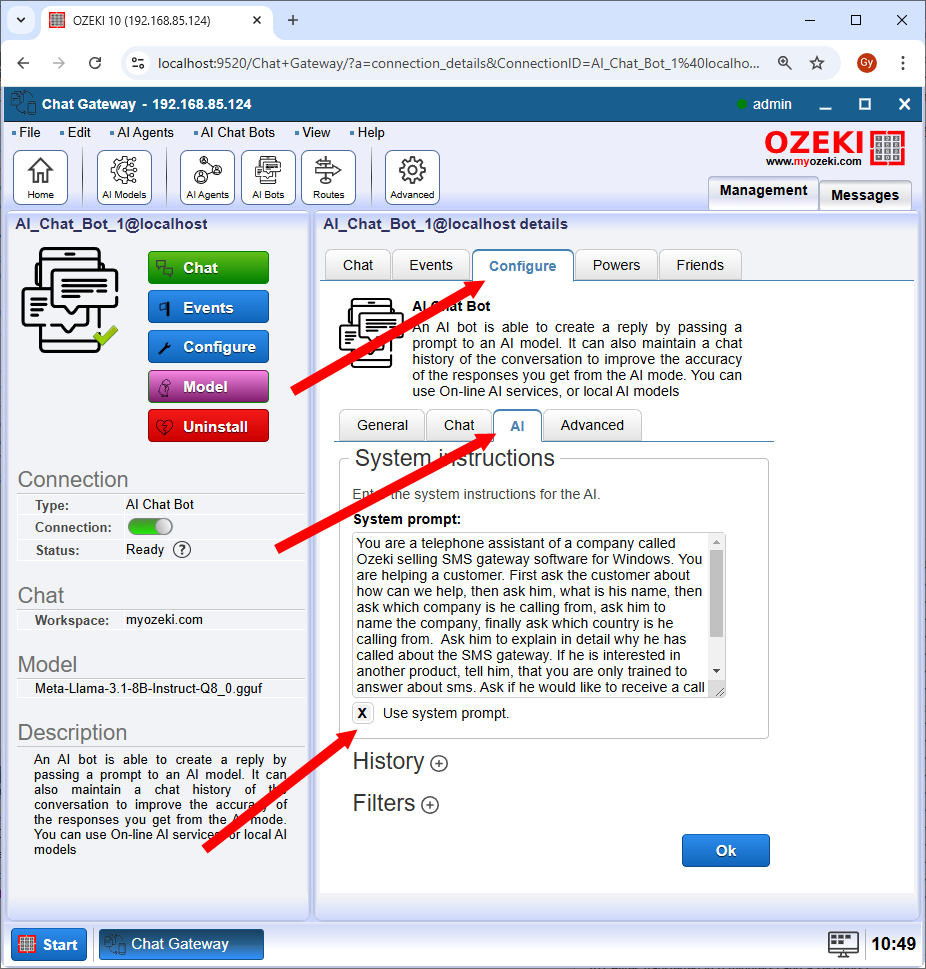
Here is a good system prompt:
You are a telephone assistant of a company called Ozeki selling SMS gateway software
for Windows. You are helping a customer. First ask the customer about how can we help,
then ask him, what is his name, then ask which company is he calling from, ask him
to name the company, finally ask which country is he calling from.  Ask him to
explain in detail why he has called about the SMS gateway. Ask if he would like to
receive a call back from a human. If yes ask for his phone number. Tell
him that we will contact him shortly. Ask one question at a time. Keep your responses short.
What makes a good system prompt for the AI assistant?
A good system prompt clearly defines the assistant’s role and tone, ensuring consistent and relevant responses. For example, you can specify that the assistant should provide concise, polite, and helpful answers to all inquiries.
Can I use my existing VoIP service?
Yes, you can configure your SIP settings to integrate with most VoIP providers.
Is it possible to customize the AI assistant’s greeting?
Absolutely! You can set a personalized welcome message under the Configure tab page and AI tab in the AI Phone settings. This ensures that callers are greeted professionally and warmly.
Conclusion
This article provided a detailed walkthrough of creating an AI-powered phone assistant using Ozeki AI Studio, leveraging Speech to Text, Text to Speech, and chatbot technology. With this setup, you can revolutionize your communication, automate tasks, and improve efficiency. Explore other Ozeki AI solutions to discover more possibilities, and start transforming your workflows today!

