How to setup Text to Image generation
Stable Diffusion is the technology to produce images from a text description. this technology forms the basis of the FLUX models. This guide explains how you can setup text to image generation in Ozeki AI studio using a FLUX model. Whether you're a beginner or an experienced user, you'll find this process simple and rewarding. In just a few minutes, you'll unlock a powerful tool that will revolutionize how you create visual content. Let's dive in!
What is Text-to-Image Generation?
Text-to-Image Generation is a technology that enables the creation of images based on text descriptions. It is used because it simplifies the process of producing customized visuals, making it ideal for creative and professional use cases.
Recommended hardware:
To use image generation it is recommended to use a GPU.
Download the required models from:
https://huggingface.co/second-state/FLUX.1-dev-GGUF/tree/mainSave the files to:
- Flux model: C:\AIModels\flux1-dev-Q5_1.gguff
- ClipModelPath: C:\AIModels\clip_l.safetensors
- T5xxlModelPath: C:\AIModels\t5xxl_fp16.safetensors
- AEModelPath: C:\AIModels\ae.safetensors
Background information
When using Flux for text-to-image generation, each model plays a unique role in creating high-quality images:
CLIP Model: This model is used to encode the text input, capturing key features and semantic information. It helps the system understand the context and details of the text prompt.
T5XXL Model: This large language model processes the text input to expand or refine the descriptions, providing richer semantic information. It enhances the text understanding, making the generated images more accurate and detailed
AE Model (Autoencoder): The AE model, often referred to as a VAE (Variational Autoencoder), is used for generating the actual images It takes the processed text information and converts it into a visual representation
Flux Model: The Flux model integrates and orchestrates all these models, ensuring they work together seamlessly.
By combining these models, Flux can create more comprehensive and accurate text-to-image representations. It ensures that the generated images closely match the text descriptions while maintaining a balance between creativity and adherence to the prompts.
How to setup Text to Image generation (Easy steps)
To setup Text to Image generation:
- Download the required models
- Create Diffusion model in Ozeki AI Studio
- Create chatbot in Ozeki AI Studio
- Generate image with chatbot
- Register MyOzeki user and add AI bot as friend
- Generate image from MyOzeki chat
Download the required models (Video tutorial)
This video demonstrates how to navigate the HuggingFace website to locate and download the required model files. It also shows how to organize the files by copying them to the C:\AIModels folder, ensuring they are ready for use in Ozeki AI Studio.
Download the required models
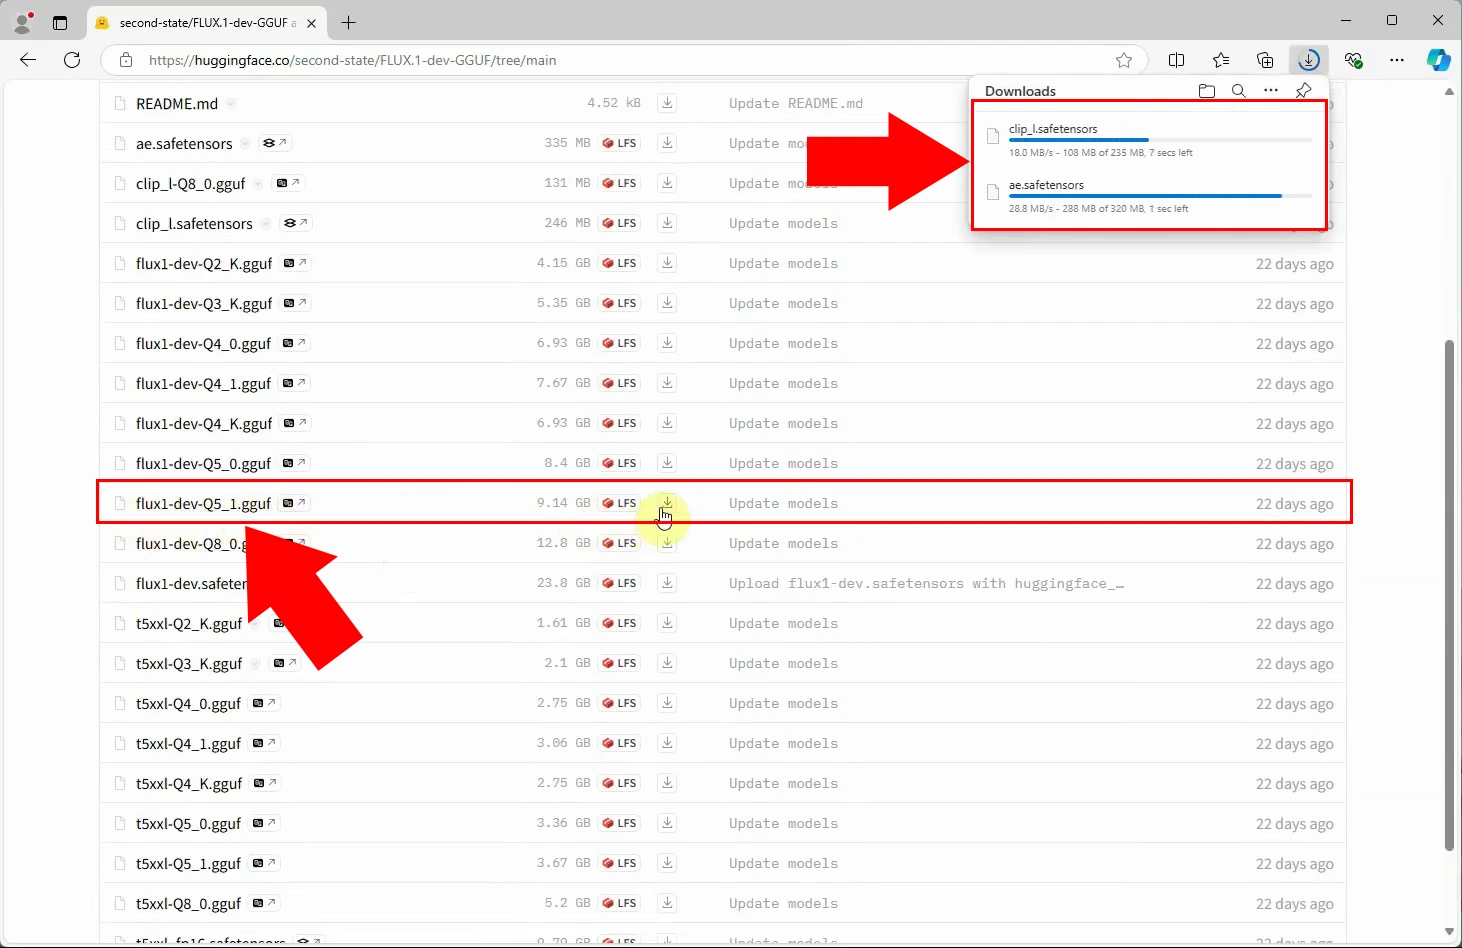
The first step is to obtain the required model files from the HuggingFace website. Navigate to the site and search for the following files: flux1-dev-Q5_1.gguff, clip_l.safetensors, t5xxl_fp16.safetensors, ae.safetensors. Once on the download page, click on each file to begin downloading. As the files download, you can monitor the progress in your browser’s download manager. This process ensures you have the necessary components to build your Text-to-Image generation model. The downloaded files will be saved to your default downloads folder, so make a note of their location for the next step.
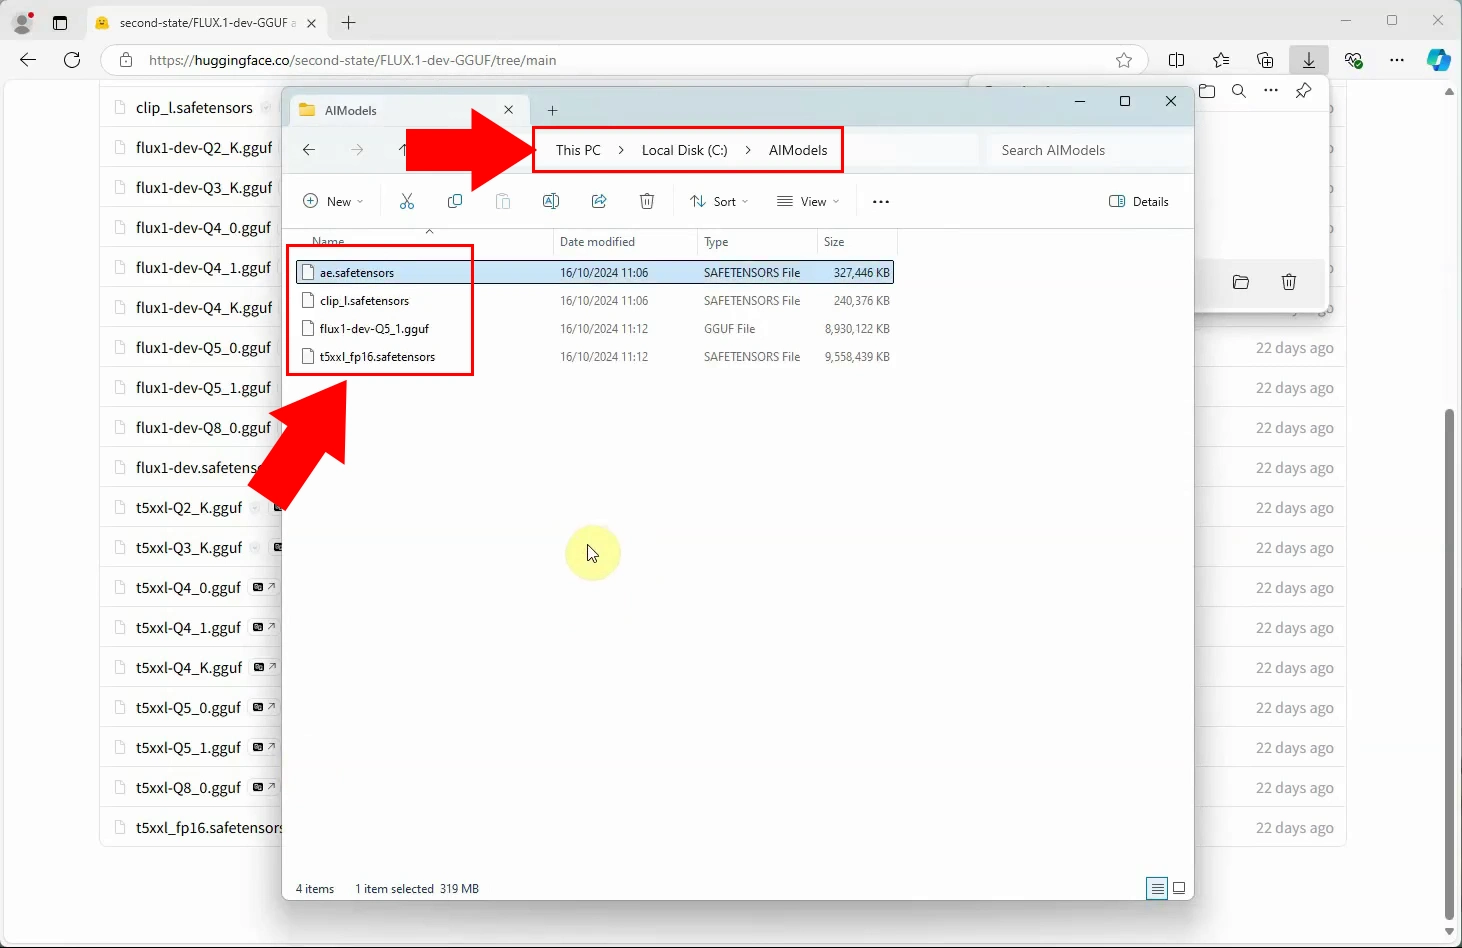
After downloading the model files, open File Explorer and navigate to C:\AIModels. If this folder doesn’t already exist, create it. Then, locate the downloaded files in your downloads folder and copy them into the C:\AIModels directory. This ensures that Ozeki AI Studio can access the models when setting up the diffusion AI model. Organizing these files in a dedicated folder helps streamline the setup process and prevents any confusion later on.
Create Diffusion model in Ozeki AI Studio (Video tutorial)
Watch this video to learn how to set up a Diffusion AI Model in Ozeki AI Studio. It covers opening the platform, creating a new AI model, and assigning the downloaded model files in the configuration panel. By the end, you'll have a fully configured Diffusion AI Model ready for Text-to-Image generation.
Create Diffusion model in Ozeki AI Studio
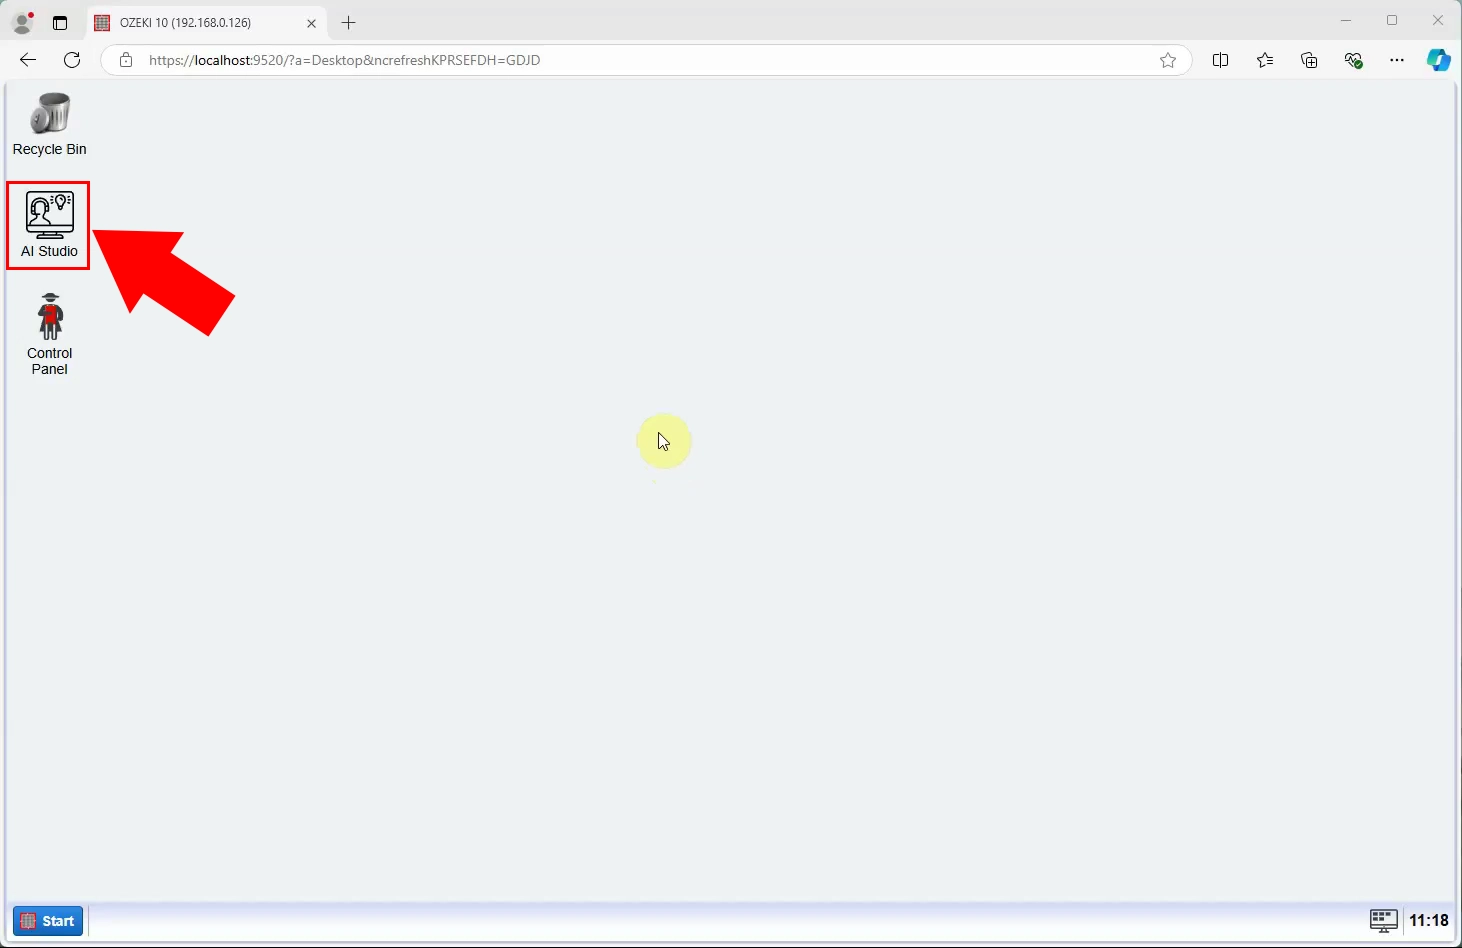
To start configuring the Diffusion AI model, open the Ozeki OS Desktop. Locate the AI Studio icon, which is marked with a red square and arrow on Figure 3. Click on this icon to open Ozeki AI Studio. Once opened, you’ll find a clean and intuitive interface designed to simplify AI model management. This step introduces you to the central hub for configuring all AI-related functionalities in Ozeki.
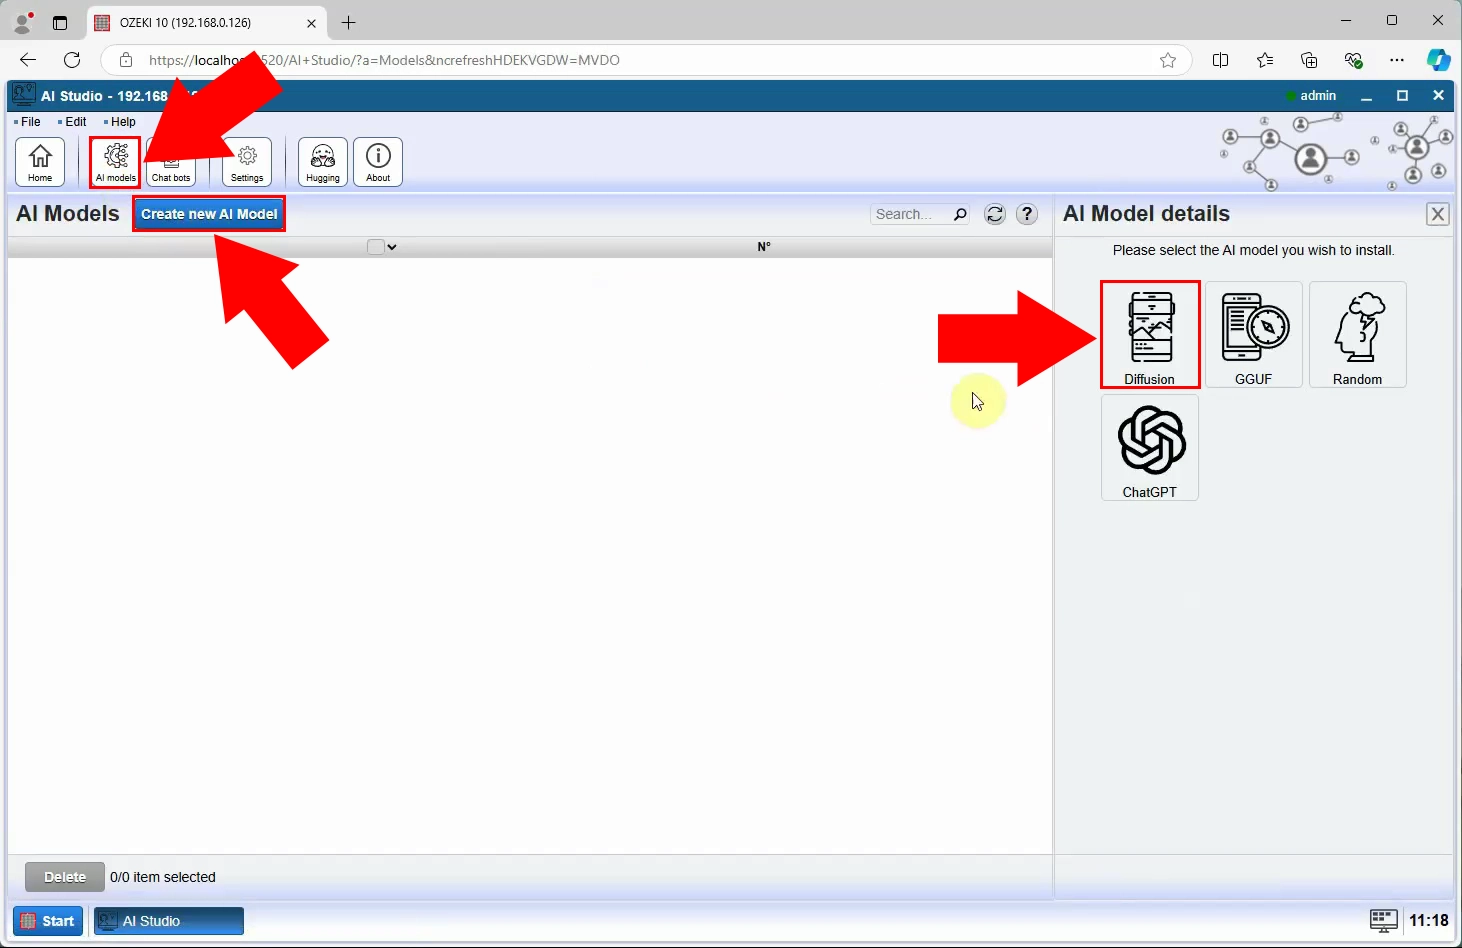
Inside Ozeki AI Studio, click on the AI Models icon located in the toolbar at the top of the screen. This will bring up a page listing all existing AI models. To create a new one, click on the blue Create New AI Model button just below the toolbar. A panel will slide out on the right-hand side of the screen, showing various AI model options. Click on the Diffusion icon, which represents the type of AI model you’ll be building. These actions initiate the model creation process, setting the stage for further customization.
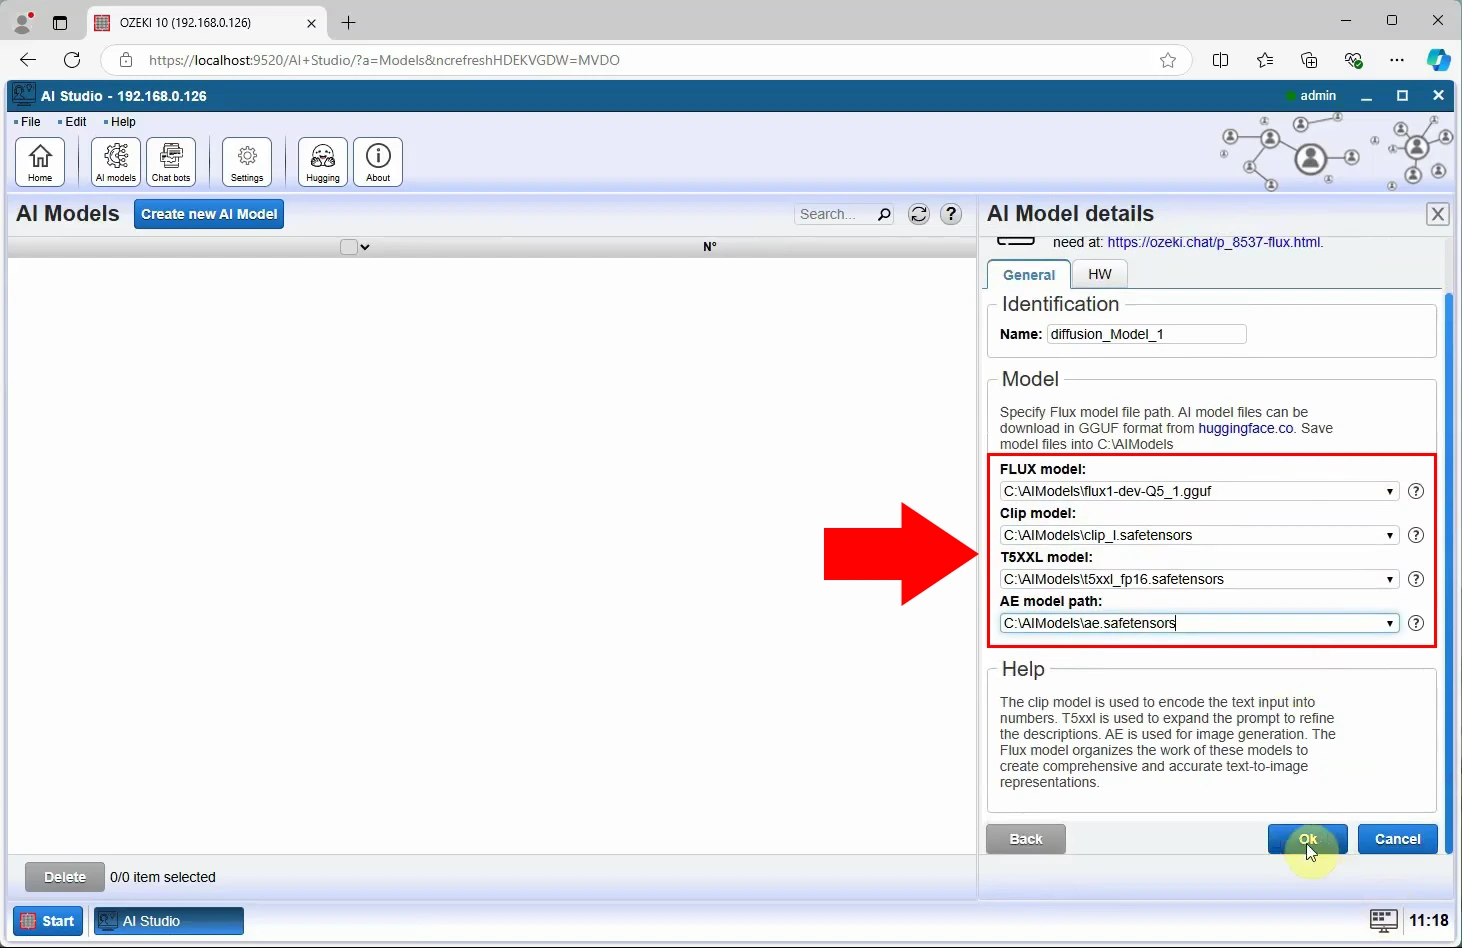
With the Diffusion AI model panel open, you’ll see input fields where you need to specify the paths to the model files downloaded earlier. Under the General Tab , locate the Model Groupbox and enter the paths for each of the four model files. This action connects your Ozeki AI Studio to the necessary files, enabling it to generate images effectively. Once all fields are populated, click OK to save your changes. This step finalizes the creation of your Diffusion AI model, marking a significant milestone in the setup process.
Create chatbot in Ozeki AI Studio (Video tutorial)
This video tutorial shows the steps to create a chatbot in Ozeki AI Studio and connect it to the Diffusion AI Model. You’ll see how to configure the chatbot’s settings, link it to the model, and confirm its appearance on the Chat Bots Dashboard, making it ready for interaction.
Create chatbot in Ozeki AI Studio
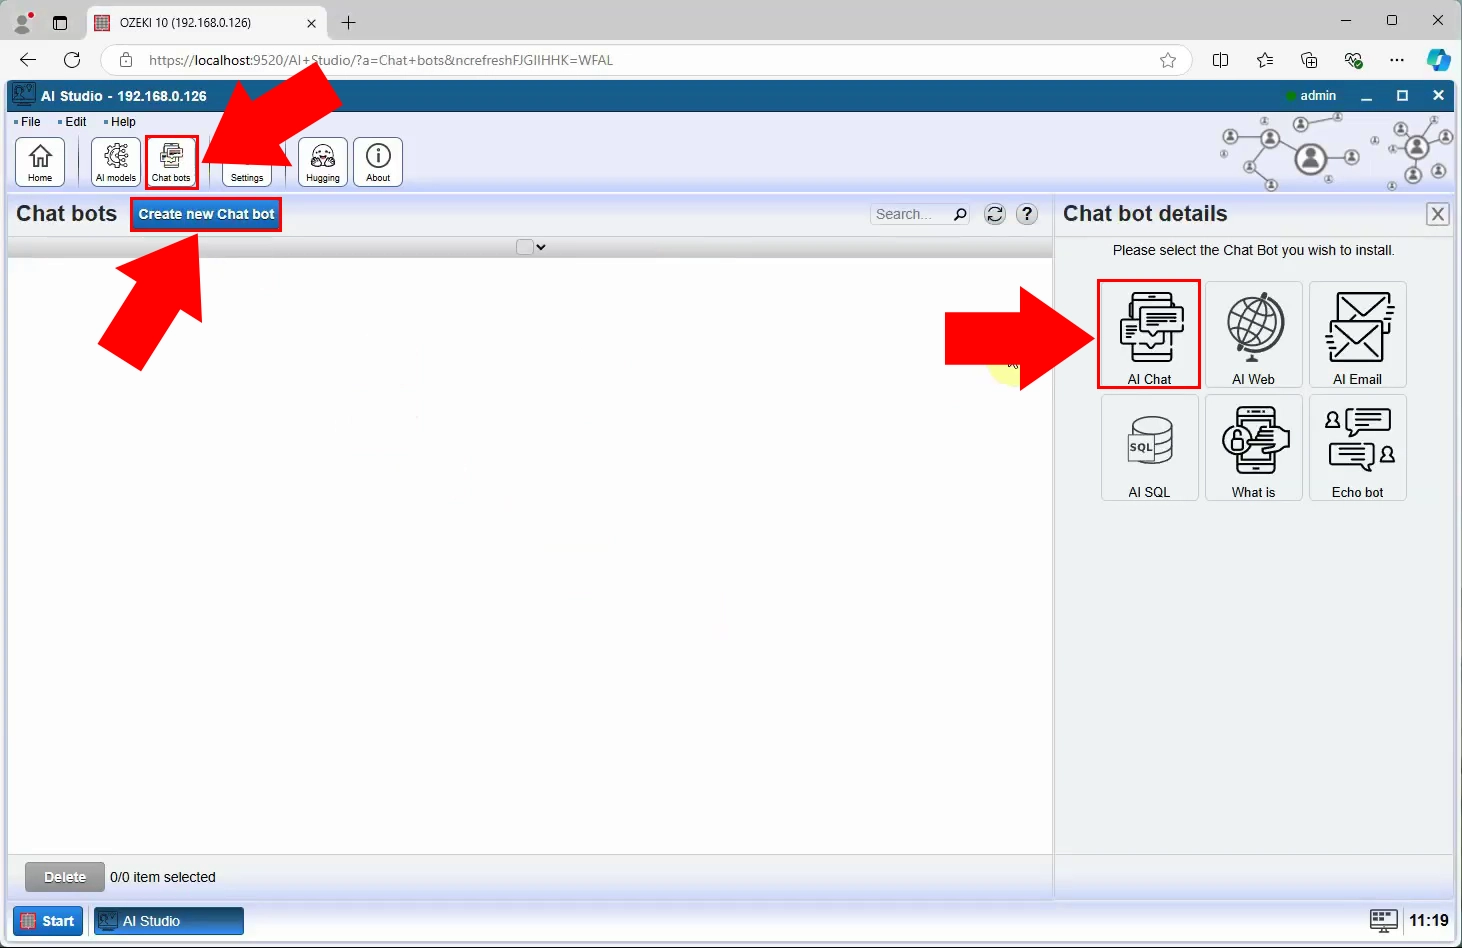
Now that your AI model is ready, it’s time to create a chatbot. Return to the Ozeki AI Studio dashboard and click on the Chat Bots icon in the toolbar. This will open a page listing all existing chatbots. To add a new one, click on the blue Create New Chat Bot button located just below the toolbar. In the panel that appears, select the AI Chat option. This process enables you to design a chatbot that can interact with the AI model you just configured.
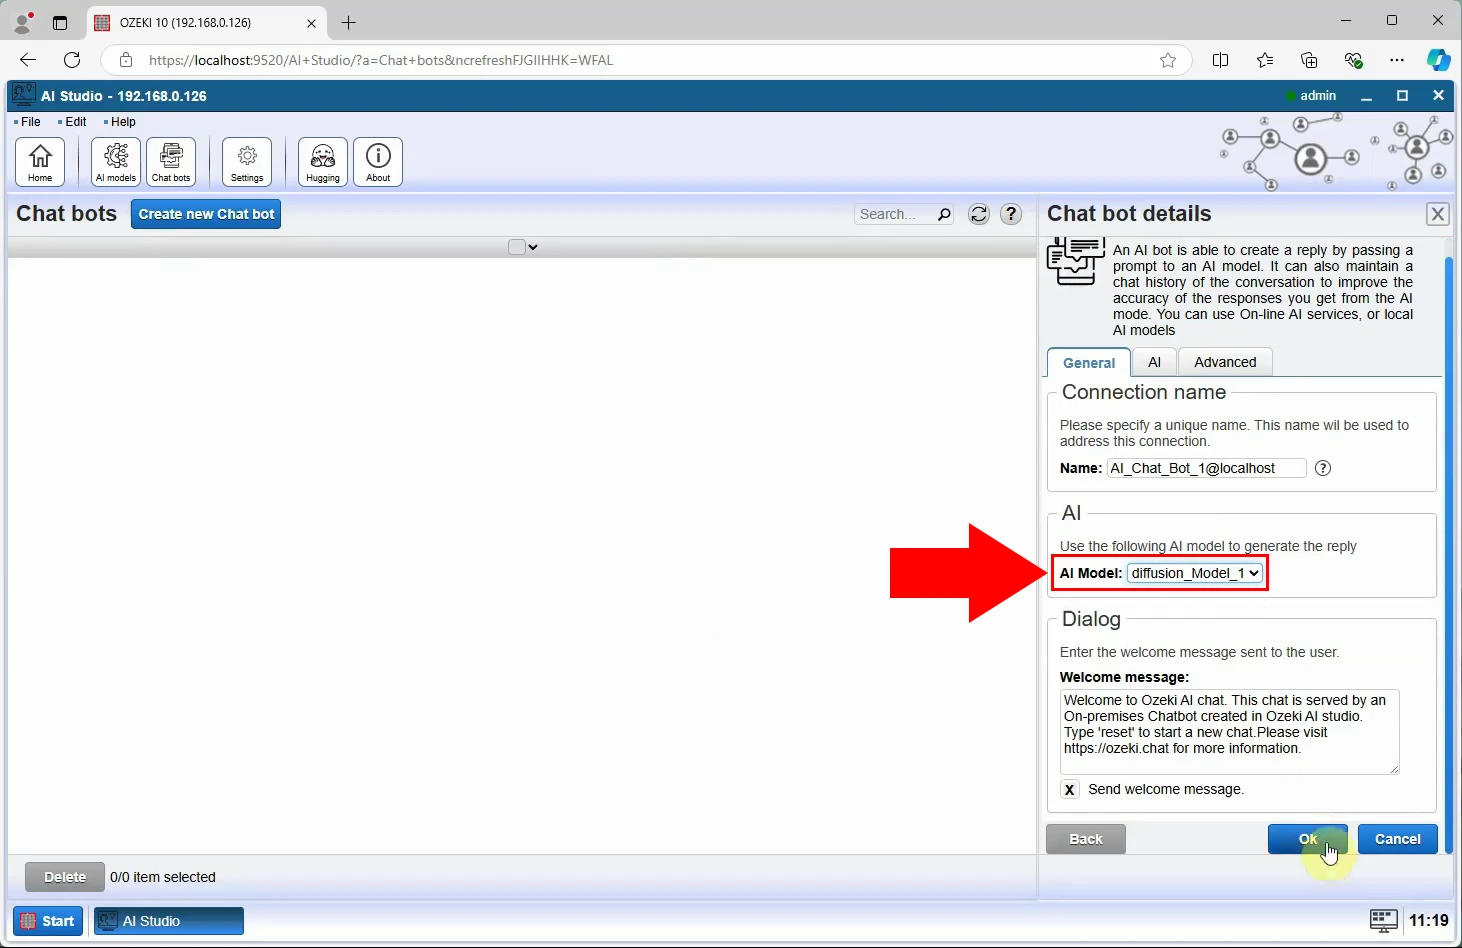
Once the chatbot panel is open, you’ll see several configuration options. Under the General Tab, find the AI Groupbox where you can select an AI model for the chatbot. Use the dropdown menu to choose the Diffusion AI model you created earlier. After selecting the model, click OK to save the configuration. This links the chatbot to your AI model, making it capable of interpreting text prompts and generating images.
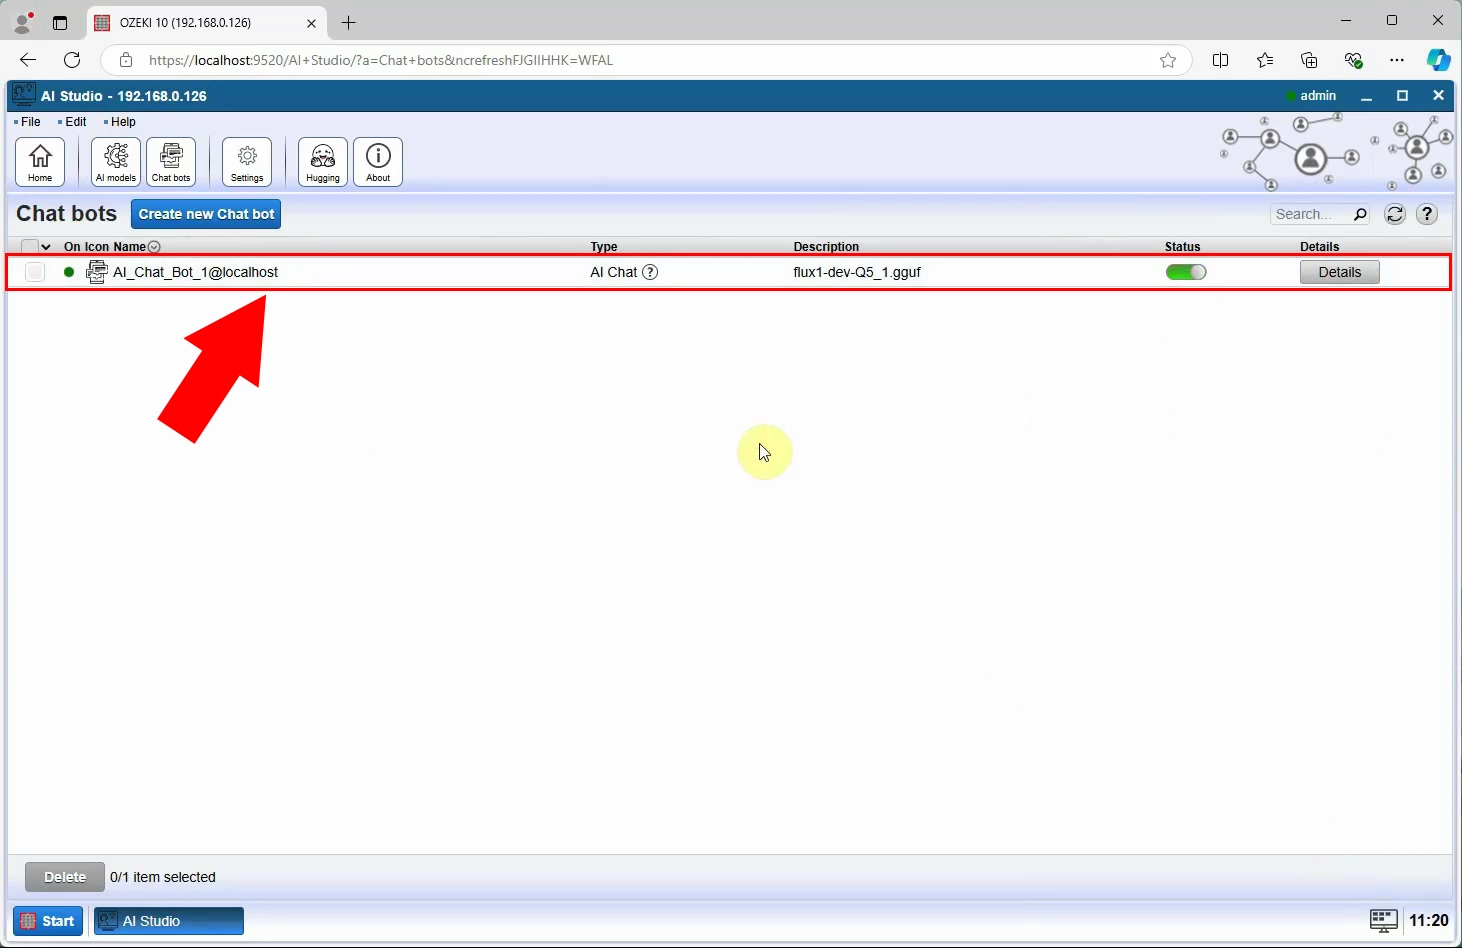
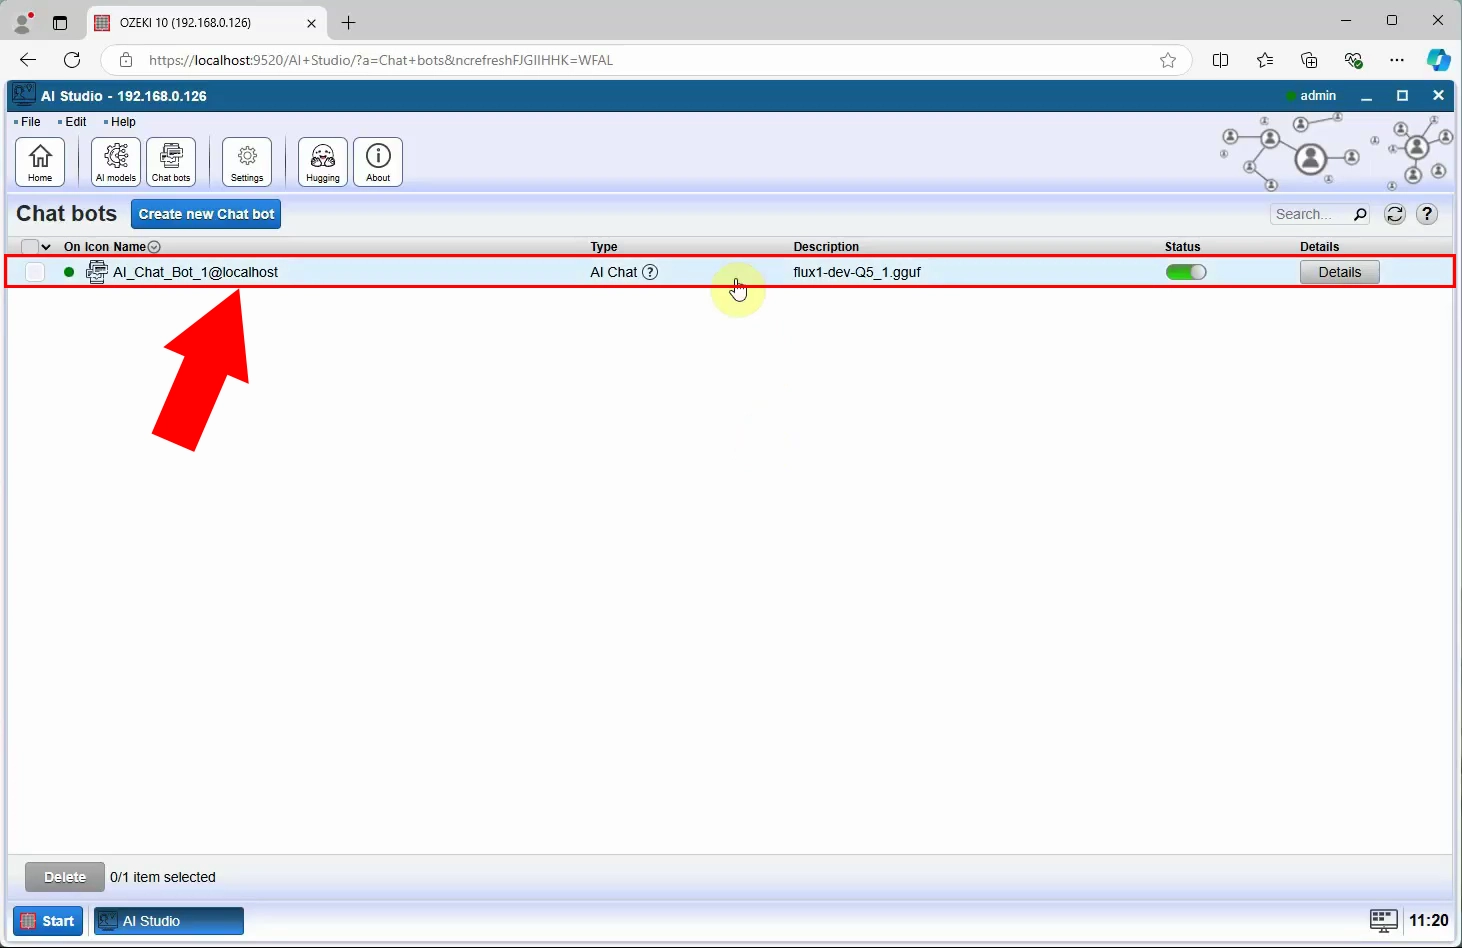
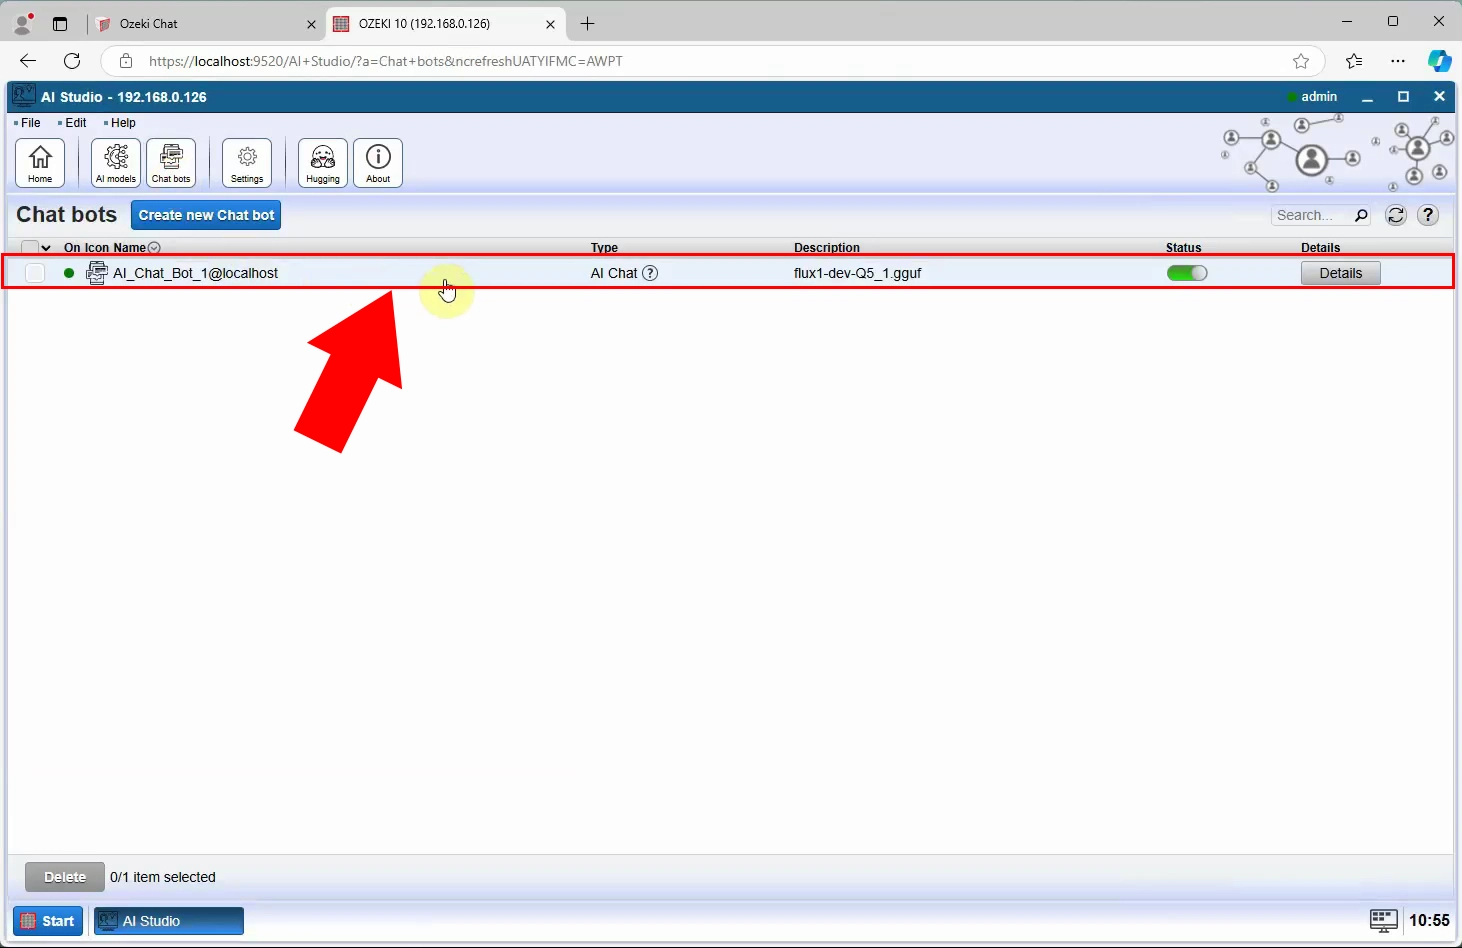
After saving your chatbot configuration, return to the Chat Bots Dashboard. You should see your newly created chatbot listed. A red rectangle and arrow on Figure 8 highlight this entry. Seeing your chatbot in the dashboard confirms that the setup was successful, and you’re now ready to interact with it.
Generate image with chatbot (Video tutorial)
Learn how to use your newly created chatbot to generate images. This video demonstrates how to open the chatbot’s details page, send a text prompt, and view the generated image directly in the chat feed, verifying the chatbot's functionality.
Generate image with chatbot
To begin using your chatbot, go back to the Chat Bots Dashboard and click on the chatbot you just created. This action will open the chatbot’s details page, where you can interact with it. The layout includes a chat feed, configuration options, and tools for sending prompts. This page serves as the central hub for engaging with your AI chatbot.
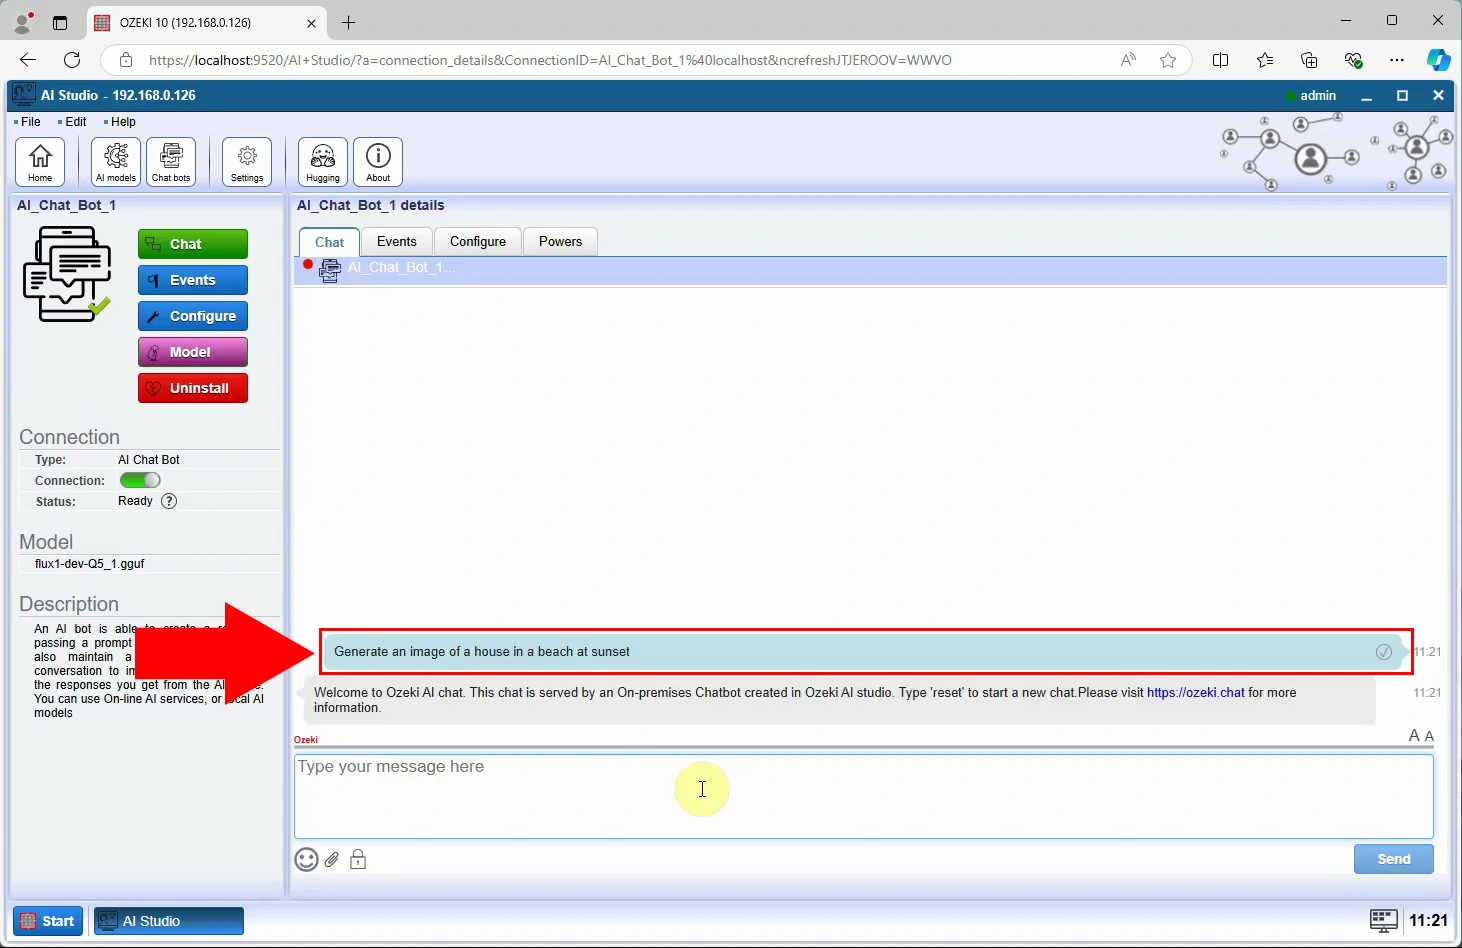
At the bottom of the chatbot’s details page, you’ll find a text input box. Type in an instructional prompt, such as "Generate an image of a house in a beach at sunset" and click the Send button. Your prompt will be processed, and you can verify that it has been sent by checking the chat feed. The chatbot will respond with a confirmation or a message indicating that the image generation process has started.
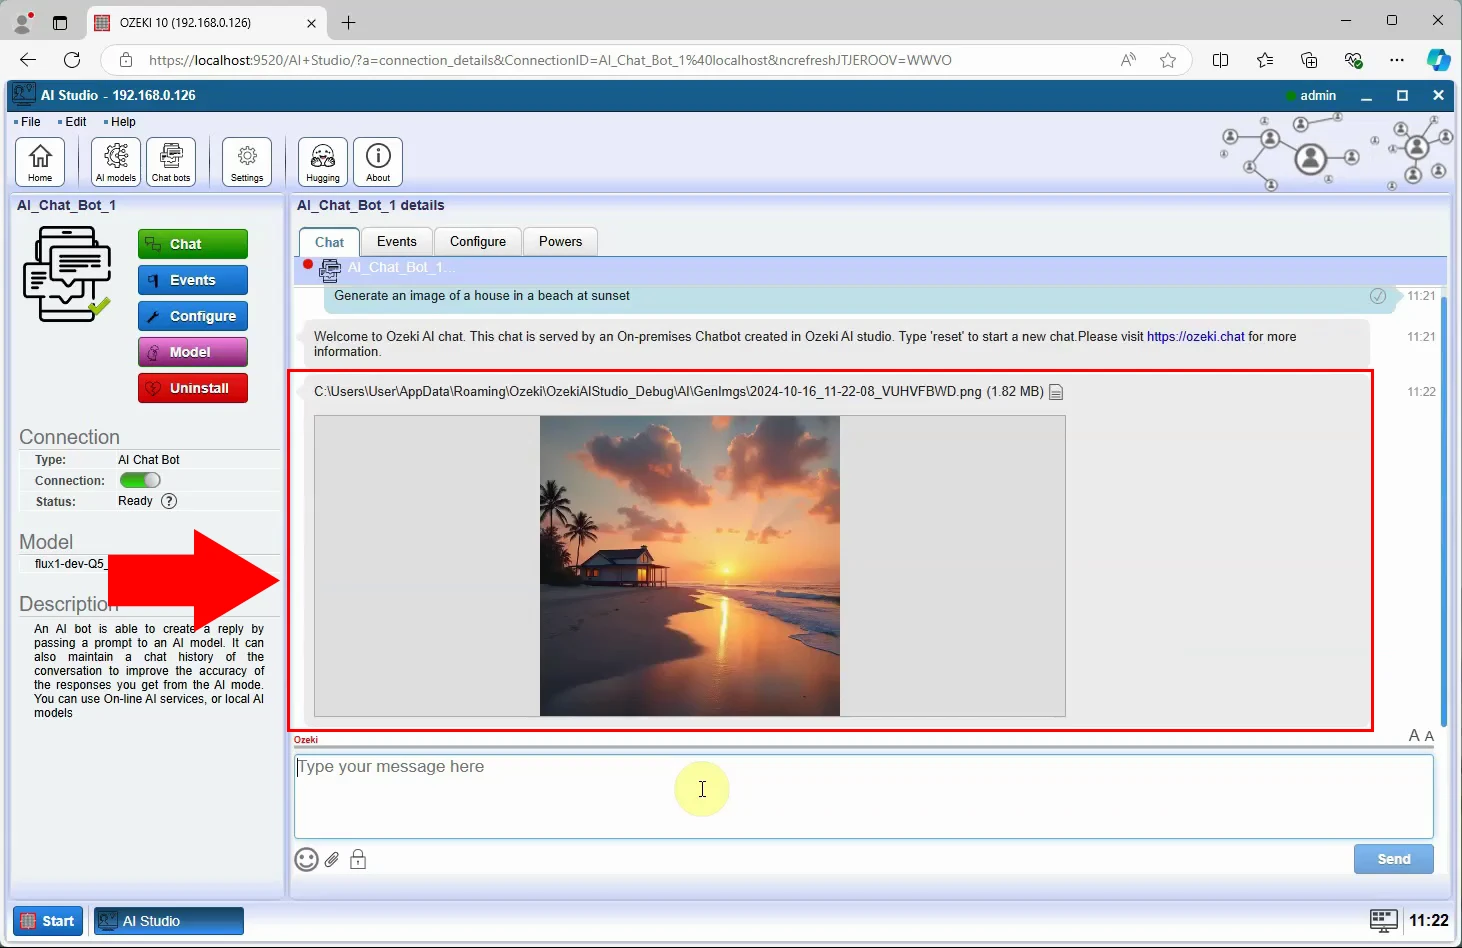
After a short processing time, the chatbot will generate an image based on your text prompt. This image will appear directly in the chat feed. This step confirms that your chatbot is fully functional and capable of creating stunning visuals based on your inputs. The result showcases the power of Text-to-Image Generation and provides immediate feedback on your creative ideas.
Register MyOzeki user and add AI bot as friend (Video tutorial)
This video explains how to create a MyOzeki account and connect it to your chatbot. It shows the registration process, logging in, and adding the chatbot as a friend in MyOzeki chat. The integration ensures your chatbot is accessible from Ozeki Chat.
Register MyOzeki user and add AI bot as friend
Create an account on MyOzeki. Navigate to MyOzeki.com and click on the Create an Account button. This action takes you to the registration page, where you can input your personal details.

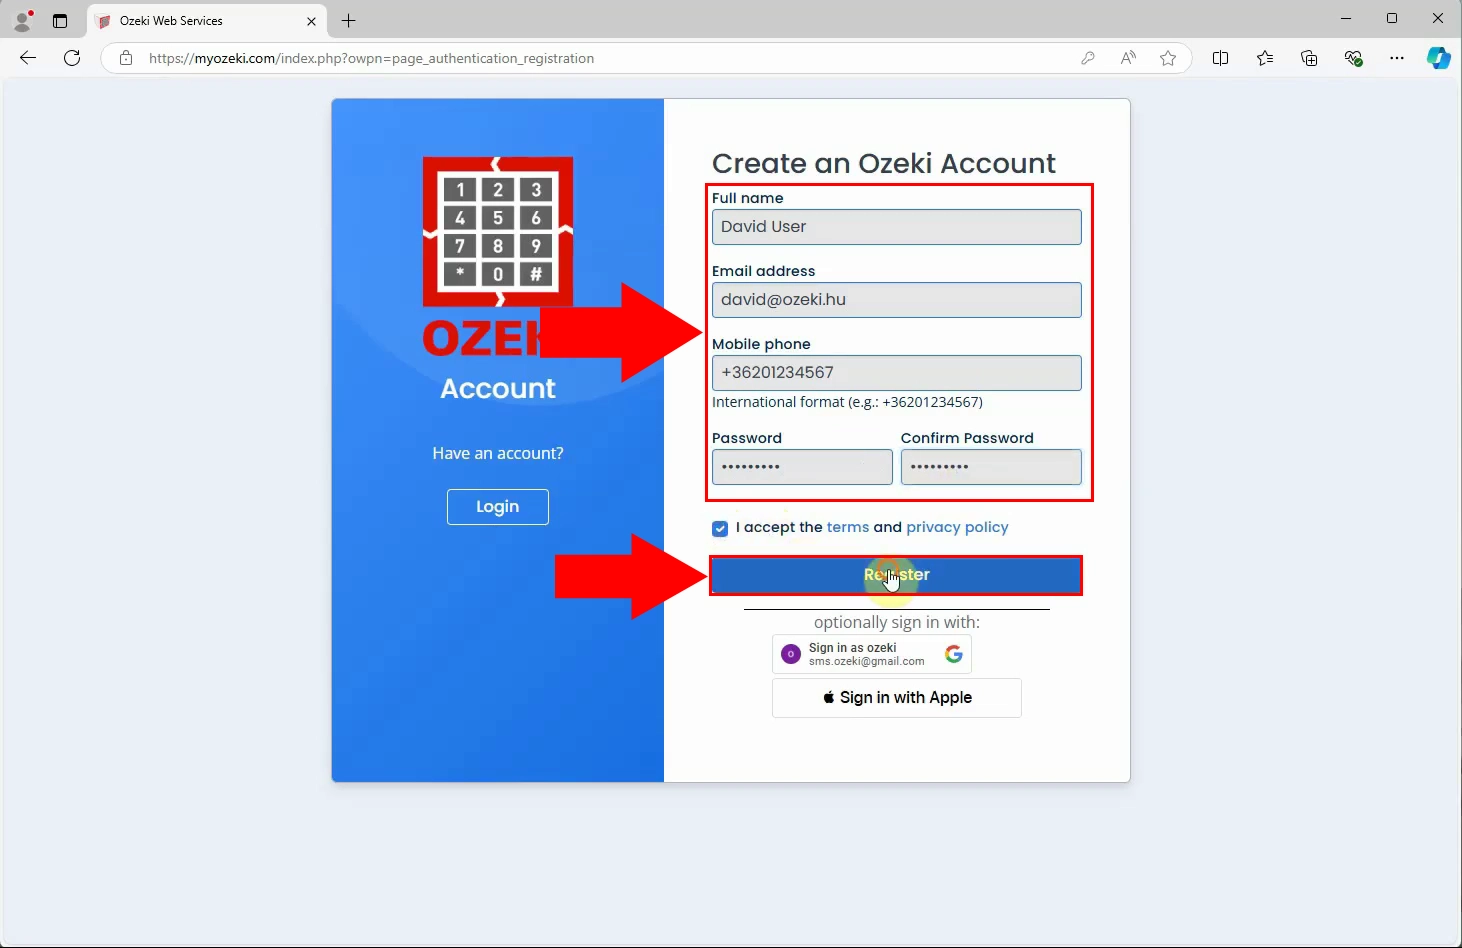
Fill out the required fields, including your full name, email address, mobile phone number, and password. After agreeing to the terms and conditions, click the Register button. A successful registration will take you to the MyOzeki homepage. If you have any issues with the registration process, check out this dedicated guide on how to create a MyOzeki account.
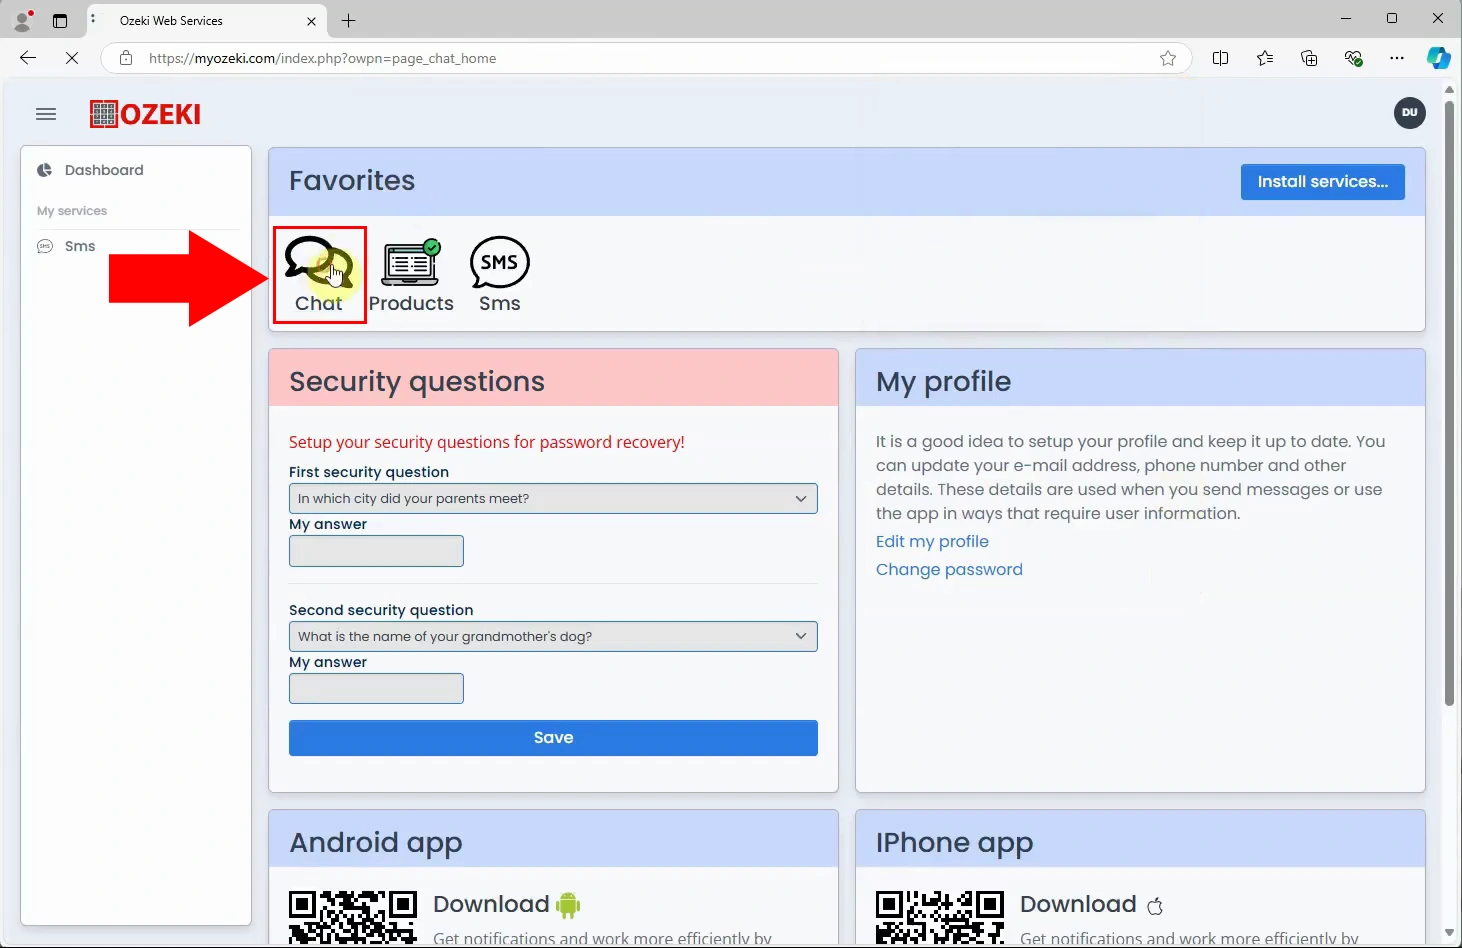
Once logged in to MyOzeki and click on the Chat icon, marked with a red rectangle on Figure 14. This opens the friend list, where you can add new friends, including your chatbot.
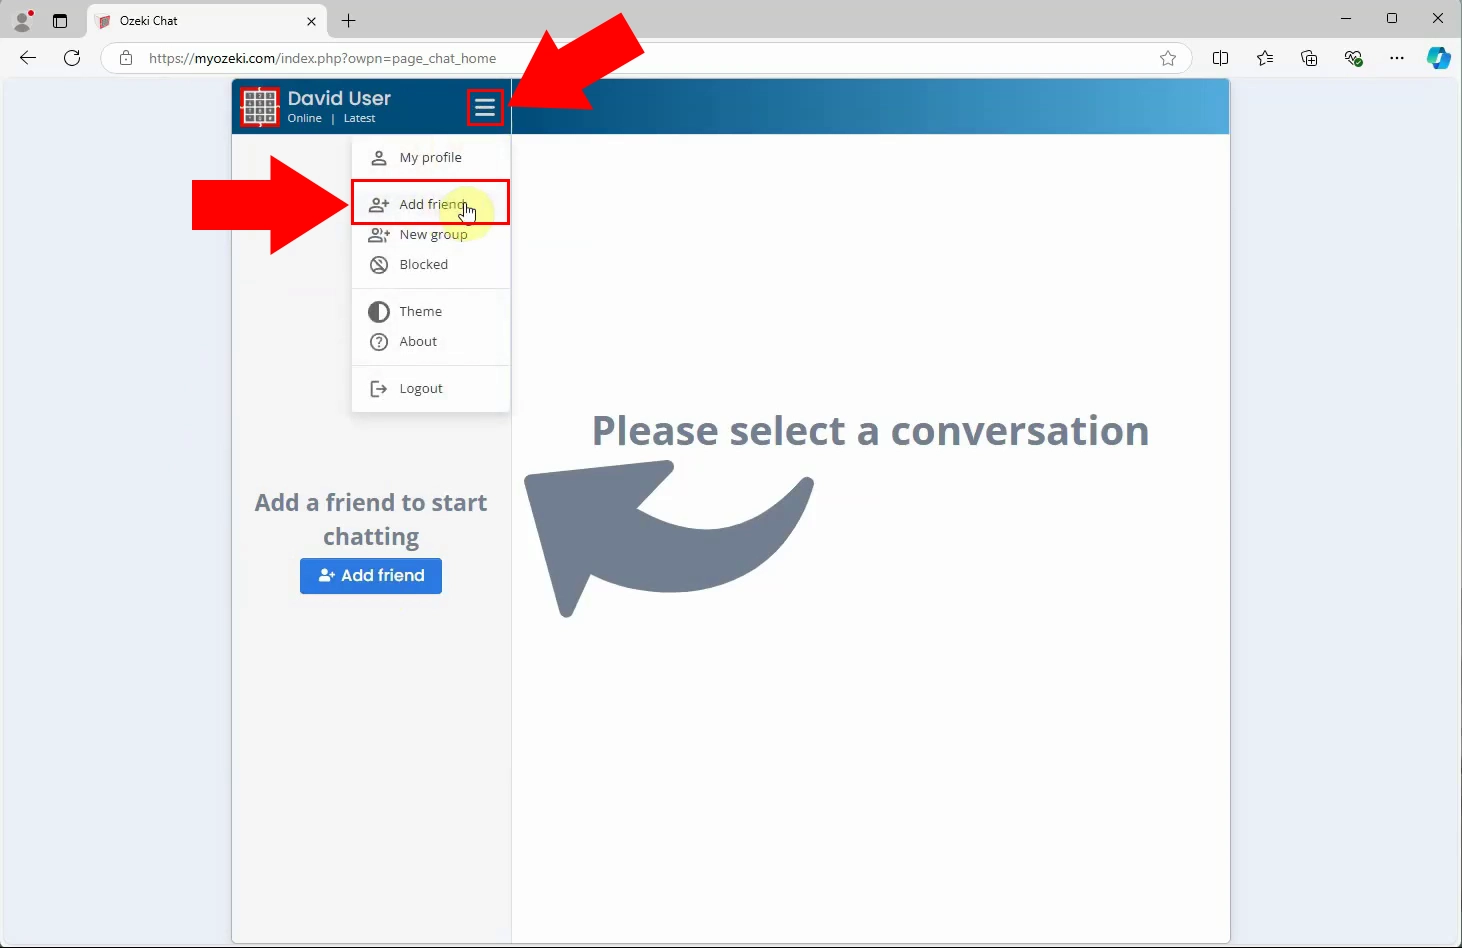
To add a new friend, click the burger menu at the top of the friend list and select Add Friend.
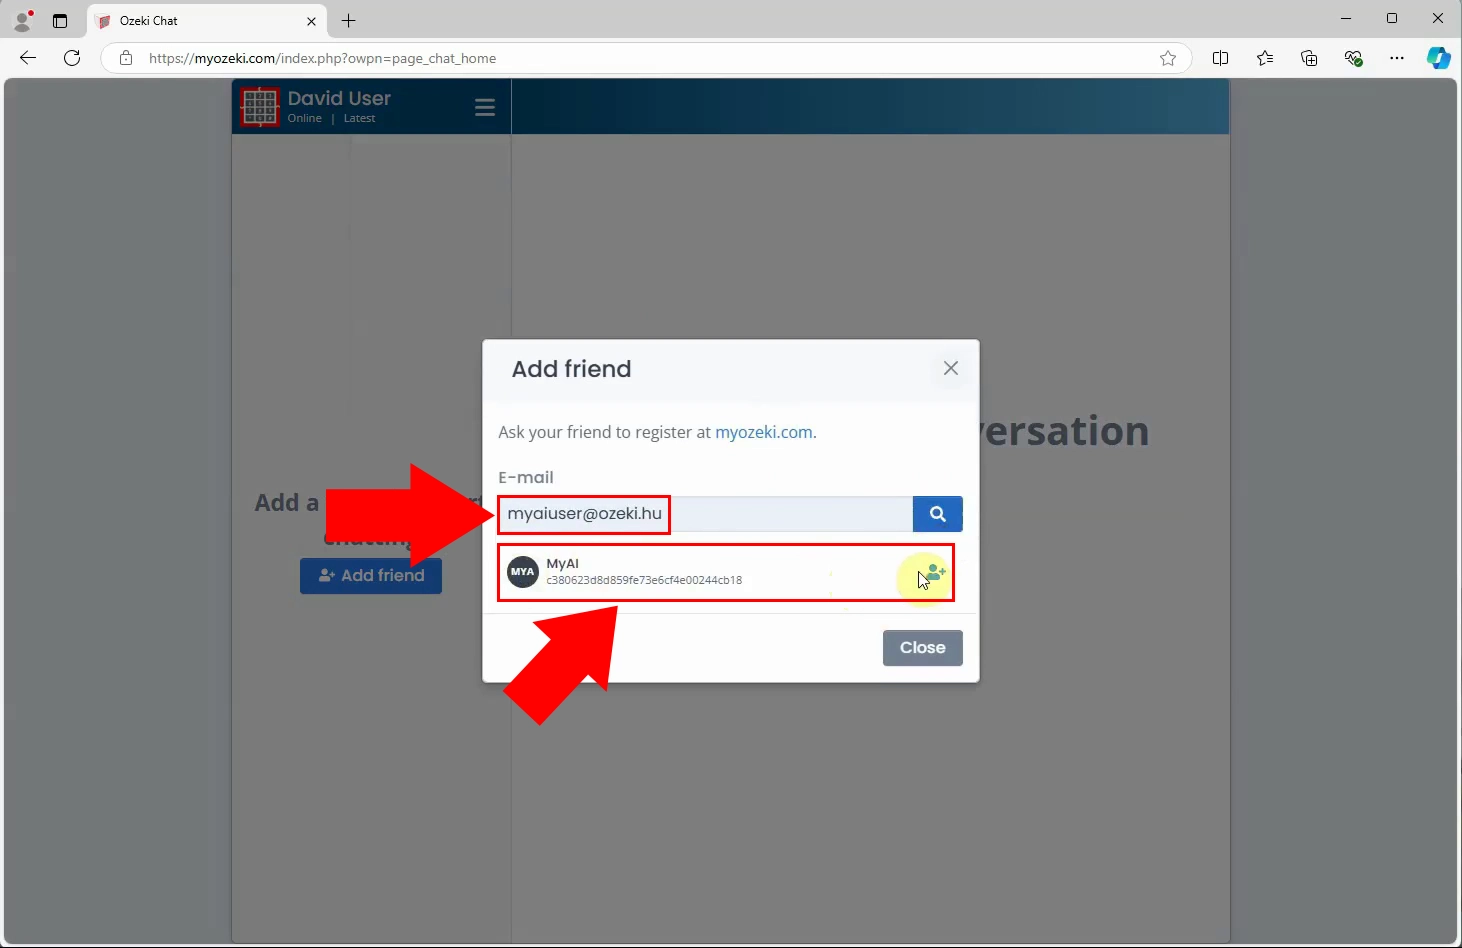
After selecting Add friend, a dialog box will appear, prompting you to enter the email address of the friend you want to add. Type in the chatbot’s email address. If successful, the chatbot’s name will appear under the input field, where you can press the Add Friend icon.
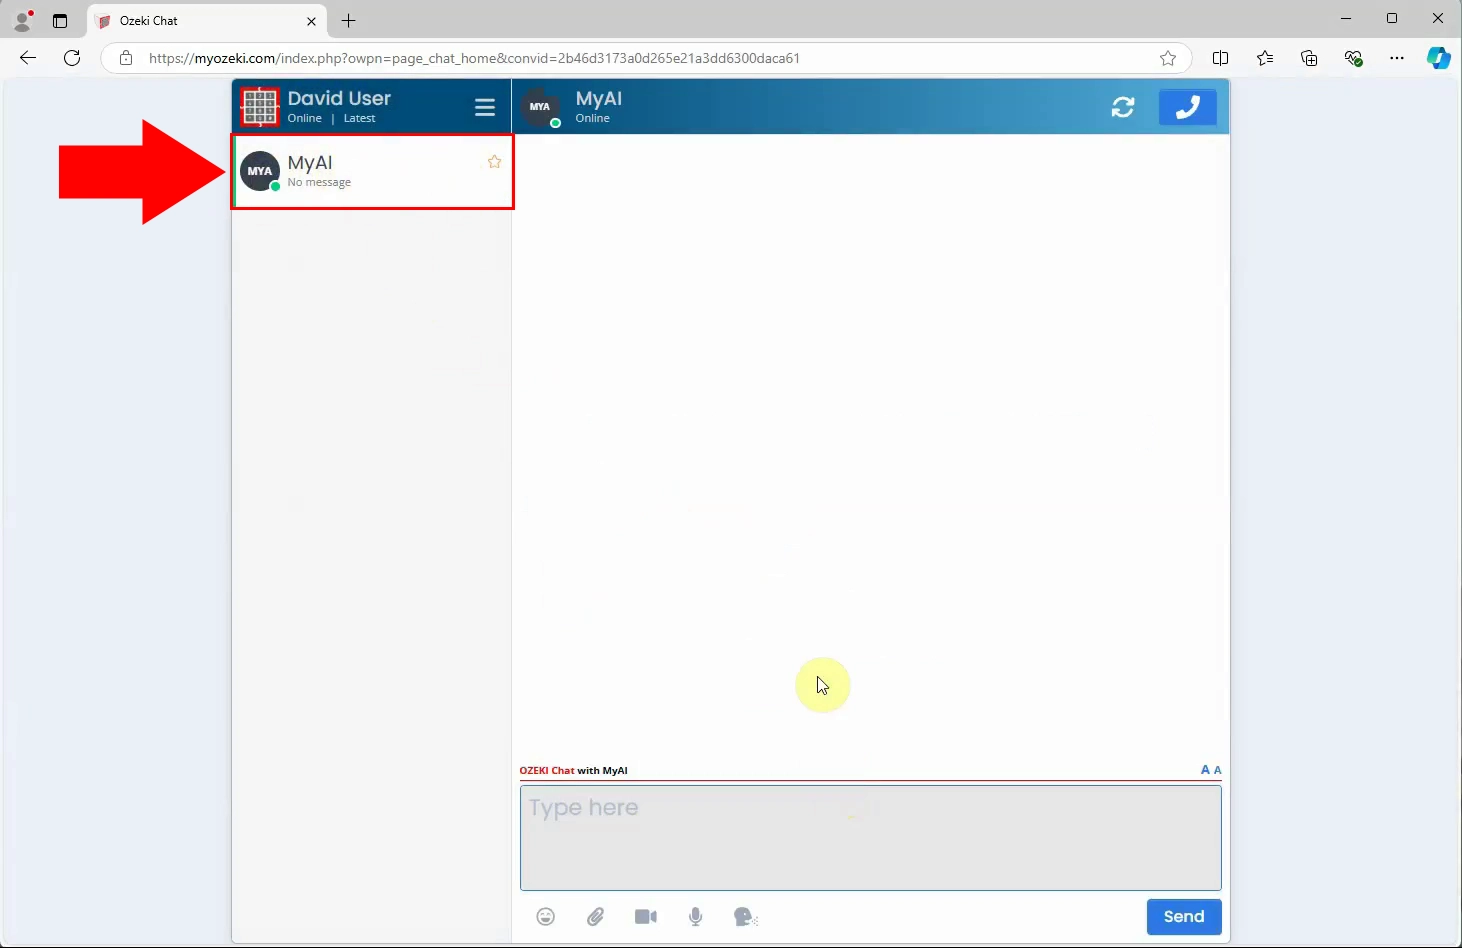
Your chatbot will now be listed in your MyOzeki friend list (Figure 17), ready for interaction. This connection allows you to generate images from MyOzeki chat, adding convenience and flexibility to your workflow.
Generate image from MyOzeki chat (Video tutorial)
In this video, you'll see how to send text prompts to your chatbot via MyOzeki chat and receive generated images as responses. It also covers configuring the chatbot with MyOzeki credentials to ensure the MyOzeki chat integration works properly.
Generate image from MyOzeki chat
Return to the Chat Bots Dashboard in Ozeki AI Studio and select your chatbot to open its details page. This is necessary for configuring additional settings that allow integration with MyOzeki.
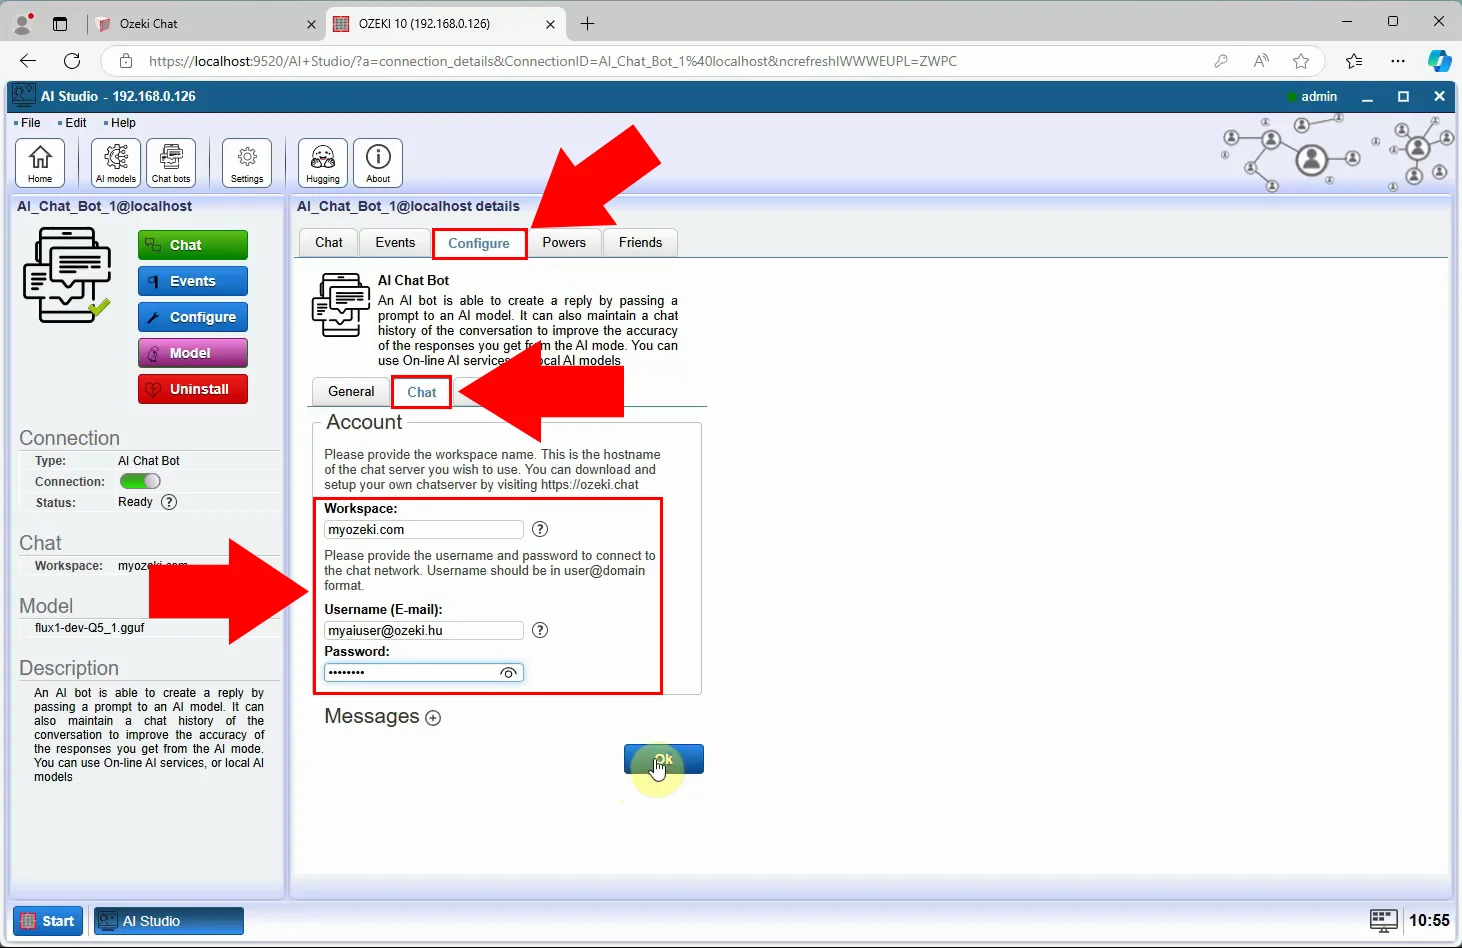
On the chatbot’s details page, switch to the Configure Tab Page. Under the Chat Tab, enter the chat bot's MyOzeki credentials (email, password, and workspace as "myozeki.com") found inside the Account Groupbox. Click OK to save these settings. This step ensures the chatbot can communicate through MyOzeki chat.
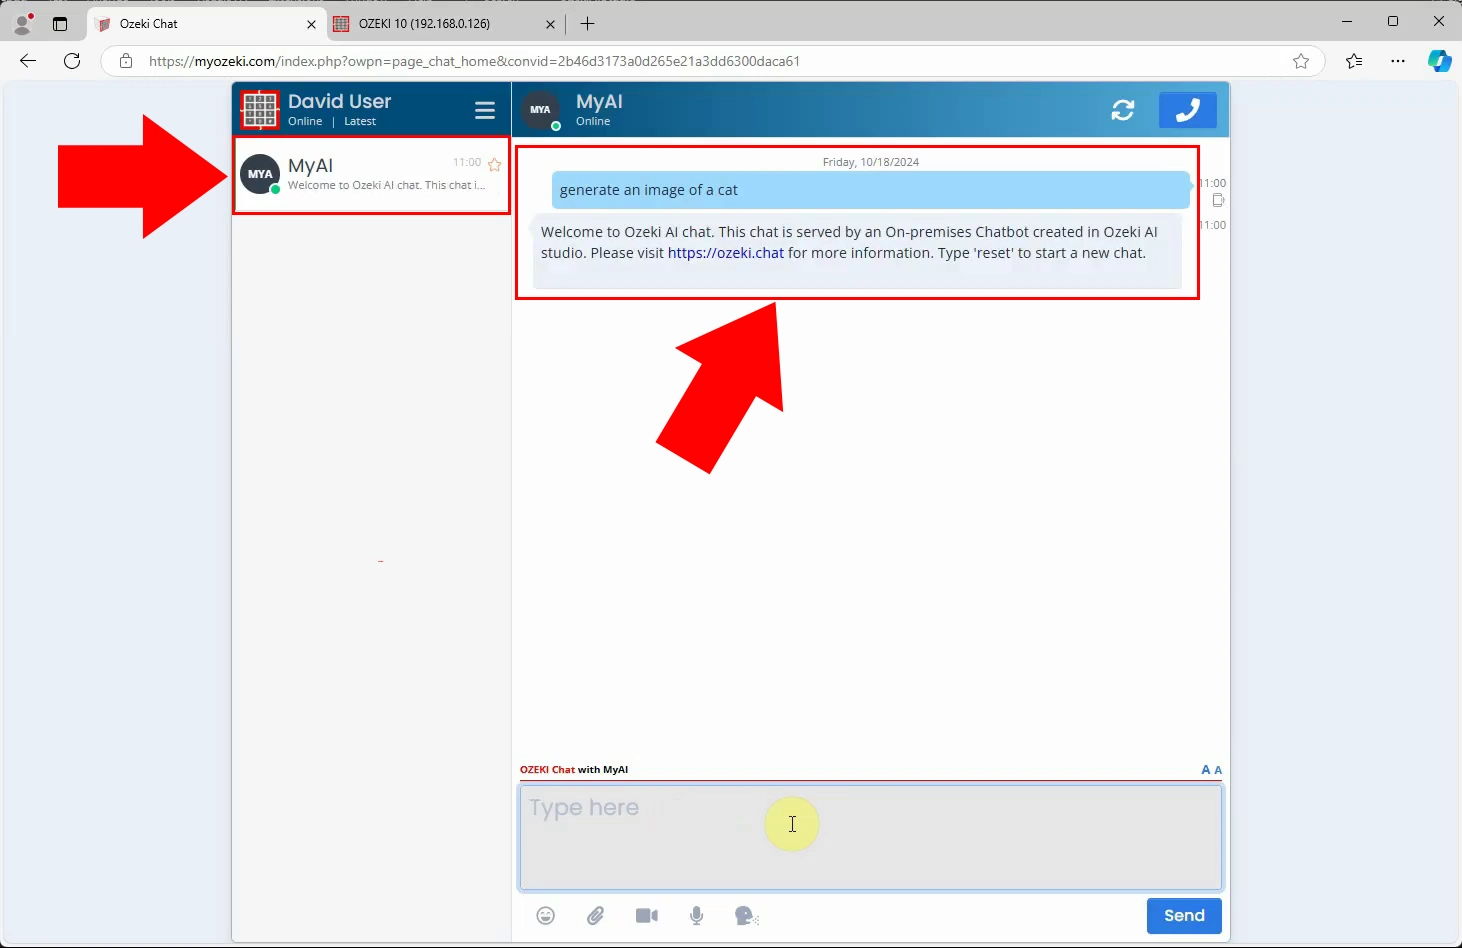
Head back to Ozeki Chat, and find your chatbot in the friend list and open a chat window. Type in a text prompt and send it as a message. You’ll receive a confirmation message from the chatbot, indicating that it has received your input.
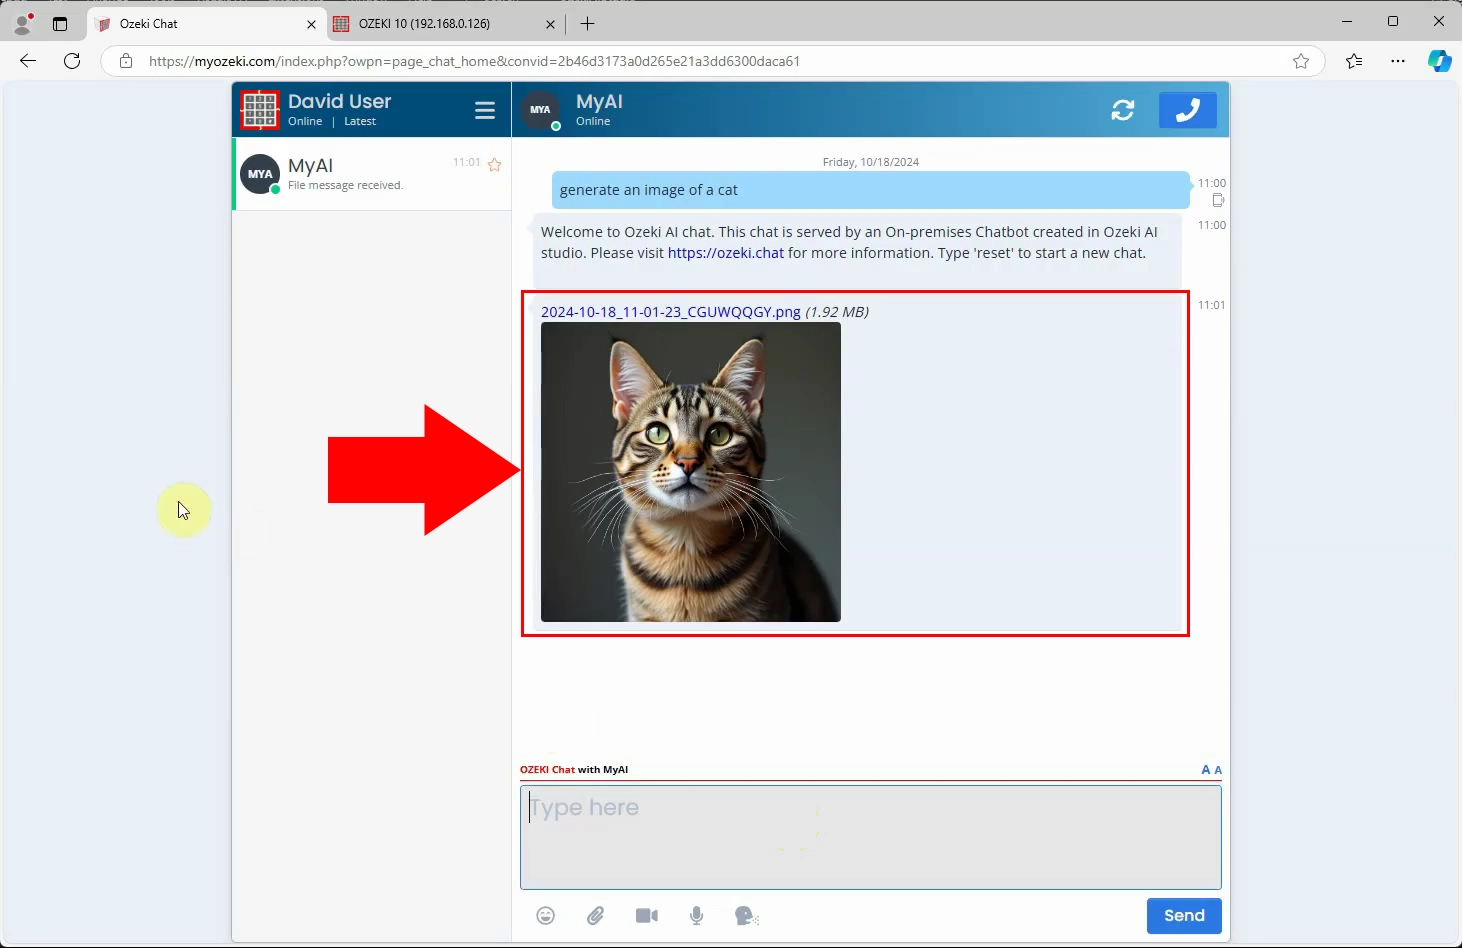
Shortly after sending your prompt, the chatbot will reply with the generated image. This response confirms that the integration is complete and functional, allowing you to create images effortlessly through MyOzeki chat.
What if the chatbot doesn’t respond?
Ensure the diffusion model is properly linked to the chatbot in Ozeki AI Studio. Double-check the chat bot's MyOzeki credentials.
Can I use other AI models with Ozeki AI Studio?
Yes, Ozeki AI Studio supports a variety of AI models. Refer to the documentation for more options.
Conclusion
This guide has walked you through setting up Text-to-Image Generation in Ozeki AI Studio using Stable Diffusion. With just a few steps, you’ve unlocked a world of creativity and functionality. Ozeki AI Studio simplifies complex AI tasks, making it a valuable tool for everyone. For more insights, check out our other AI guides on the Ozeki website. Start creating today and see the magic unfold!

