How to analyse websites with an AI assistant
With the power of artificial intelligence, you can now analyse websites, interpret content, summarize data, and even interact with online services—all through natural language. This guide will walk you through the complete setup of a Web AI assistant using the Ozeki AI Server, from downloading an AI model to interacting with it via a browser-based chat interface. Whether you're using this tool for research, monitoring, or customer support, setting up an AI assistant will make web interaction smarter and faster.
What is Ozeki AI Server?
Ozeki AI Server is a powerful, self-hosted platform that allows you to run and integrate AI models on your local machine or private server. With support for speech recognition, chatbot creation, database interaction, and web integration, it enables businesses and developers to build advanced, private AI solutions without relying on cloud services.
What is AI assistant?
An AI assistant is a virtual chatbot powered by artificial intelligence that can understand and respond to natural language prompts. It can be used for tasks like content analysis, answering user queries, summarizing web pages, and much more. When integrated with the Ozeki AI Server, it becomes a private, customizable assistant that can be accessed via browser or messaging interface.
Download an AI Model from Huggingface.co (Quick Steps)
- Download a GGUF-format model from Huggingface and place it into the C:\AIModels folder.
Ozeki AI Server Setup (Quick Steps)
- Launch Ozeki 10 and open the AI Server module.
- Go to AI Models > Create New AI Model.
- Select GGUF as the type and choose your downloaded .gguf file.
- Open Chat Bots > Create New Chat Bot.
- Select AI Web and assign the GGUF model.
- Enable the bot by switching it online.
- Click the bot to open the chat interface and send a test message.
Ozeki Chat Setup and AI Chat Communication (Quick Steps)
- Enable Login to Chat Network in the Web AI bot’s Chat settings.
- Set the Workspace, Username, and Password for MyOzeki login.
- Log in at myozeki.com with the configured chat account.
- Open the Chat App and send a website URL for the AI assistant to analyze.
- Check the Events tab in Ozeki AI Server to view the conversation log.
Download an AI model Huggingface.co (Video tutorial)
In this tutorial, you'll learn how to download a GGUF-format language model from Huggingface. You'll begin by navigating to the Huggingface website and filtering models by Library and GGUF format. After choosing a suitable model, you’ll download the .GGUF file and move it to C:\AIModels, which is the standard location for Ozeki AI Server to detect and use models.
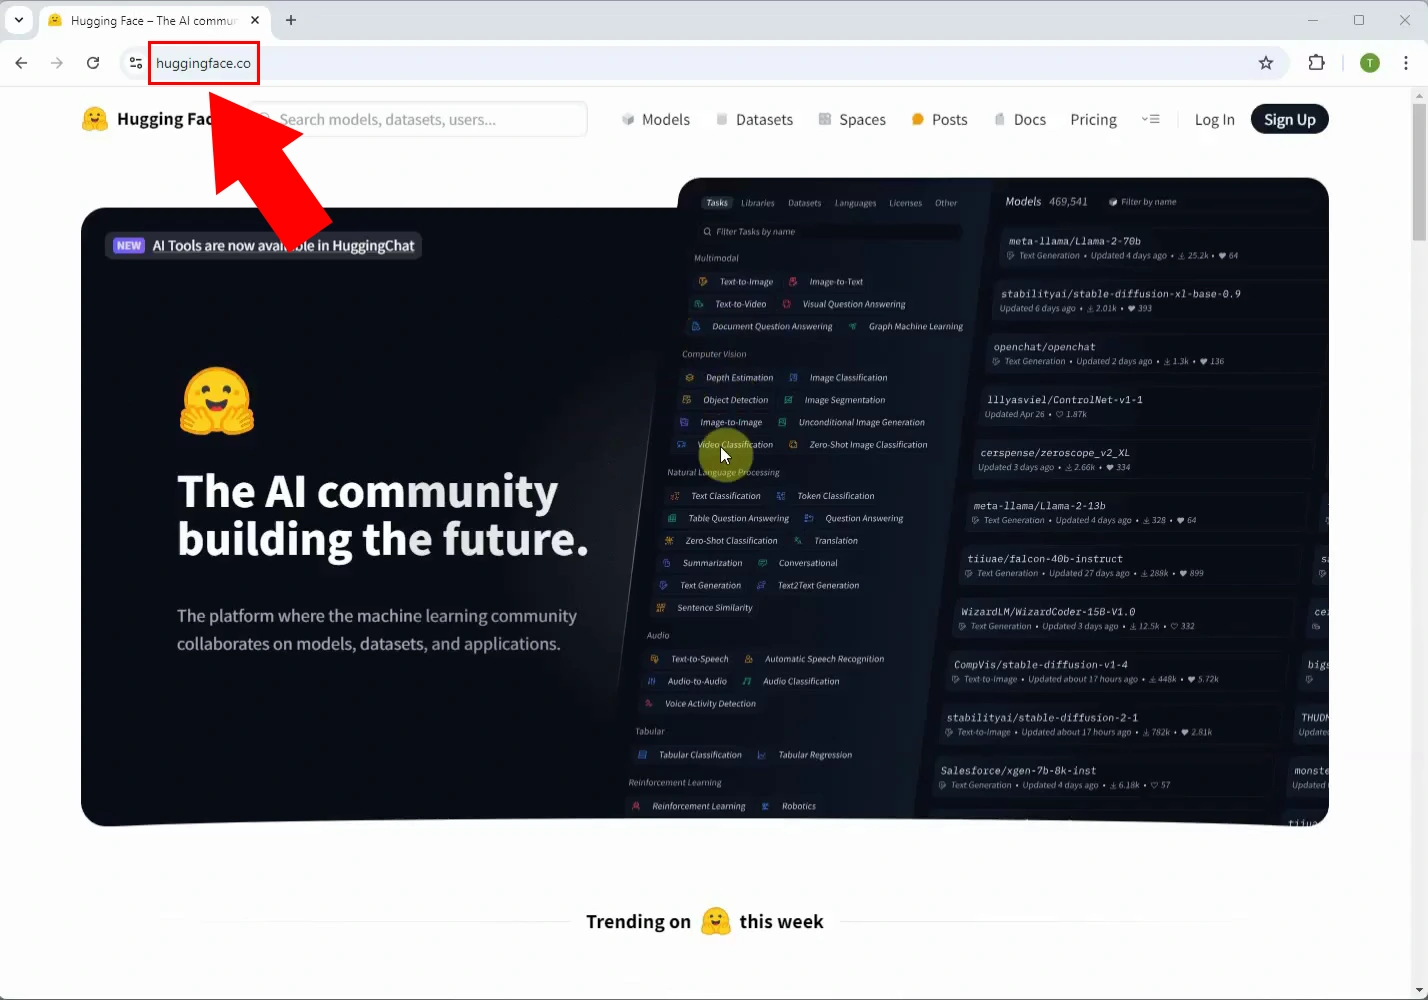
Step 1 - Open huggingface.co page
Open your browser and go to huggingface.co, which is a popular platform for sharing and downloading pre-trained AI models. It provides access to thousands of models for various tasks such as text generation, summarization, translation, and more (Figure 1).
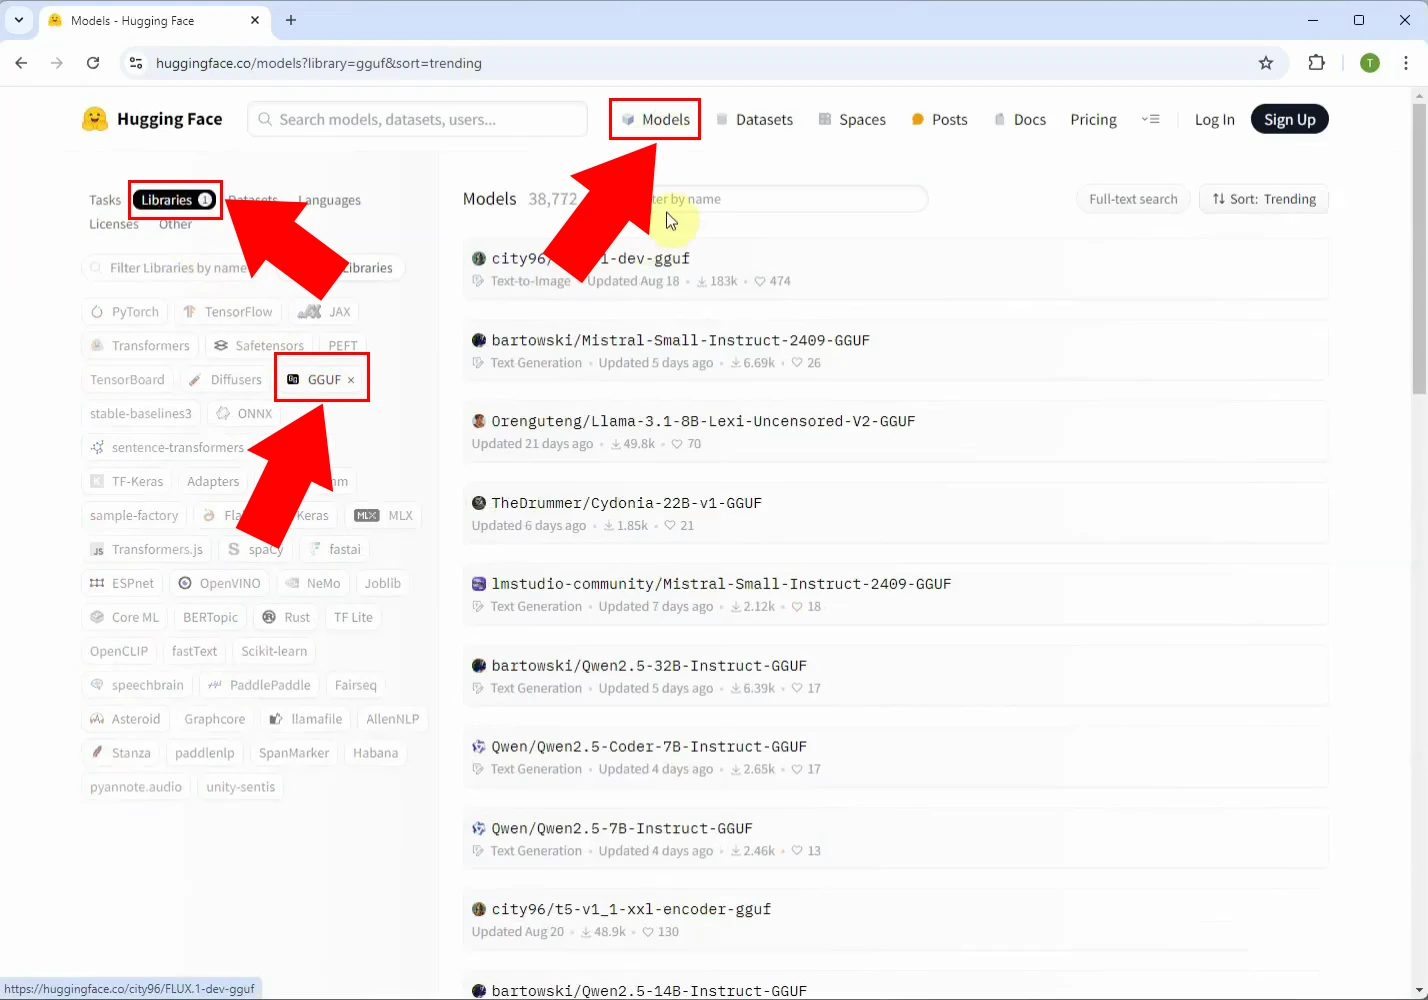
Step 2 - Select GGUF models
Click the Models tab near the top edge of the screen, filter for Libraries, then GGUF in the left panel (Figure 2).
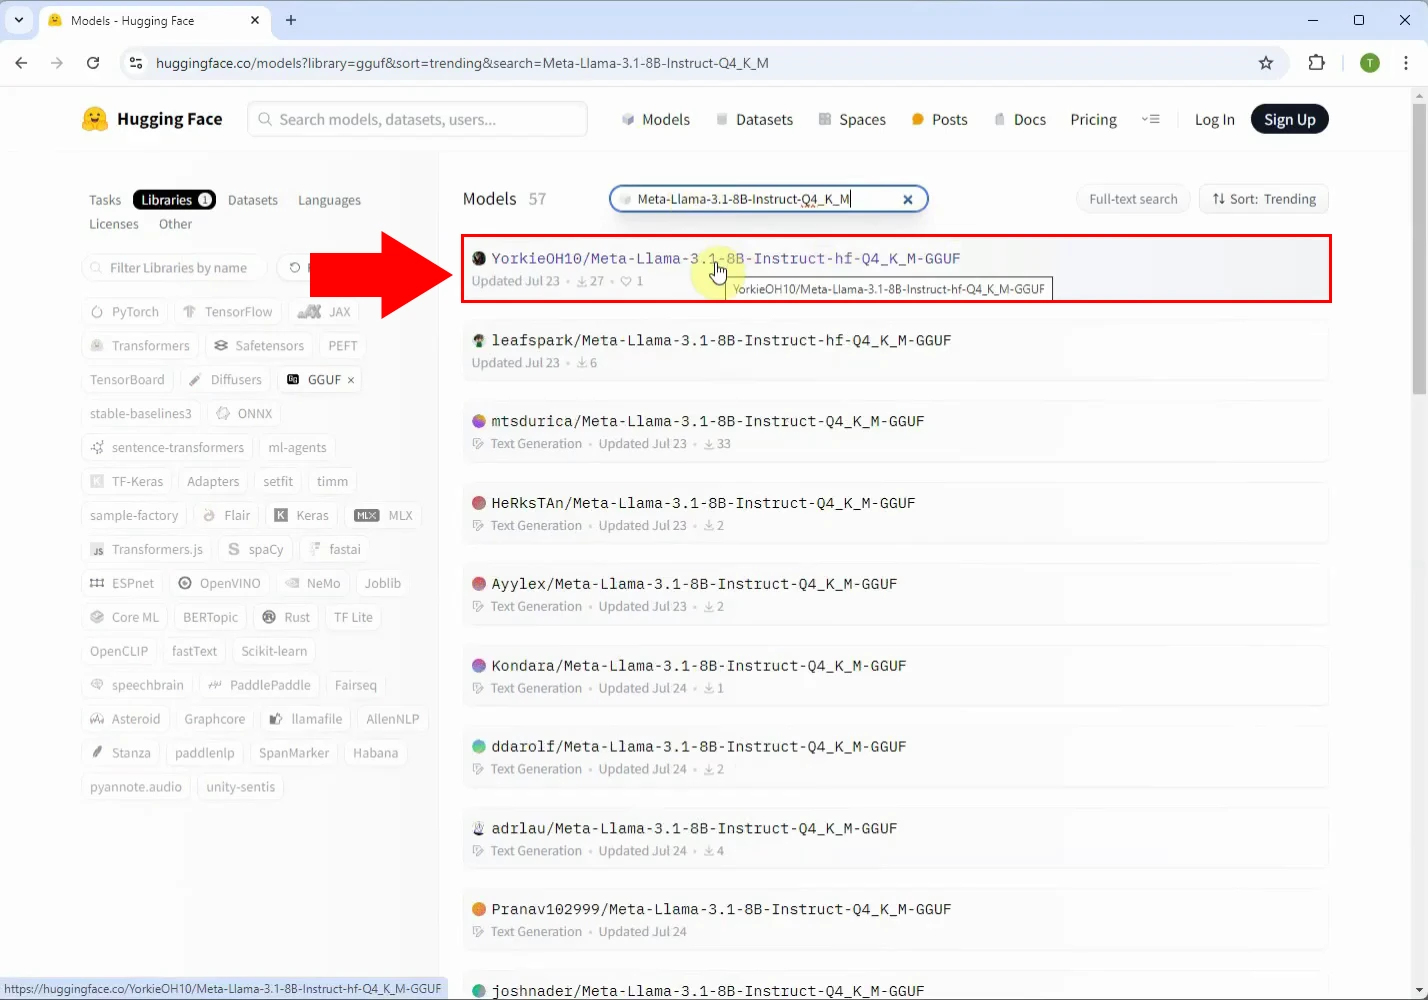
Step 3 - Select model library
Browse the filtered list or use the search bar to find a suitable model. For example, you can search for Meta-Llama-3.1-8B-Instruct-hf-Q4_K_M-GGUF. Click on the model name to open its details page and review the available versions (Figure 3).
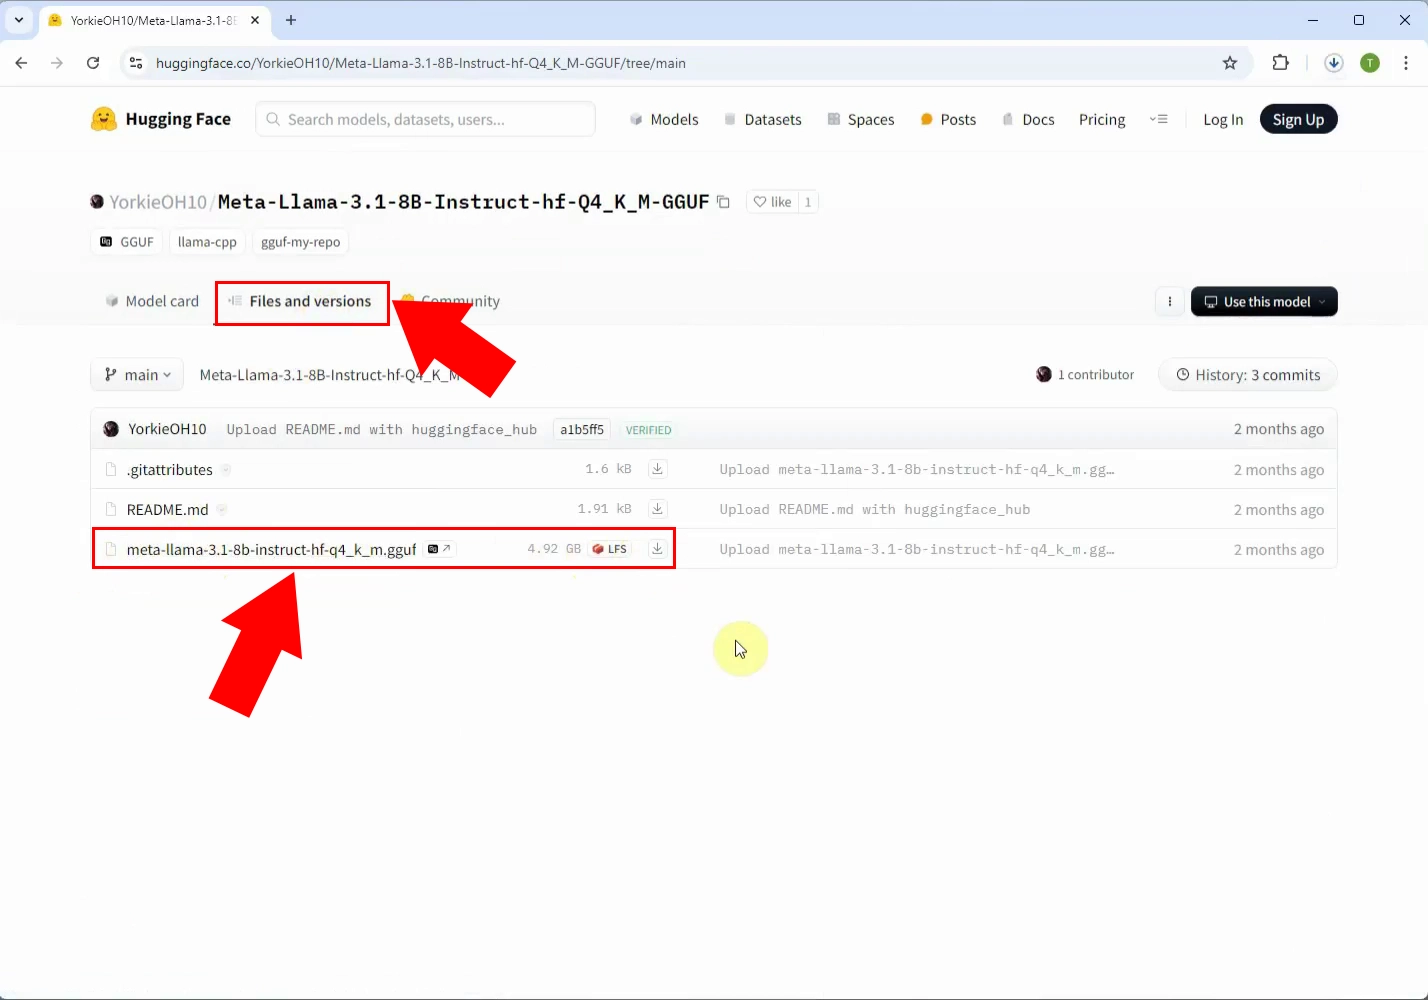
Step 4 - Download model file
Go to the Files and versions tab of the model page. Locate the .gguf file, this is the model file you need. Click the download icon to begin downloading the file to your local machine. Depending on the model size, this may take a few minutes (Figure 4).
Step 5 - Copy GGUF model file to C:\AIModels
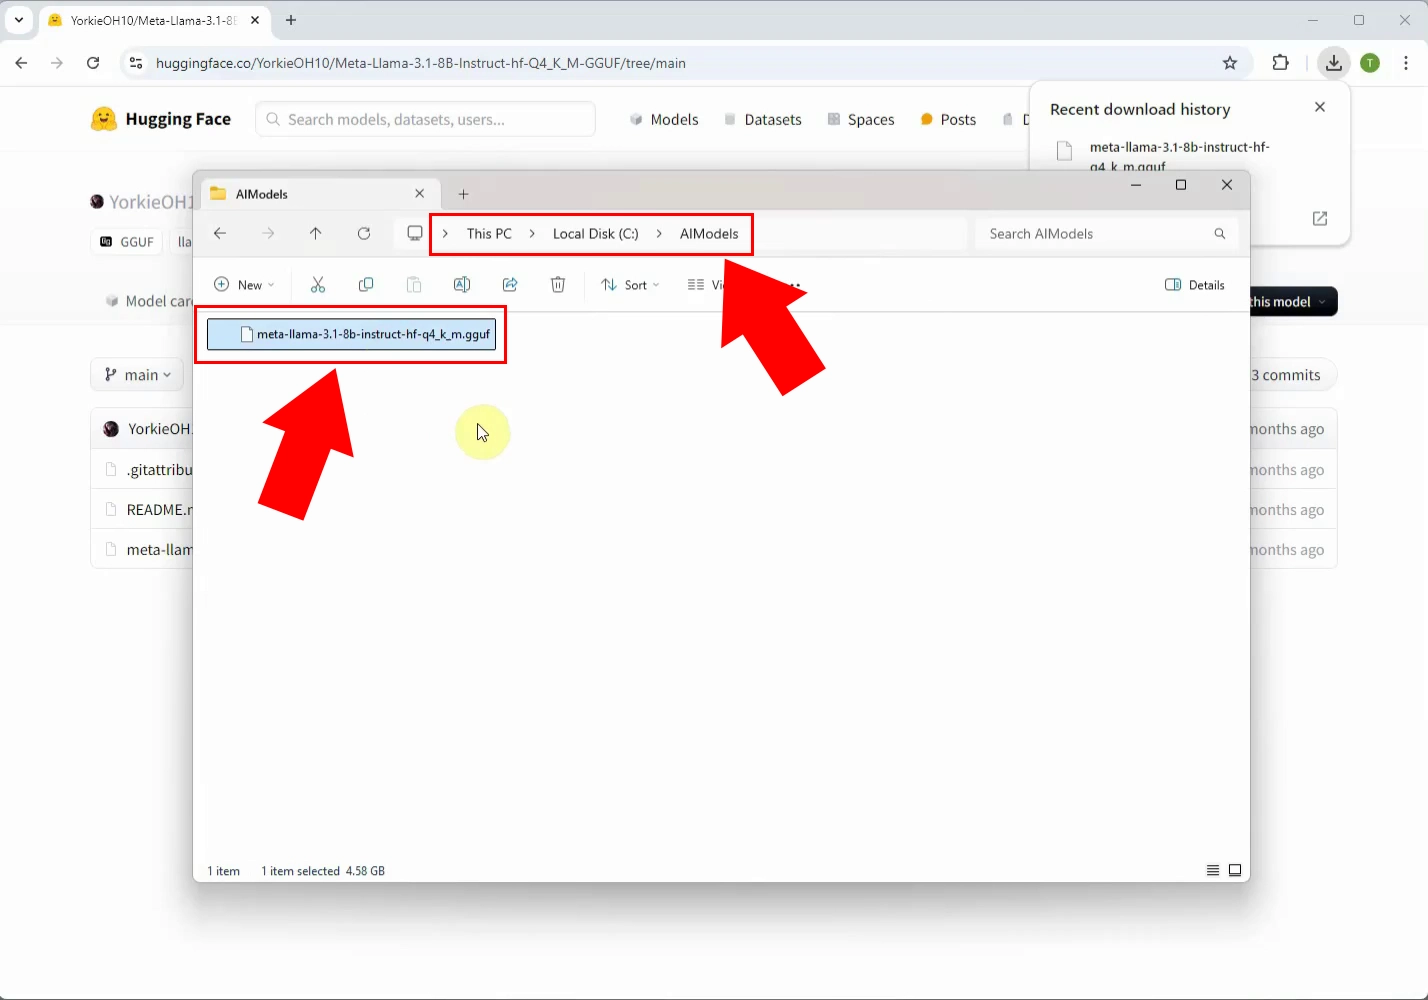
After downloading, locate the file on your computer and move it to the folder C:\AIModels. This is the standard directory used by Ozeki AI Server to detect local models. Make sure the file remains in .gguf format and is not renamed (Figure 5).
Open Ozeki AI Server and setup the model (Video tutorial)
This short video walks you through the process of integrating a downloaded AI model into Ozeki AI Server. It covers the steps from launching the software to selecting the GGUF model and finalizing the configuration so it can be used in your chatbot.
Step 6 - Open AI Server
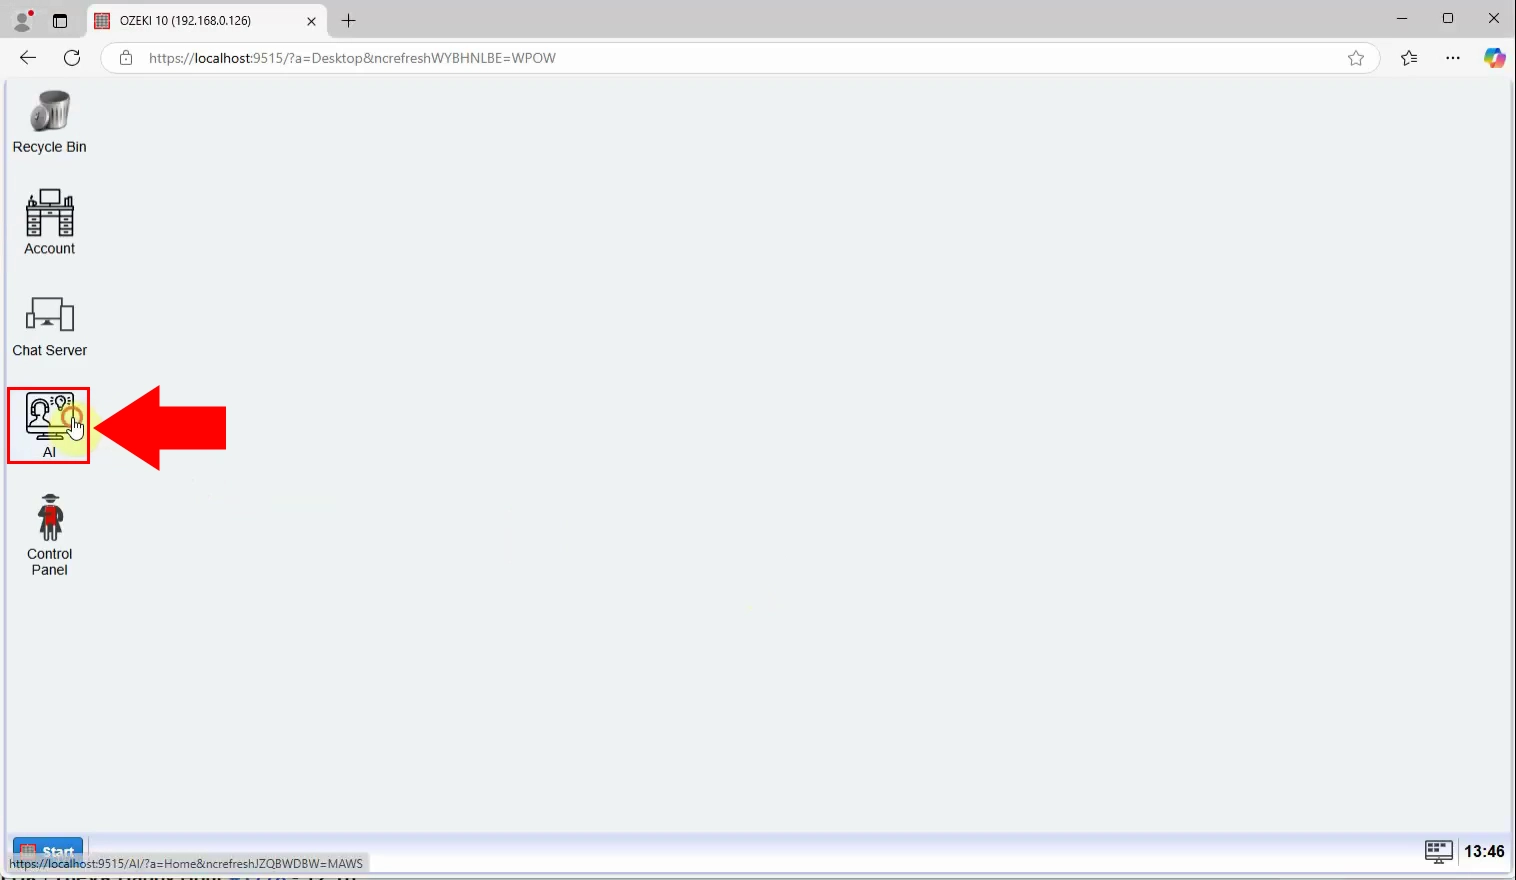
Open Ozeki 10 and navigate to the "AI" module to begin model setup (Figure 6).
Step 7 - Create new AI model
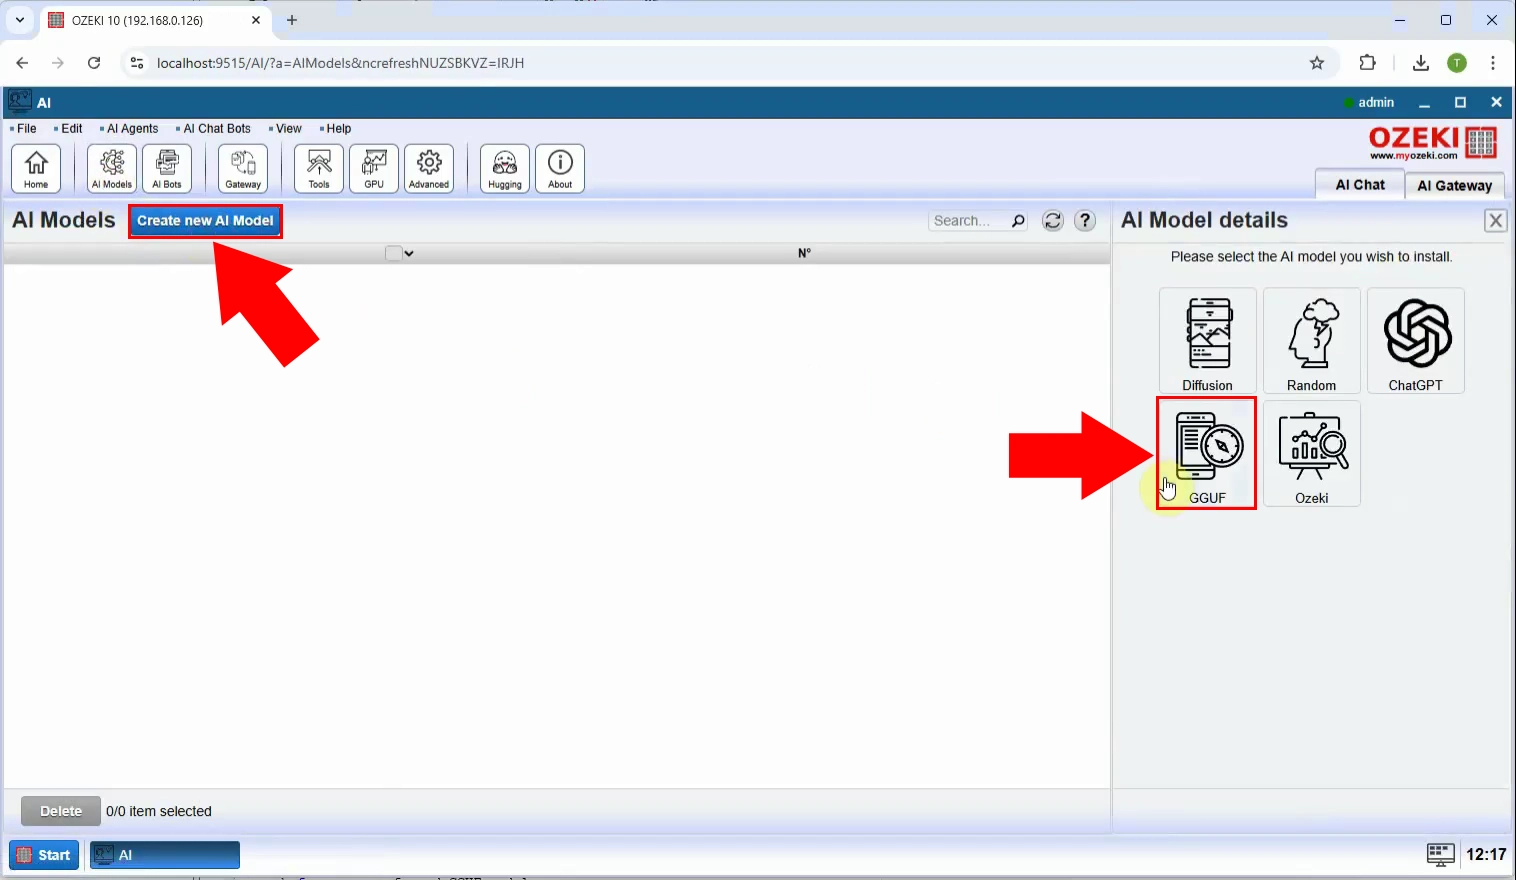
The Ozeki AI Server interface is now visible on the screen. To create a new GGUF model, start by clicking on "AI Models" at the top of the screen. Next, click the blue button labeled "Create a new AI Model". On the right side of the interface, you will see various options, select the "GGUF" menu (Figure 7).
Step 8 - Select model file
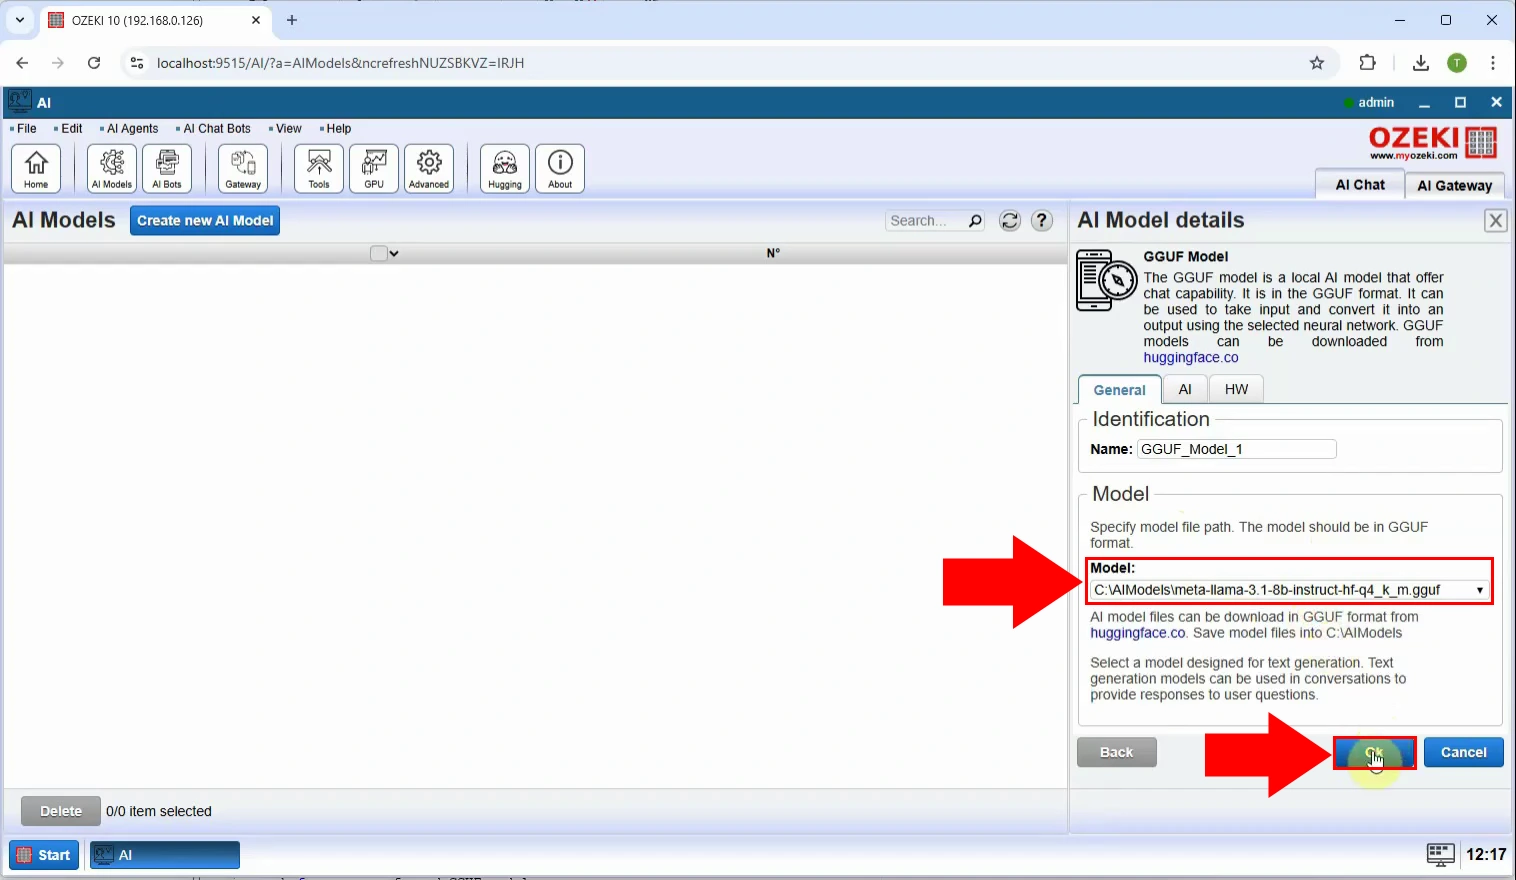
After selecting the "GGUF" menu, select the "General" tab, select the "C:\AIModels\meta-llama-3.1-8b-instruct-hf-q4_k_m.gguf" Model file then click "Ok" (Figure 8).
Create Web AI Chat bot (Video tutorial)
Here, you’ll see how to create a chatbot that uses the browser as its interface. The tutorial shows how to create a new Web AI chatbot in Ozeki AI Server, assign your AI model to it, and test it by sending and receiving messages in the local interface.
Step 9 - Create new Web AI Chat bot
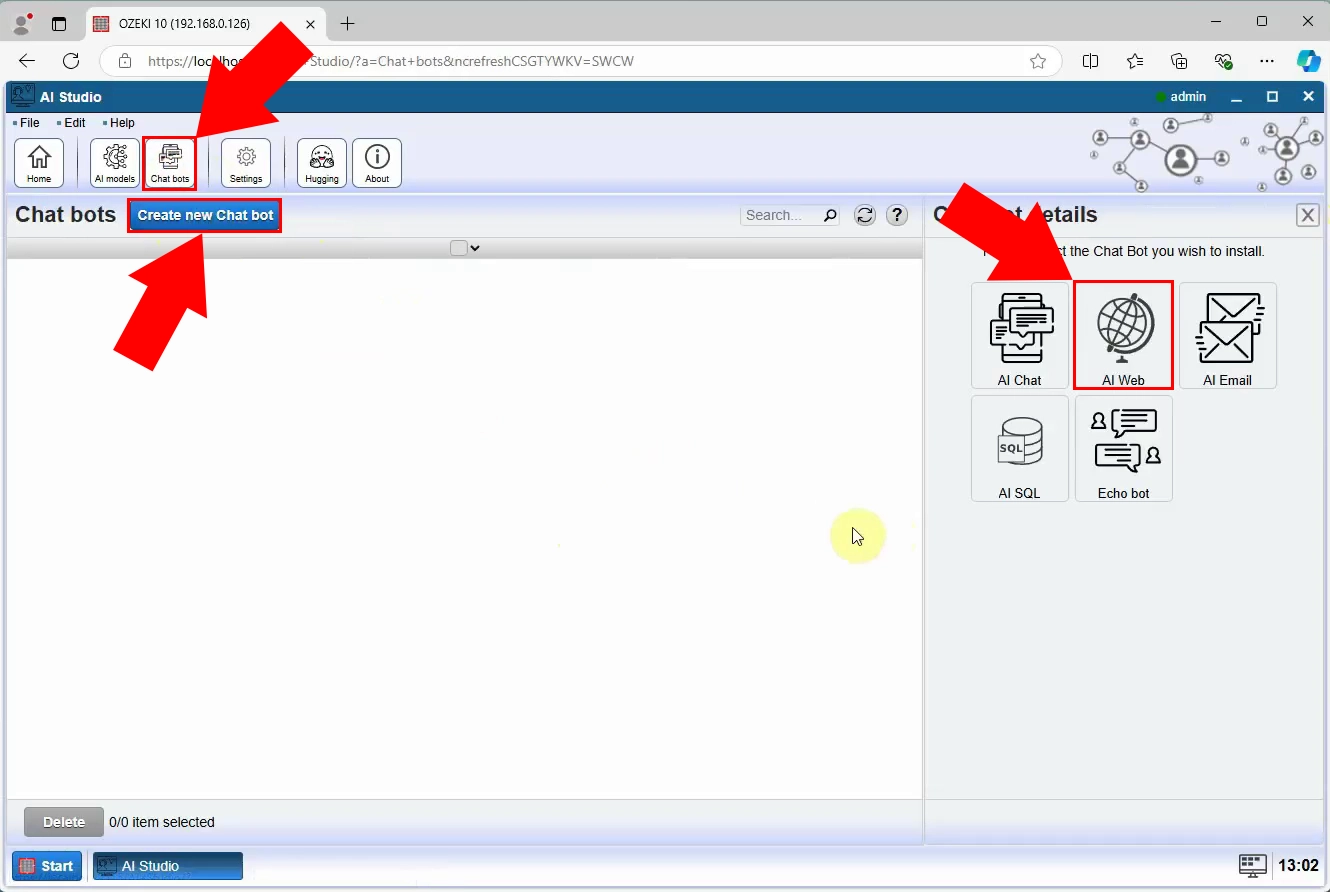
To create a new Web AI Chat bot, start by clicking on "Chat bots" at the top of the screen. Next, click the blue button labeled "Create new Chat bot". On the right side of the interface, you will see various options, select the "AI Web" menu (Figure 9).
Step 10 - Select AI model
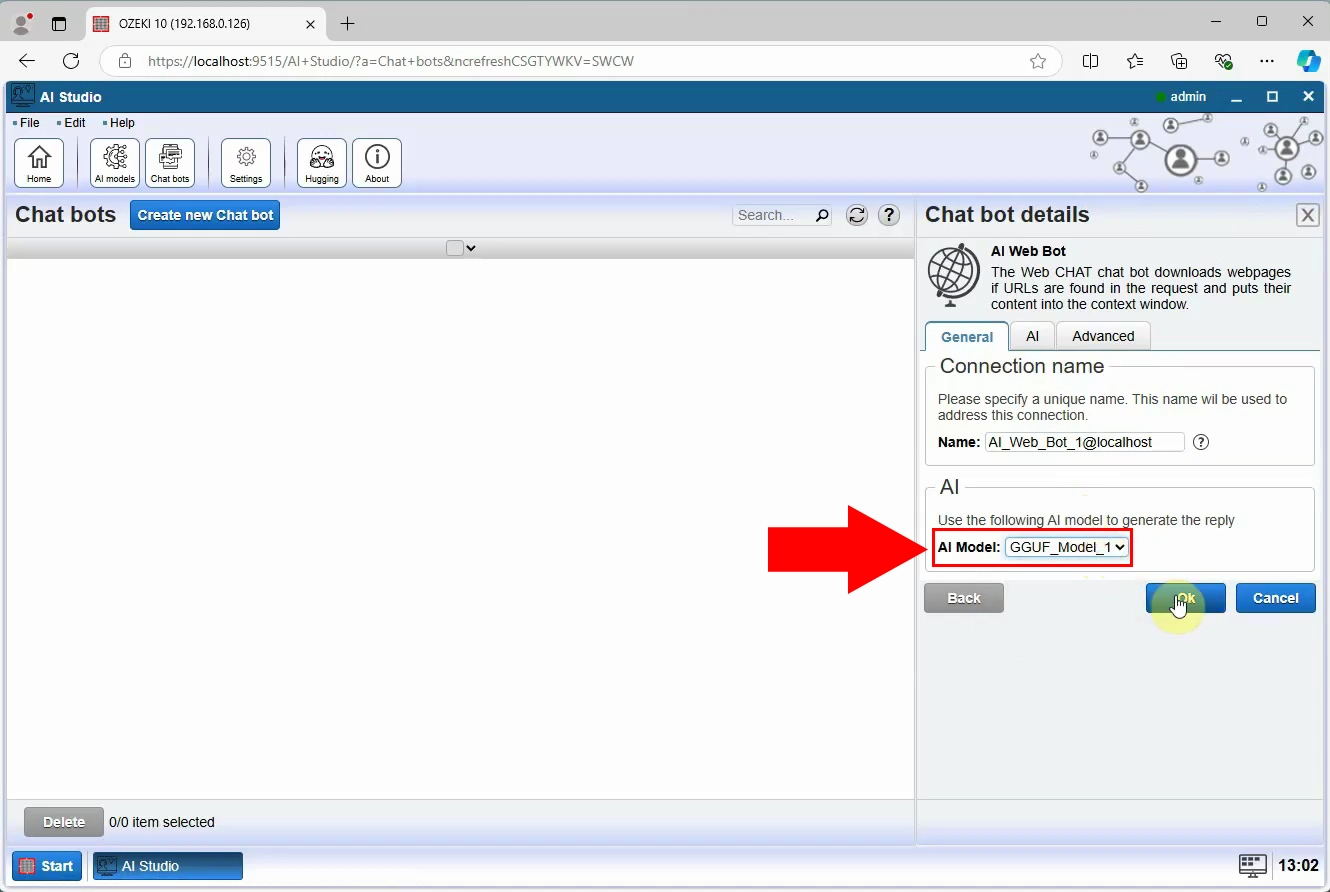
After selecting the "AI Web" menu, select the "General" tab, select the already created AI Model file then click "Ok" (Figure 10).
Step 11 - Open Web AI chat bot
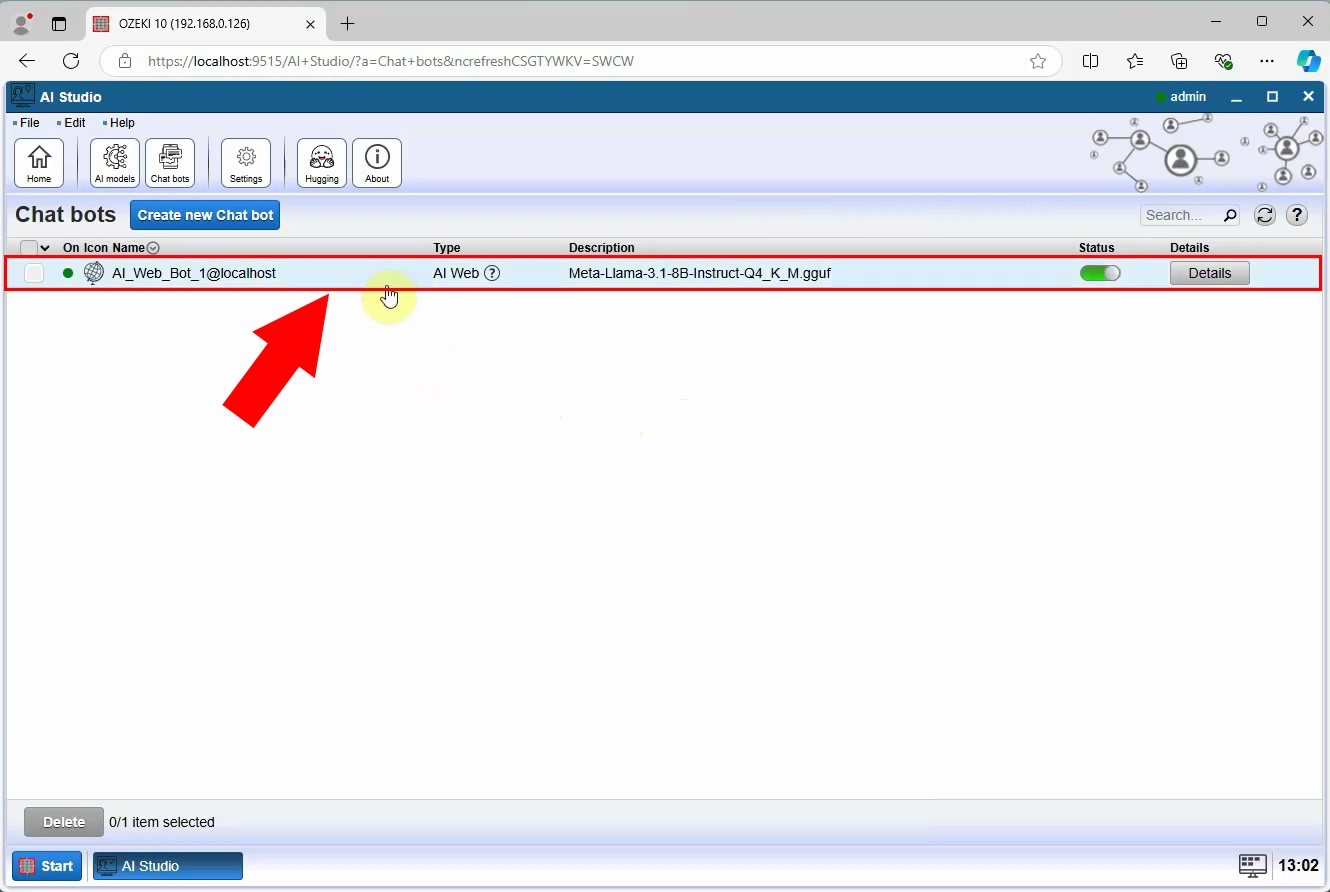
Make the created bot active, this can be done by turning on the status switch and then click on the bot (Figure 11).
Step 12 - Send message to chat bot
Send a message to your AI assistant. It will respond using the AI model you loaded. All messages will appear in real time in the web interface (Figure 12).

Step 13 - Message received from chat bot
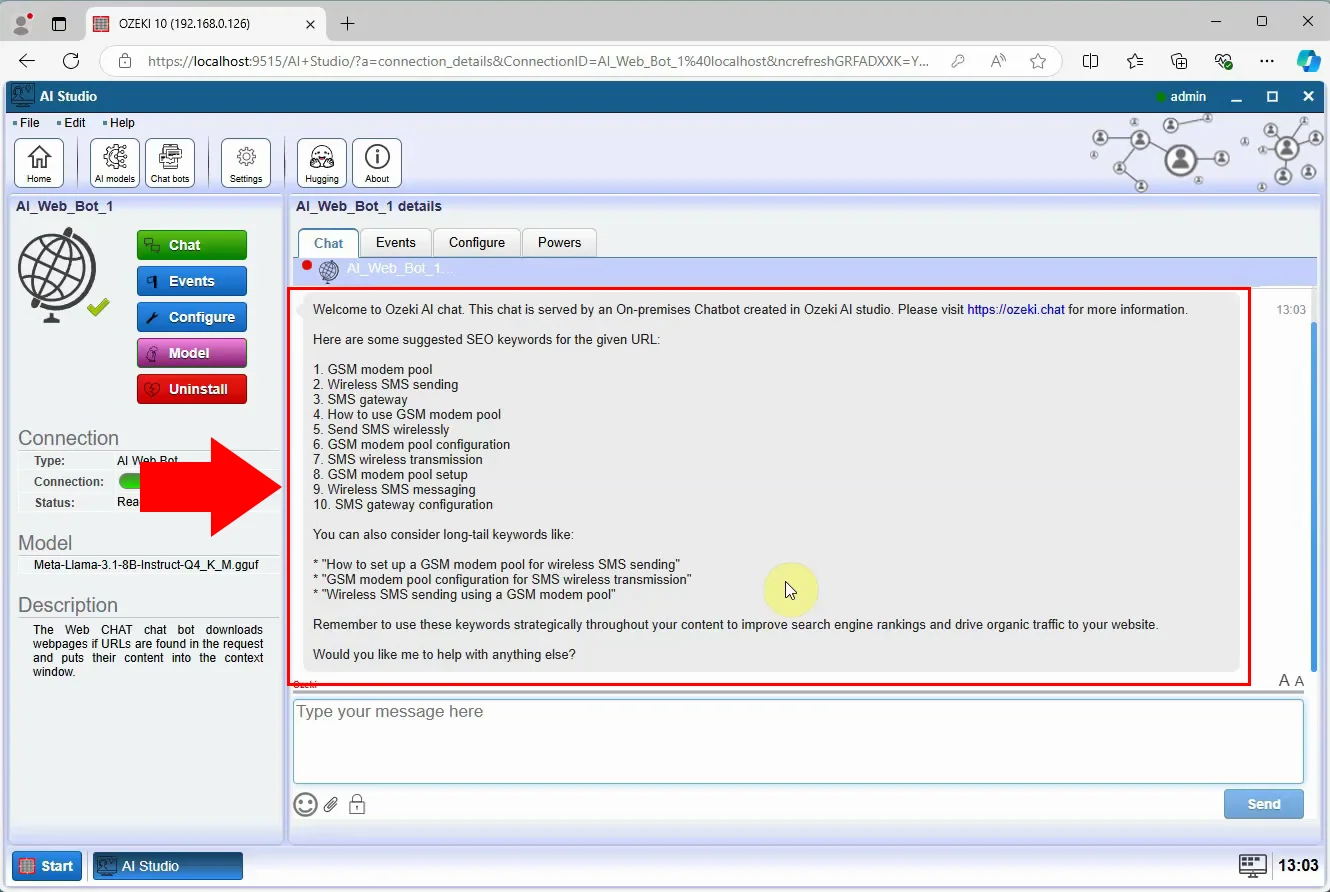
You can see the bot's response to the message sent, in this case SEO keywords recommendations (Figure 13).
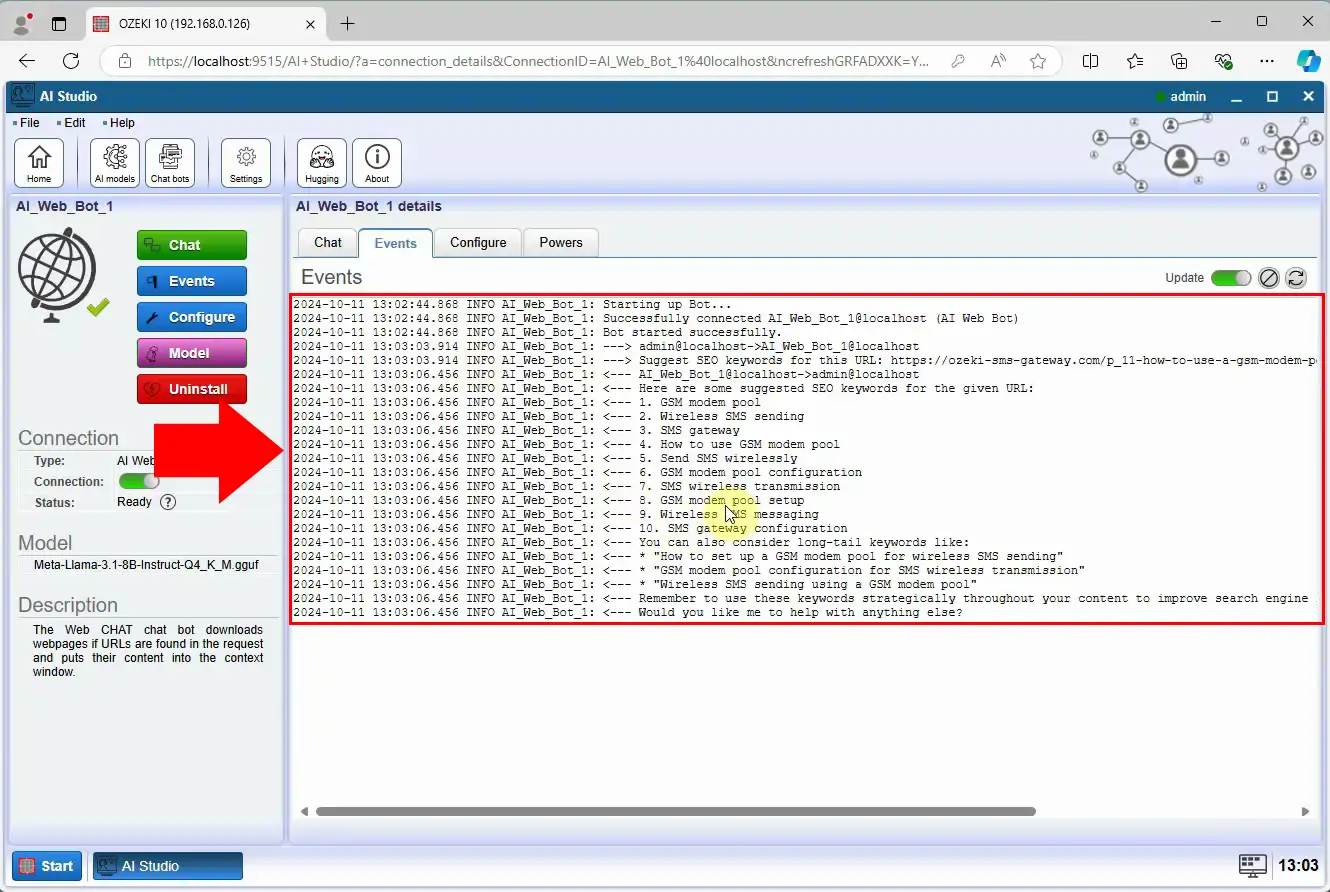
Step 14 - Chat log
You can also monitor the chat logs through the Ozeki AI Server dashboard, ensuring everything works correctly (Figure 14).
Setup Ozeki chat account (Video tutorial)
This video explains how to assign a chat user account to your AI bot. This is necessary for connecting to the MyOzeki chat platform. You'll set a username and password and link them with the bot so it can log in and respond to users.
Step 15 - Open AI Server
Open Ozeki 10 and navigate to the "AI" module to begin model setup (Figure 15).

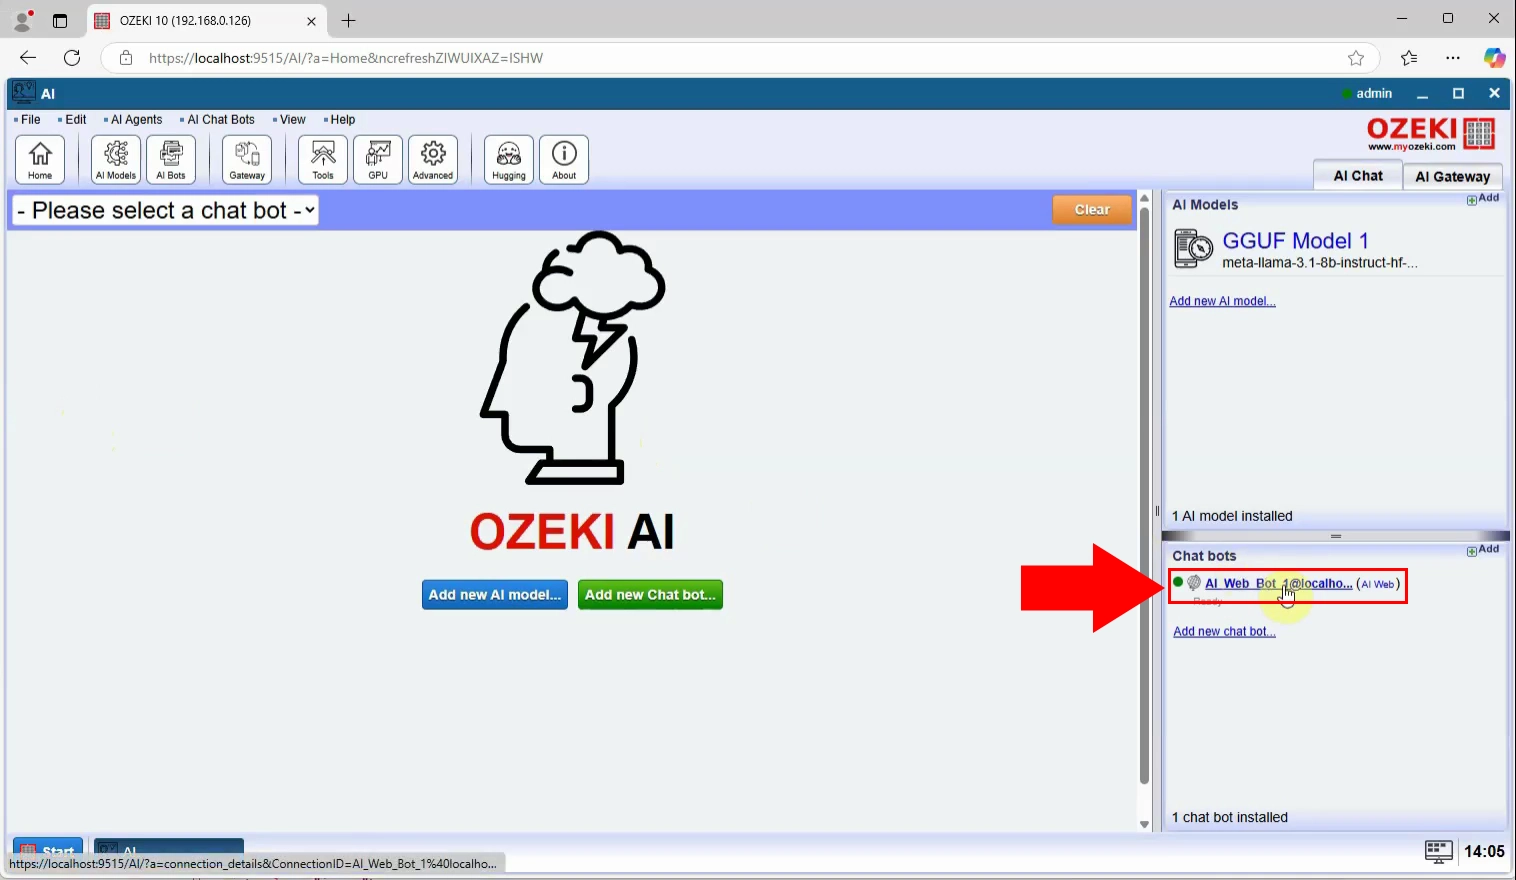
Step 16 - Select chat bot
In the home menu, on the right hand side under the "Chat bots" section, select the "AI_Web_Bot_1" bot you created and click on it (Figure 16).
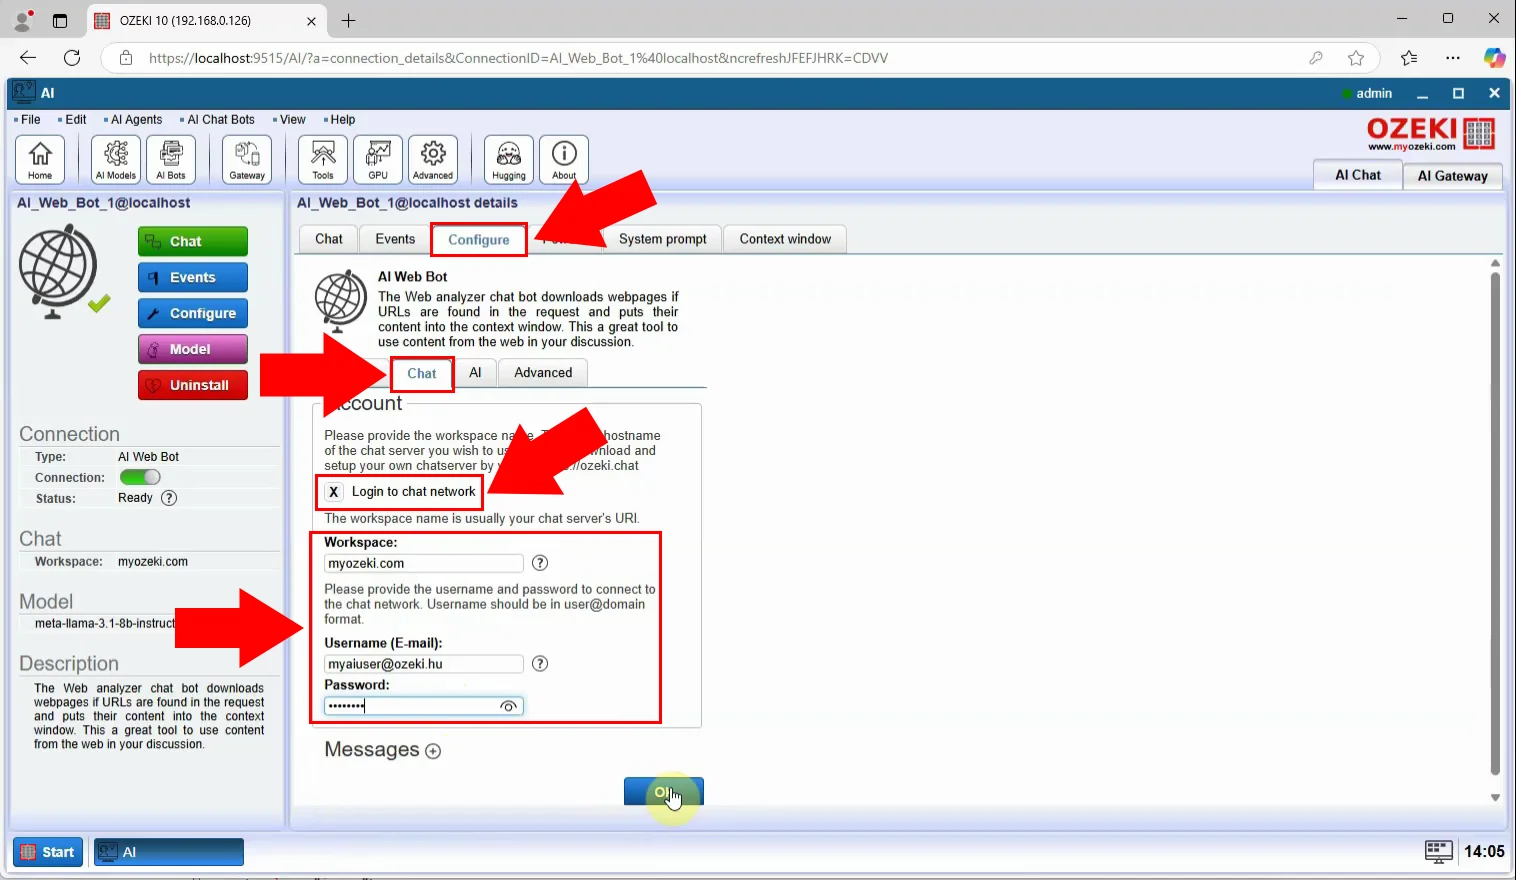
Step 17 - Configure chat account for chat bot
To configure the bot, first select the "Configure" tab, then the "Chat" tab to access the chat configuration. To configure, tick "Login to chat network", then set "Workspace" and "Username", "Password" and press "Ok" (Figure 17).
MyOzeki chat in browser (Video tutorial)
This final video demonstrates how to open your browser, log in to MyOzeki, start chatting with your AI assistant, and view the chat responses in real-time. You'll also see where to find logs and how to confirm the bot is active.
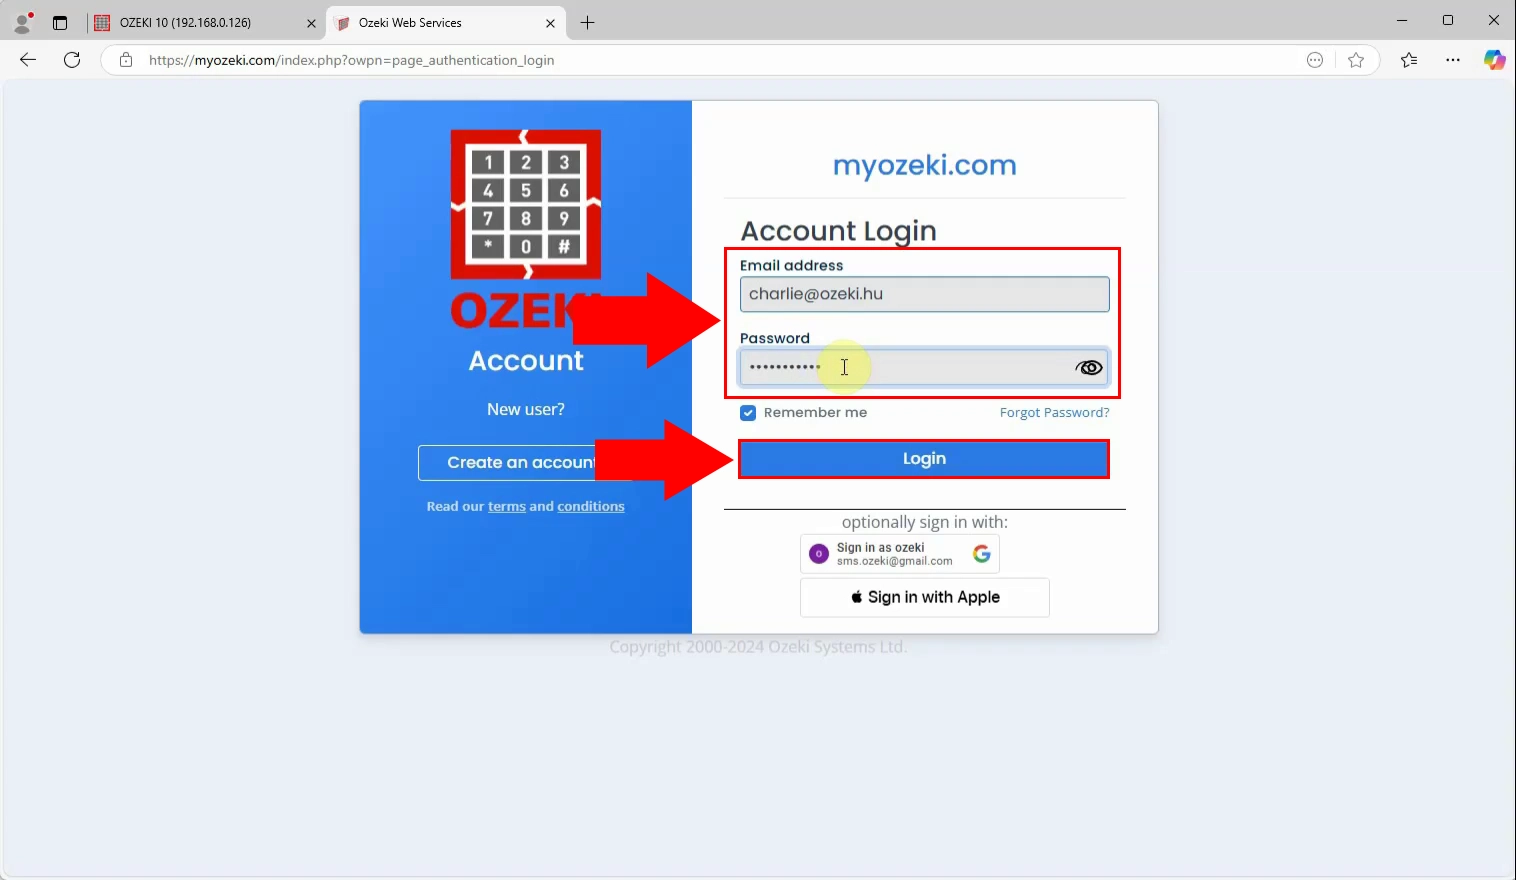
Step 18 - Login to Myozeki.com
Open your browser, go to Myozeki.com and log in (Figure 18).
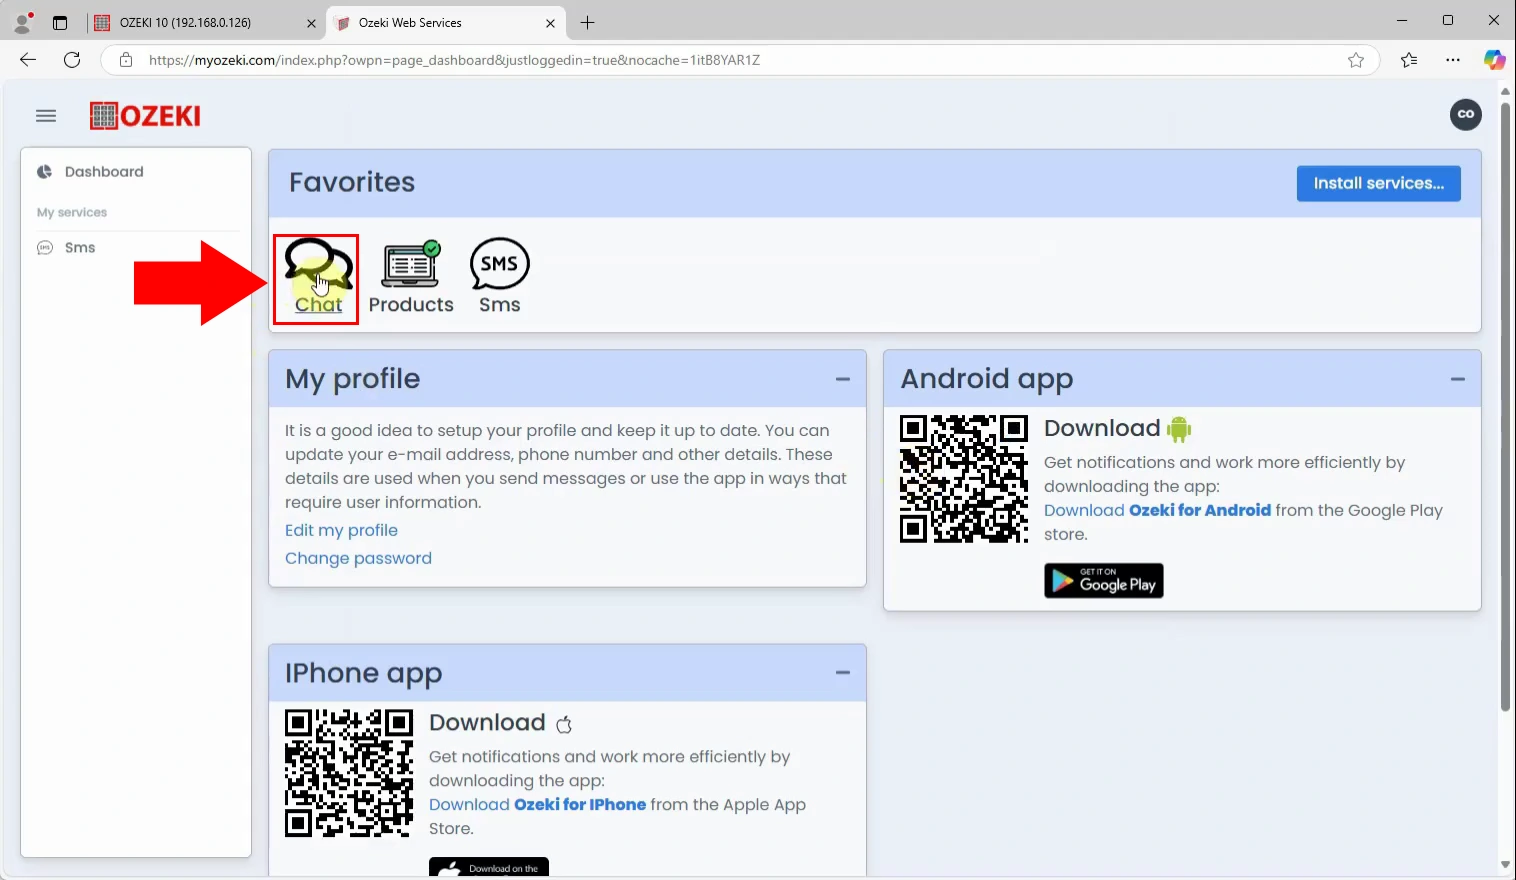
Step 19 - Open Chat app
Once logged in, locate the Chat App in the dashboard and open it. This is the interface where you can start a conversation with the AI assistant connected through Ozeki AI Server (Figure 19).
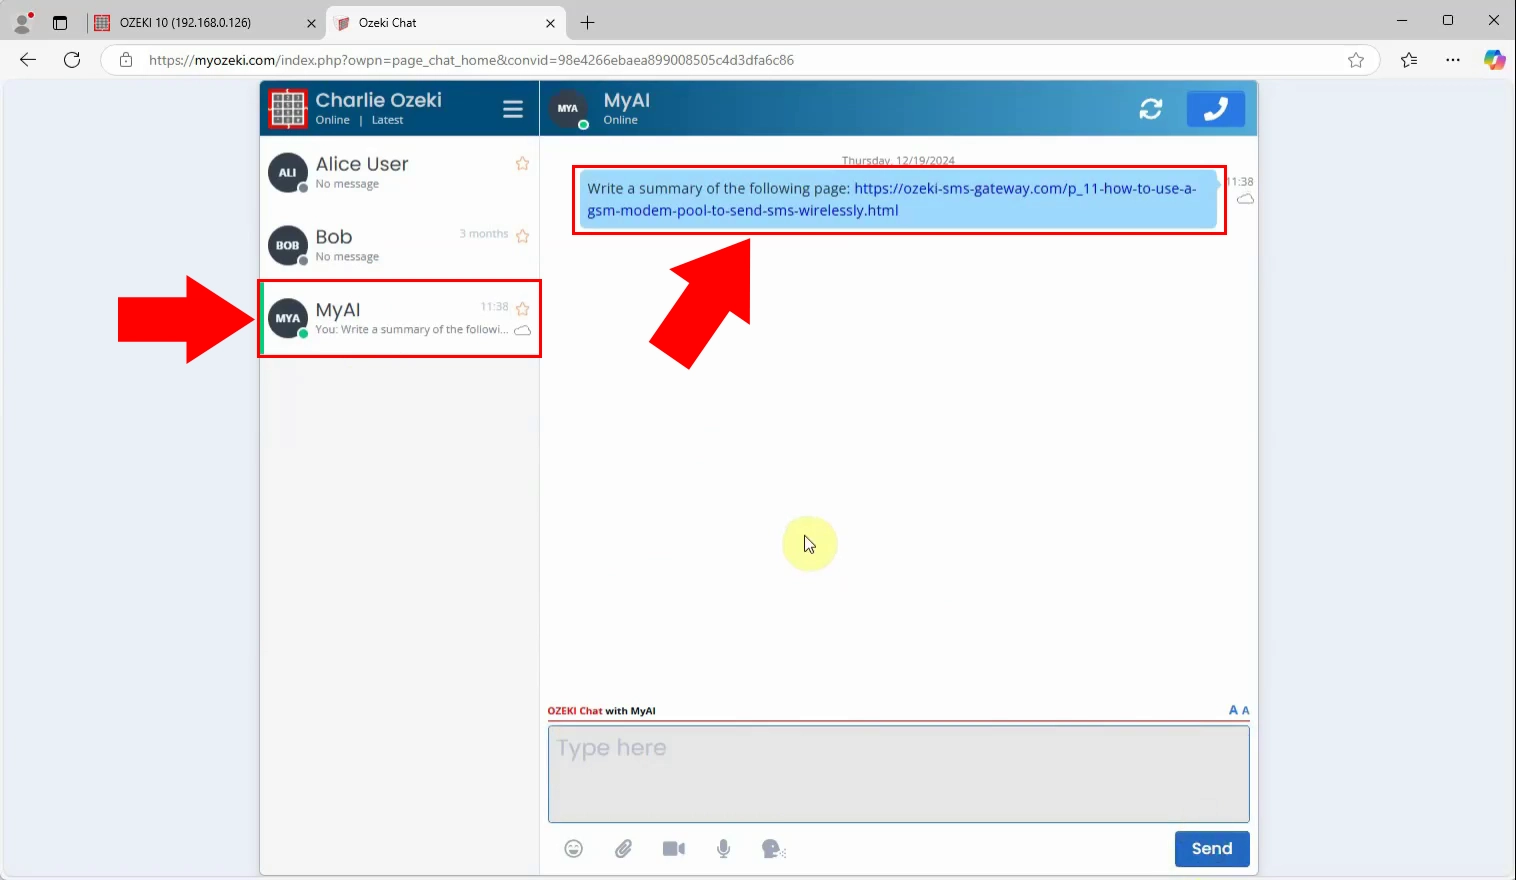
Step 20 - Send message to connected account
Type a question or message into the chat input field and send it to your AI assistant. The message will be forwarded to the model, processed, and a response will be generated (Figure 20).
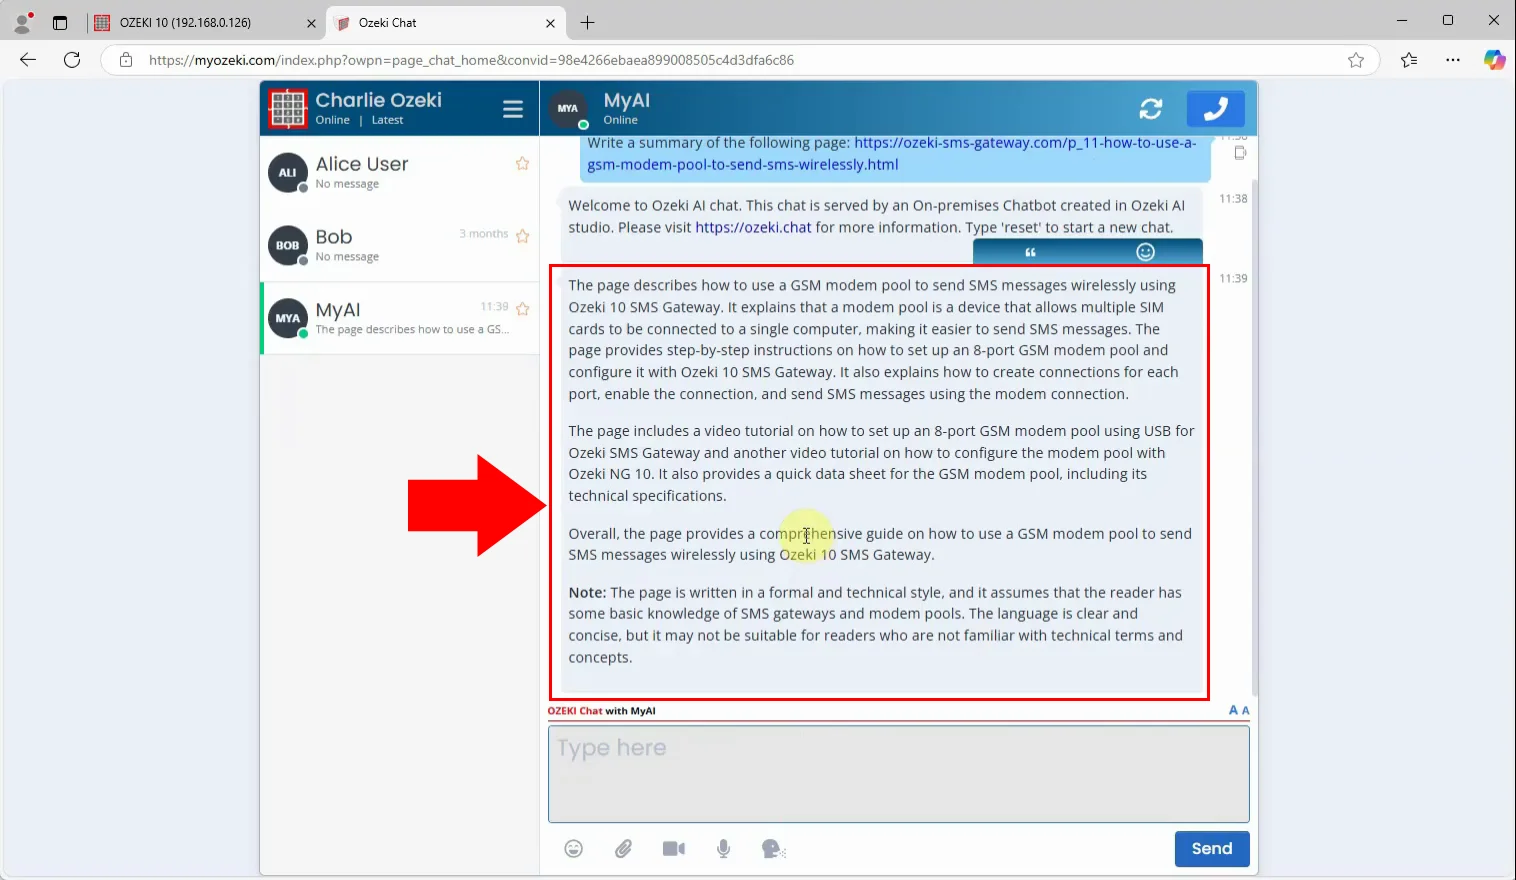
Step 21 - Response received form Web AI
Within seconds, the AI assistant will respond based on the loaded model and its configuration. The reply appears in the same browser chat window, showing real-time interaction (Figure 21).
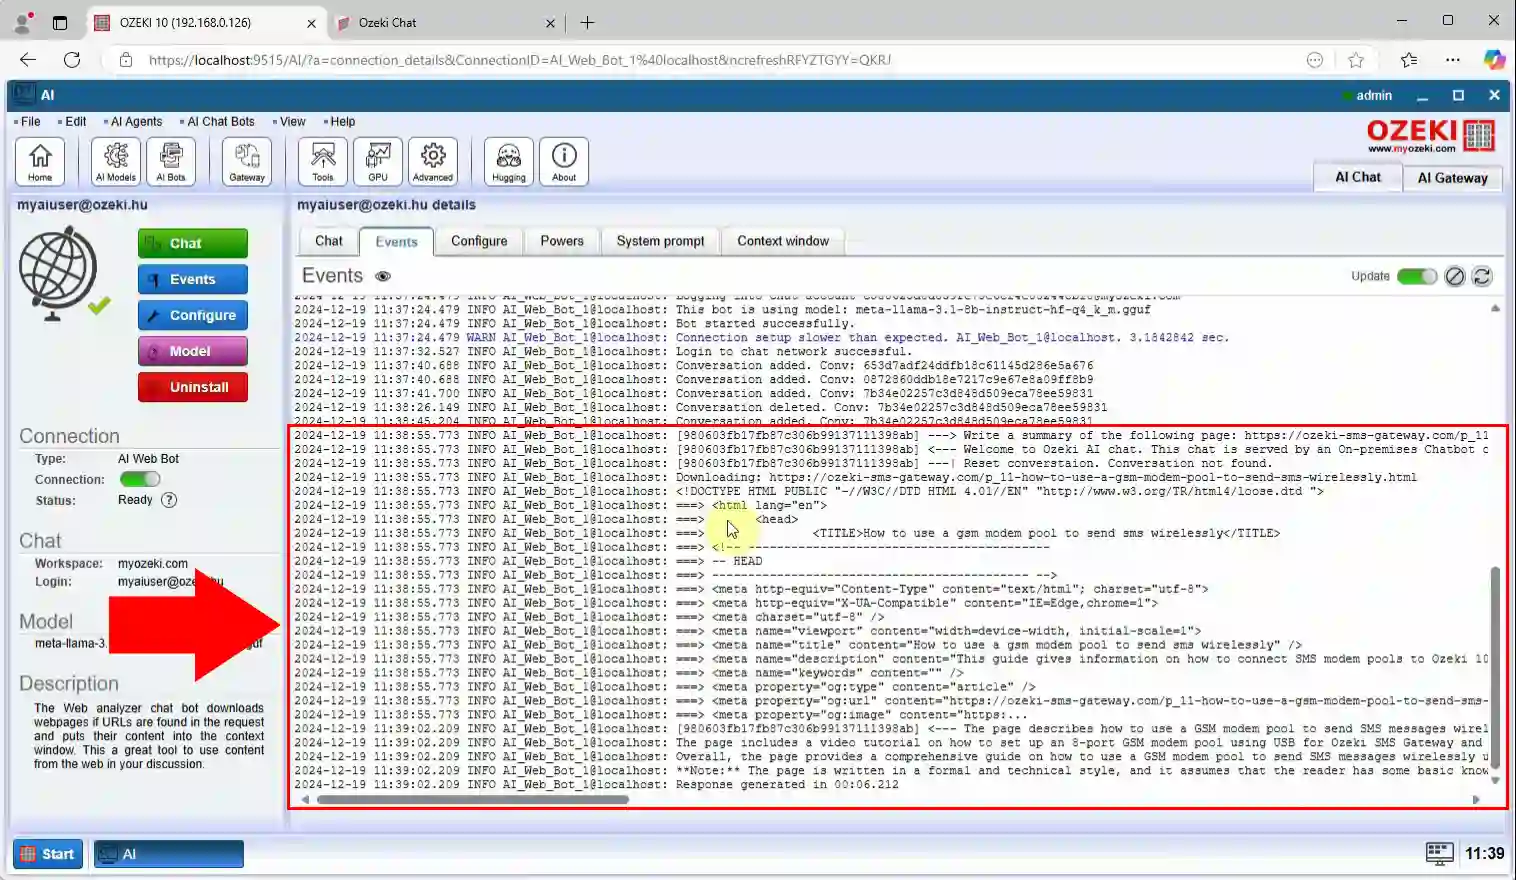
Step 22 - Chat communication log in Chat gateway
Finally, you can return to the Ozeki AI Server module to view a detailed log of the communication session. This helps you monitor performance, track usage, or debug any issues that may occur (Figure 22).
Summary
This guide provides a step-by-step walkthrough for setting up an AI chatbot using Ozeki’s SMS and Chat Gateway, with an AI model sourced from Hugging Face. It begins with selecting and downloading a GGUF model .file and configuring it in Ozeki’s AI Studio. Following this, the guide shows how to create a chatbot, establish the necessary routes, and connect an Ozeki Chat account to enable automated messaging. The final section covers how to send messages to the chatbot through Ozeki Chat and review the communication logs for message tracking.

