How to run Qwen Coder 7B model on a desktop PC
In this chapter, we will explore how to install and run the Qwen Coder 7B model on a personal computer (PC). As a powerful AI model designed for coding and development tasks, it requires substantial computational resources. However, thanks to modern optimization techniques and hardware acceleration, it can now be efficiently executed on high-end PCs. Additionally, we will discuss how to integrate Qwen Coder 7B with the Ozeki AI Server, allowing for seamless AI-assisted coding and enhanced development capabilities. Finally, we will test the setup using Postman, ensuring that the model functions correctly and can respond to API requests.
What is Qwen Coder 7B?
Qwen Coder 7B is a large language model (LLM) with 7.61 billion parameters, designed for code generation, reasoning, and debugging. It supports over 40 programming languages and can handle large codebases with its 128K token context length. Built on a transformer-based architecture, it provides accurate and efficient coding assistance for developers. Due to its computational requirements, it performs best on high-performance hardware or distributed computing environments.
What is Ozeki AI Server?
Ozeki AI Server is a software platform that integrates artificial intelligence (AI) with communication systems, enabling businesses to develop and deploy AI-driven applications. It facilitates task automation, including text messaging, voice calls, chatbots, and machine learning processes. By connecting AI capabilities with communication networks, it enhances customer support, streamlines workflows, and improves user interactions across different industries. Ozeki AI Server provides a powerful solution for organizations looking to optimize communication through AI technology.
How to download Qwen Coder 7B model (Quick Steps)
- Go to the huggingface.co website
- Search for Qwen 2.5 Coder
- Click on "Files and versions"
- Click on "qwen2.5-coder-7b-instruct-q4_0.gguf"
- Download this .gguf file with the arrow pointing down
How to create Ozeki AI Server model (Quick Steps)
- Open Ozeki 10
- Launch the Ozeki AI Server
- Create new GGUF model, configure it
- Create HTTP API user, configure it
- Test Qwen Coder 7B model with Postman
- See the response in the Ozeki AI Server
How to download Qwen Coder 7B model (Video tutorial)
This tutorial video will guide you through the process of downloading the Qwen Coder 7B model from Huggingface.co and saving it to the C:\AIModels directory on your computer. By following the step-by-step instructions, you can easily set up the model and have it ready for use in no time.
Step 1 - Open Huggingface.co
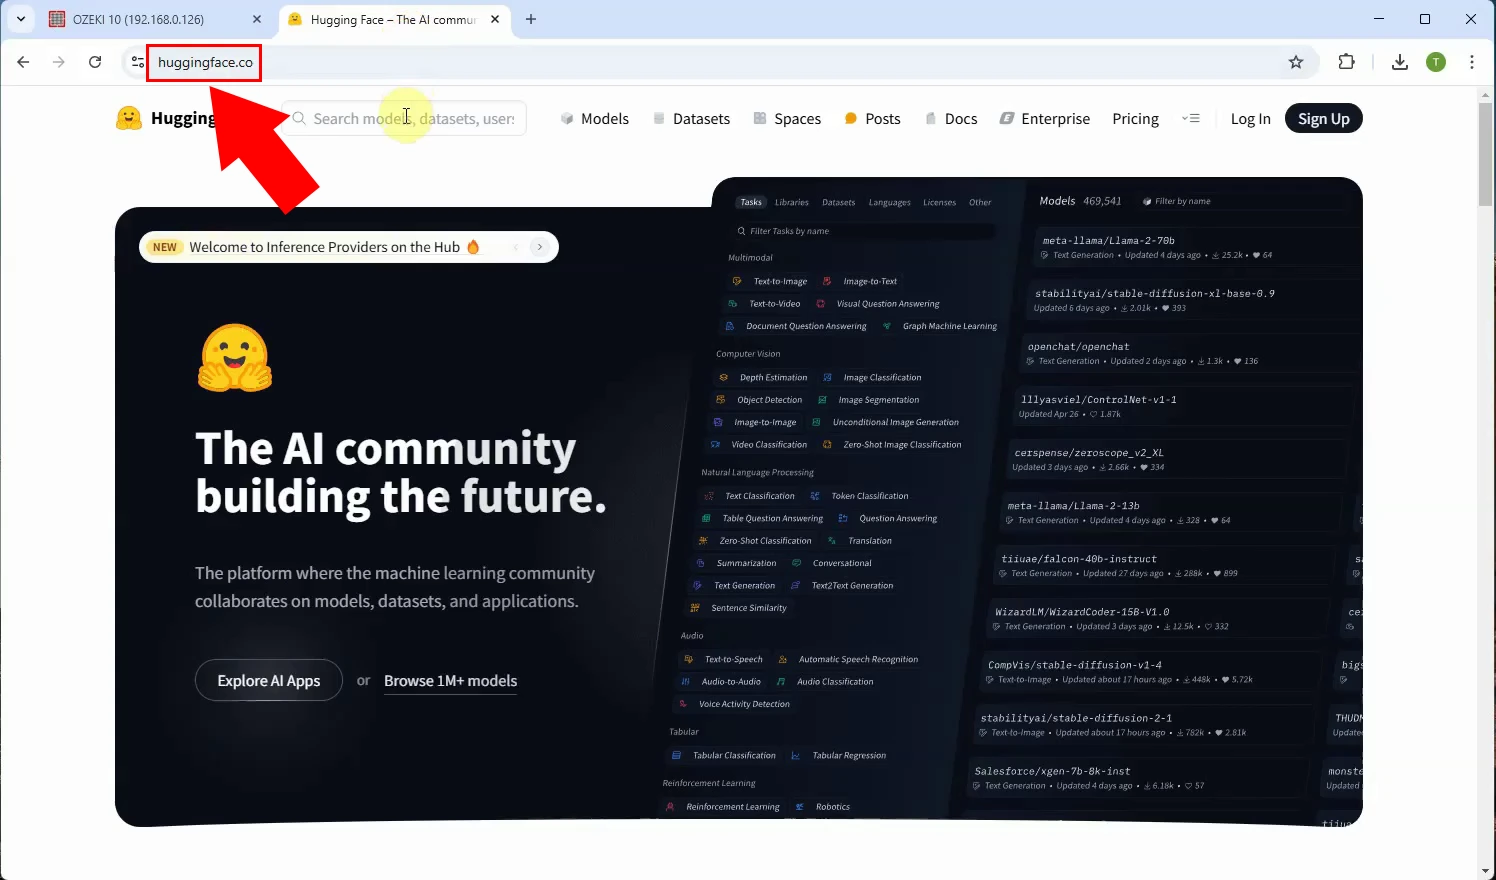
First, go to the Huggingface website, then click on the search bar and search for "Qwen 2.5 Coder" (Figure 1).
Step 2 - Open model page
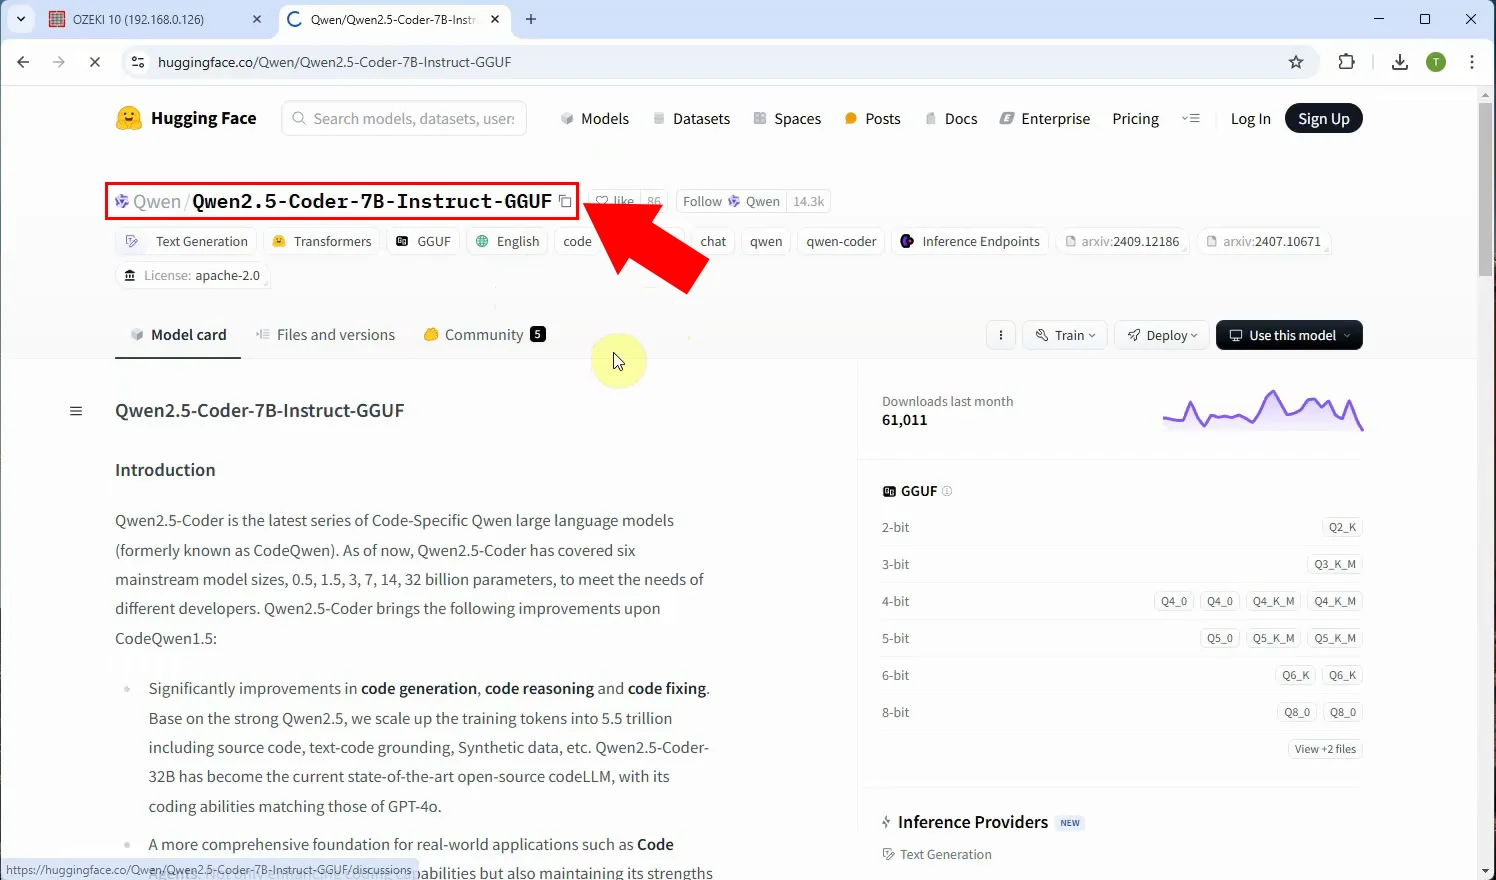
After searching, select "Qwen2.5-Coder-7B-Instruct-GGUF" (Figure 2).
Step 3 - Download model file
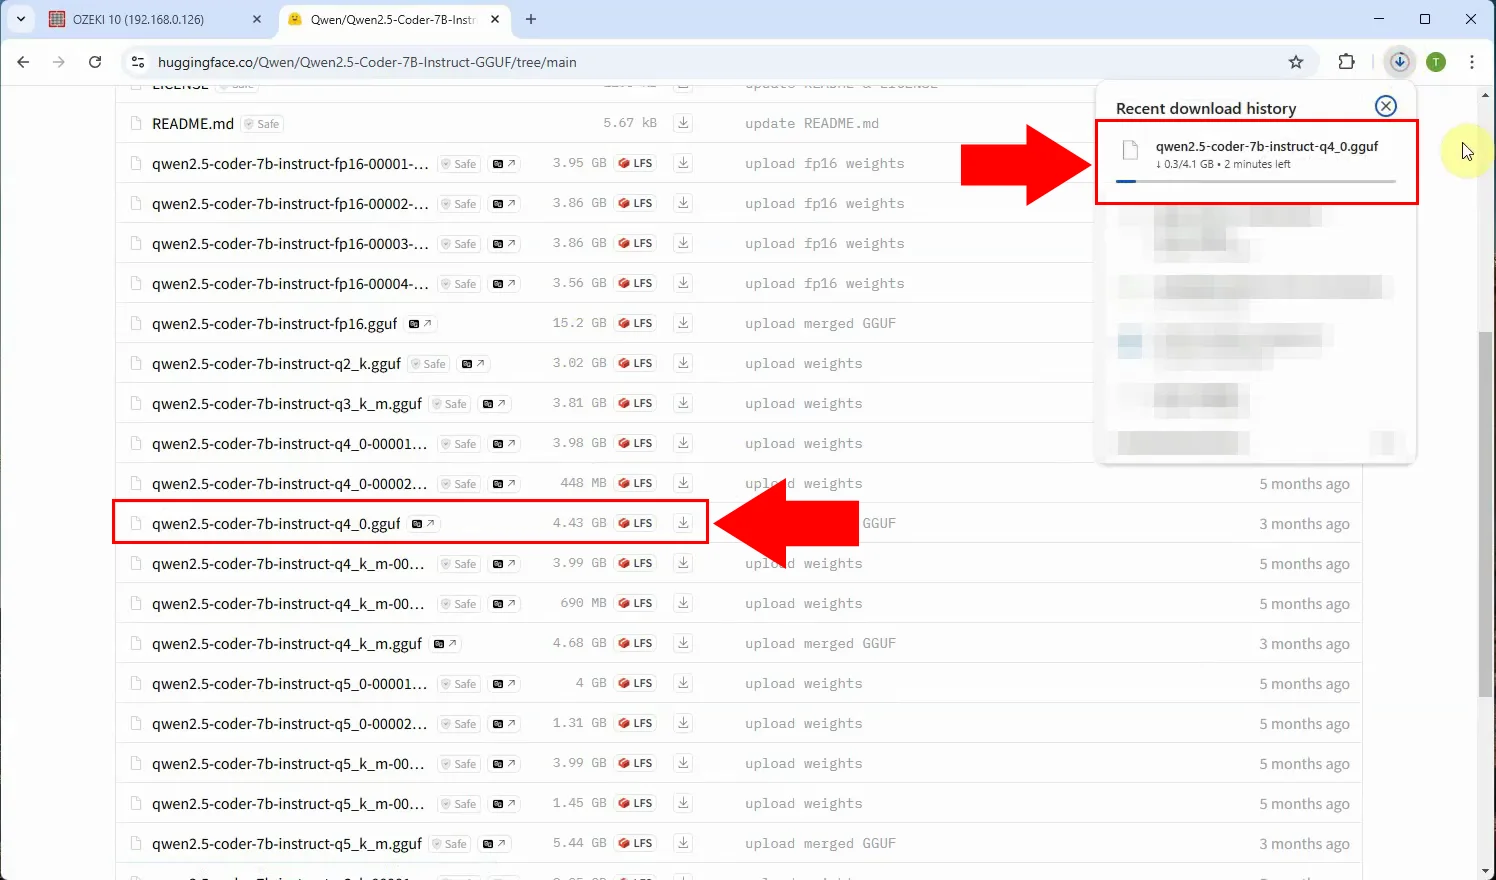
Click on the "Files and versions" tab and download the "qwen2.5-coder-7b-instruct-q4_0.gguf" version. You can download it with the down arrow (Figure 3).
Step 4 - Paste model file to C:\AIModels folder
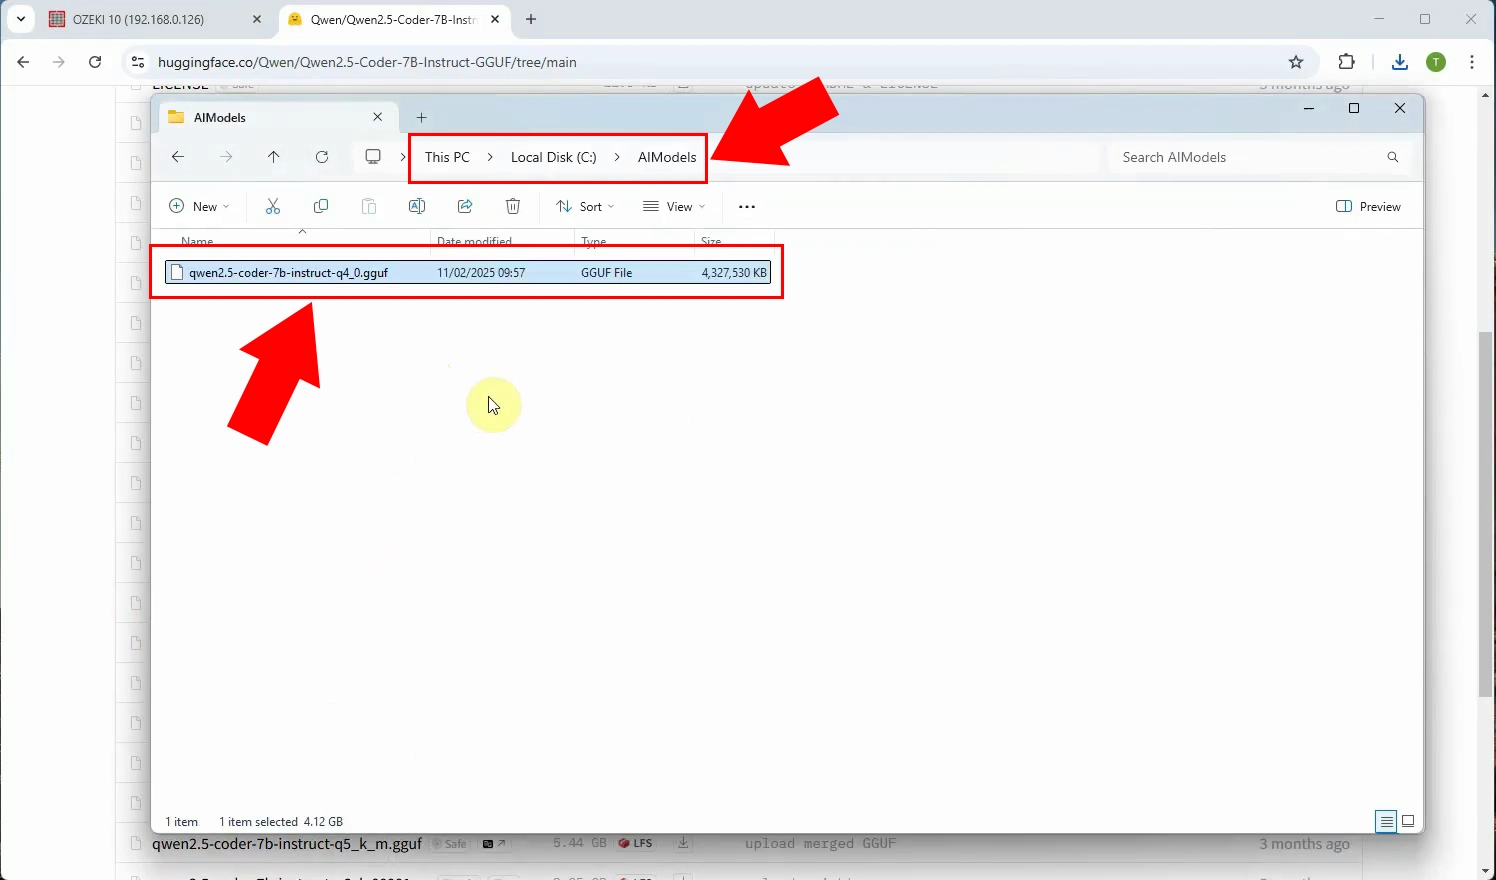
You have downloaded a file with the extension .gguf. Place the downloaded file in the C:\AIModels folder (Figure 4).
Setup model in Ozeki AI Server (Video tutorial)
This video will provide a detailed guide on how to create a new AI Model using Ozeki AI Server.
Step 5 - Open AI Server
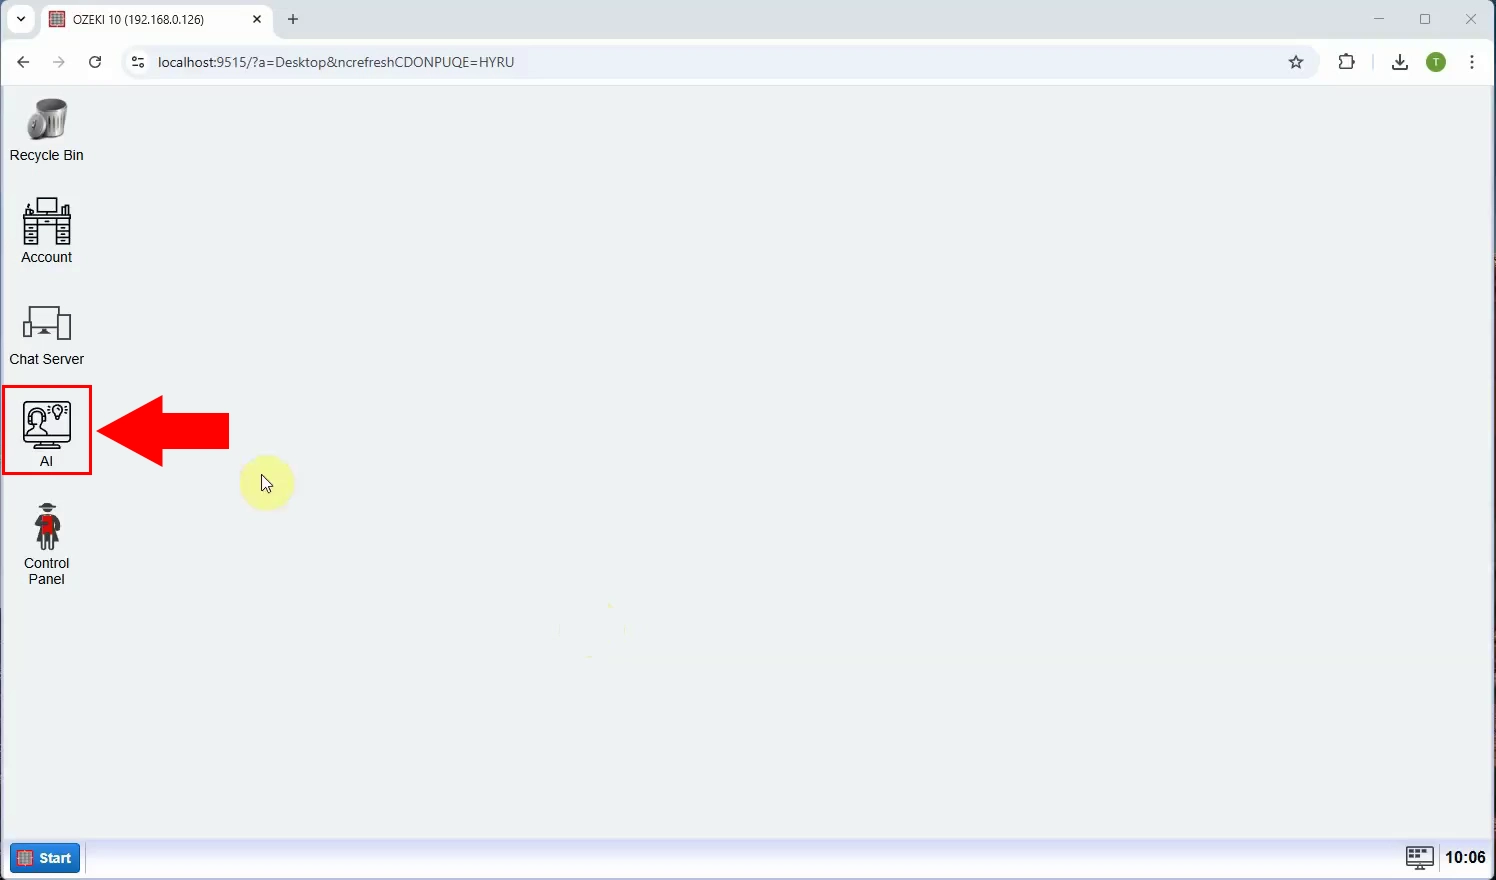
Launch the Ozeki 10 app. If you don't already have it, you can download it here. Once opened, open the Ozeki AI Server (Figure 5).
Step 6 - Create new GGUF model
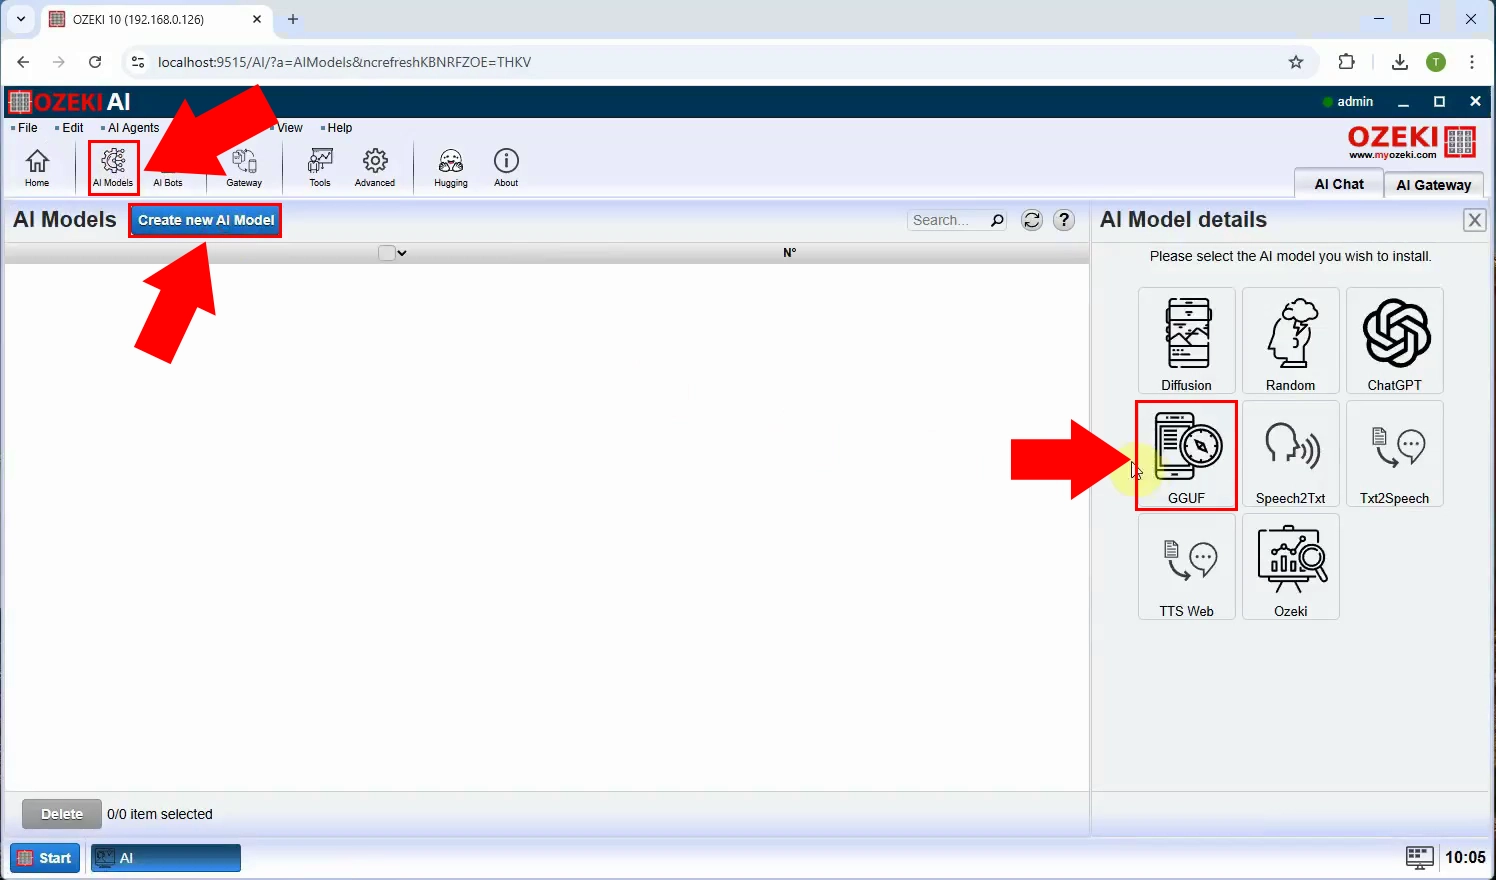
The Ozeki AI Server interface is now visible on the screen. To create a new GGUF model, start by clicking on "AI Models" at the top of the screen. Next, click the blue button labeled "Create a new AI Model". On the right side of the interface, you will see various options, select the "GGUF" menu (Figure 6).
Step 7 - Select model file
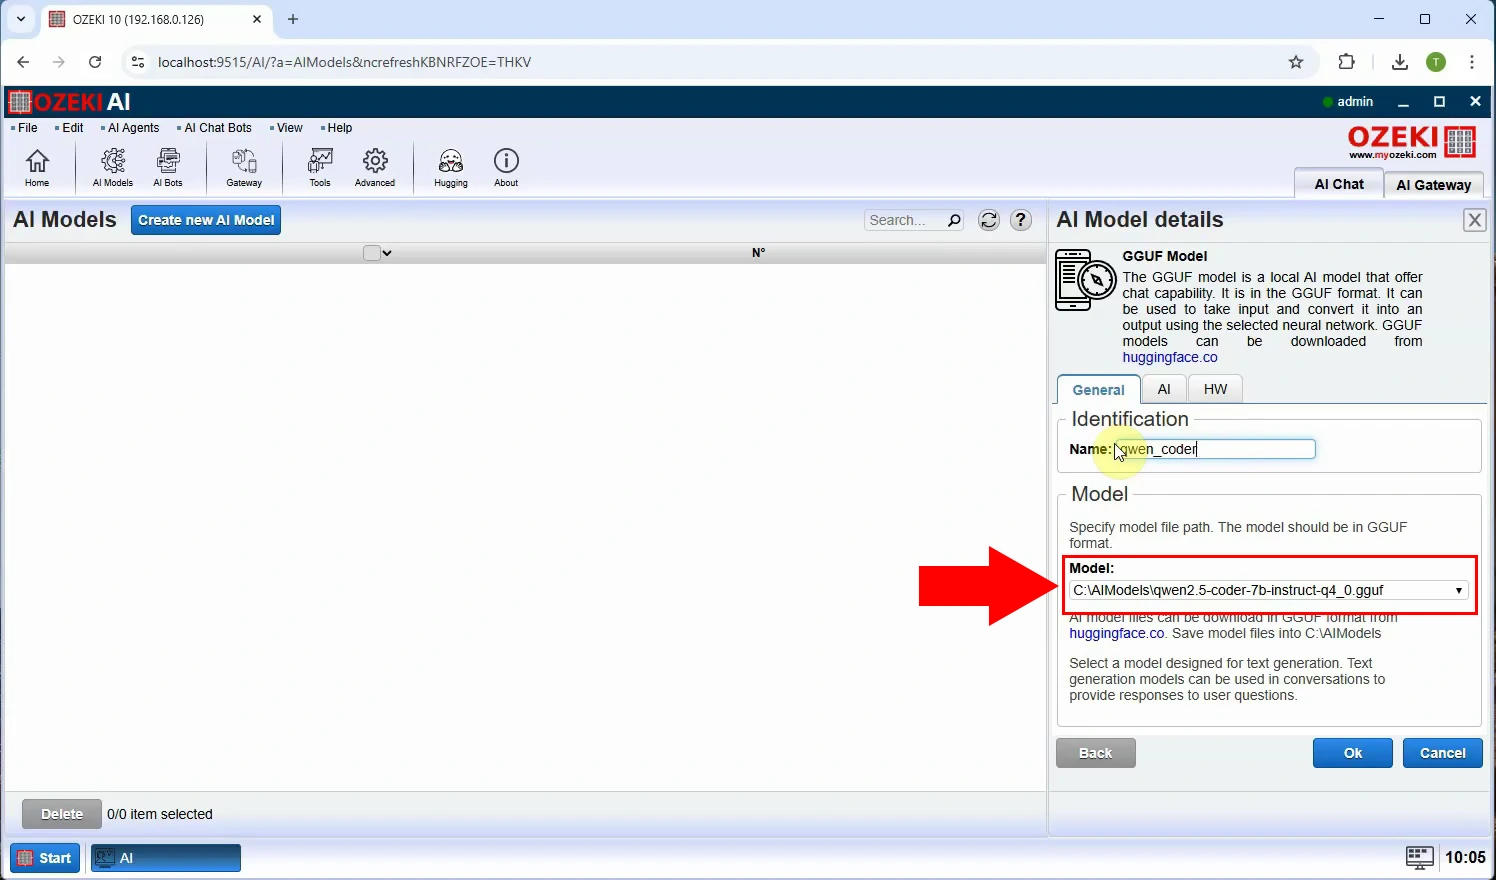
After selecting the "GGUF" menu, select the "General" tab, under Indentification rename it to "qwen_coder" select the "C:\AIModels\qwen2.5-coder-7b-instruct-q4_0.gguf" Model file then click "Ok" (Figure 7).
Create HTTP API user for Qwen Coder 7B model (Video tutorial)
In this video, you will learn how to create an HTTP API user for the Qwen Coder 7B model, allowing seamless integration with applications. The tutorial will guide you through the necessary steps to set up user and configure API access.
Step 8 - Open AI Server
Launch the Ozeki 10 app. If you don't already have it, you can download it here. Once opened, open the Ozeki AI Server (Figure 8).

Step 9 - Open AI Gateway
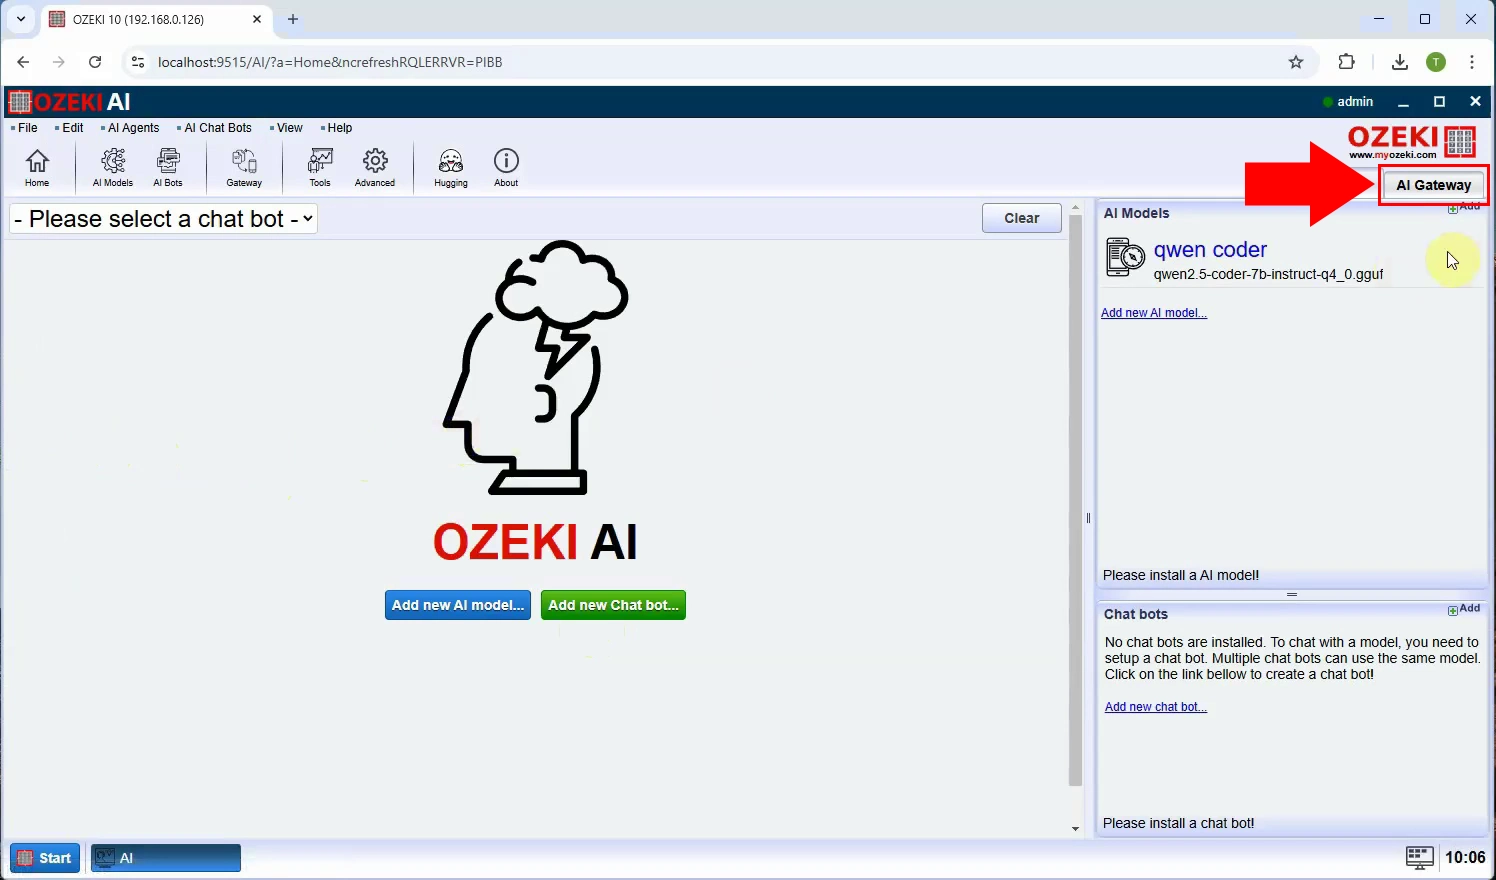
The Ozeki AI Server interface is now visible on the screen. On the right side, select the "AI Gateway" tab (Figure 9).
Step 10 - Add new AI Chatbot
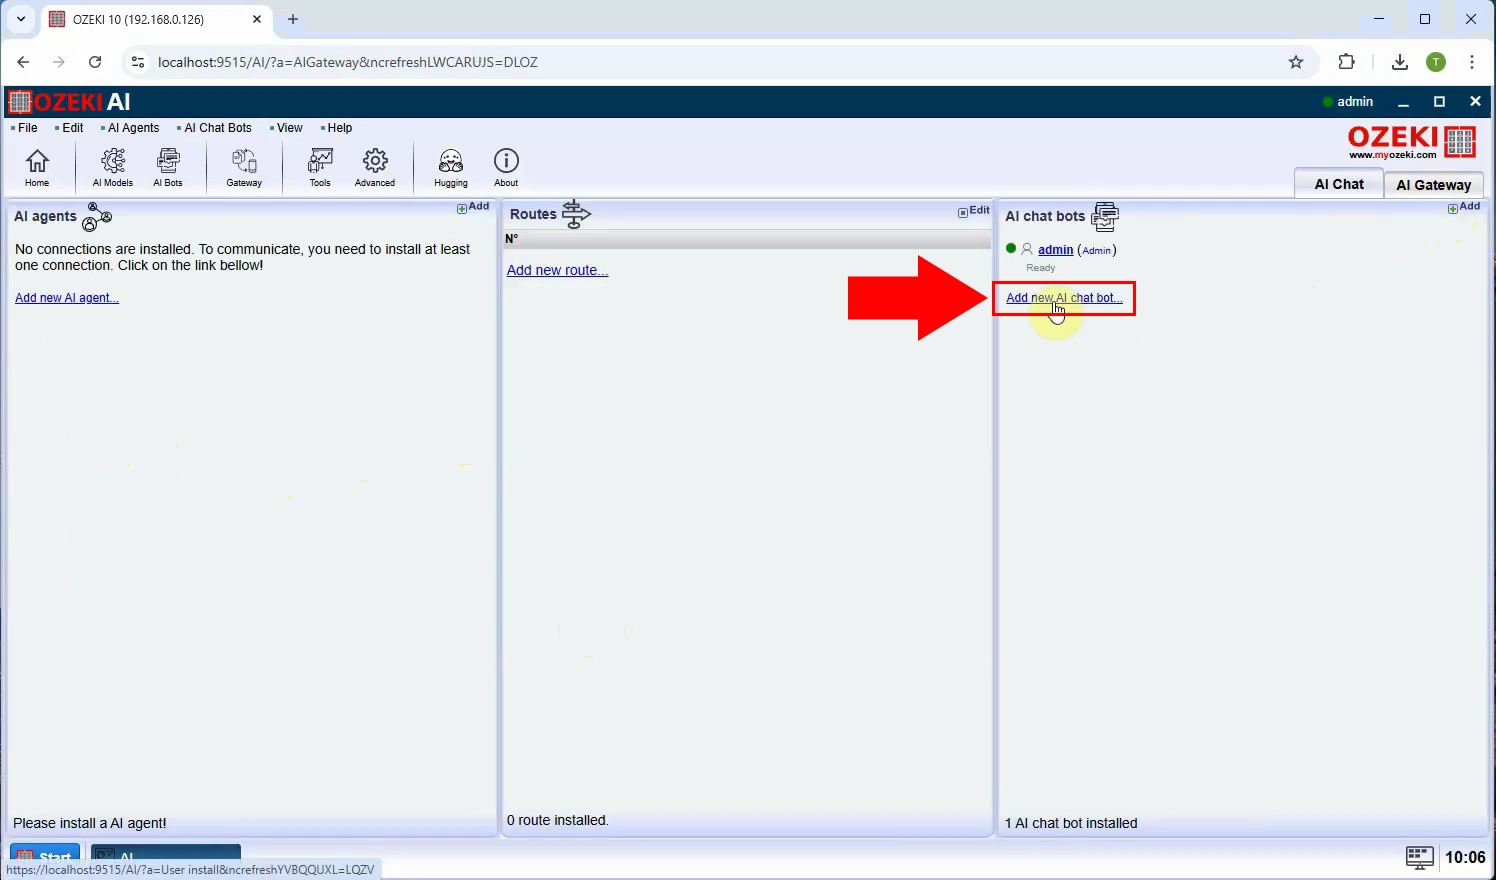
In the "AI chat bots" section, click on "Add new AI chat bot..." to create a new bot (Figure 10).
Step 11 - Install HTTP user
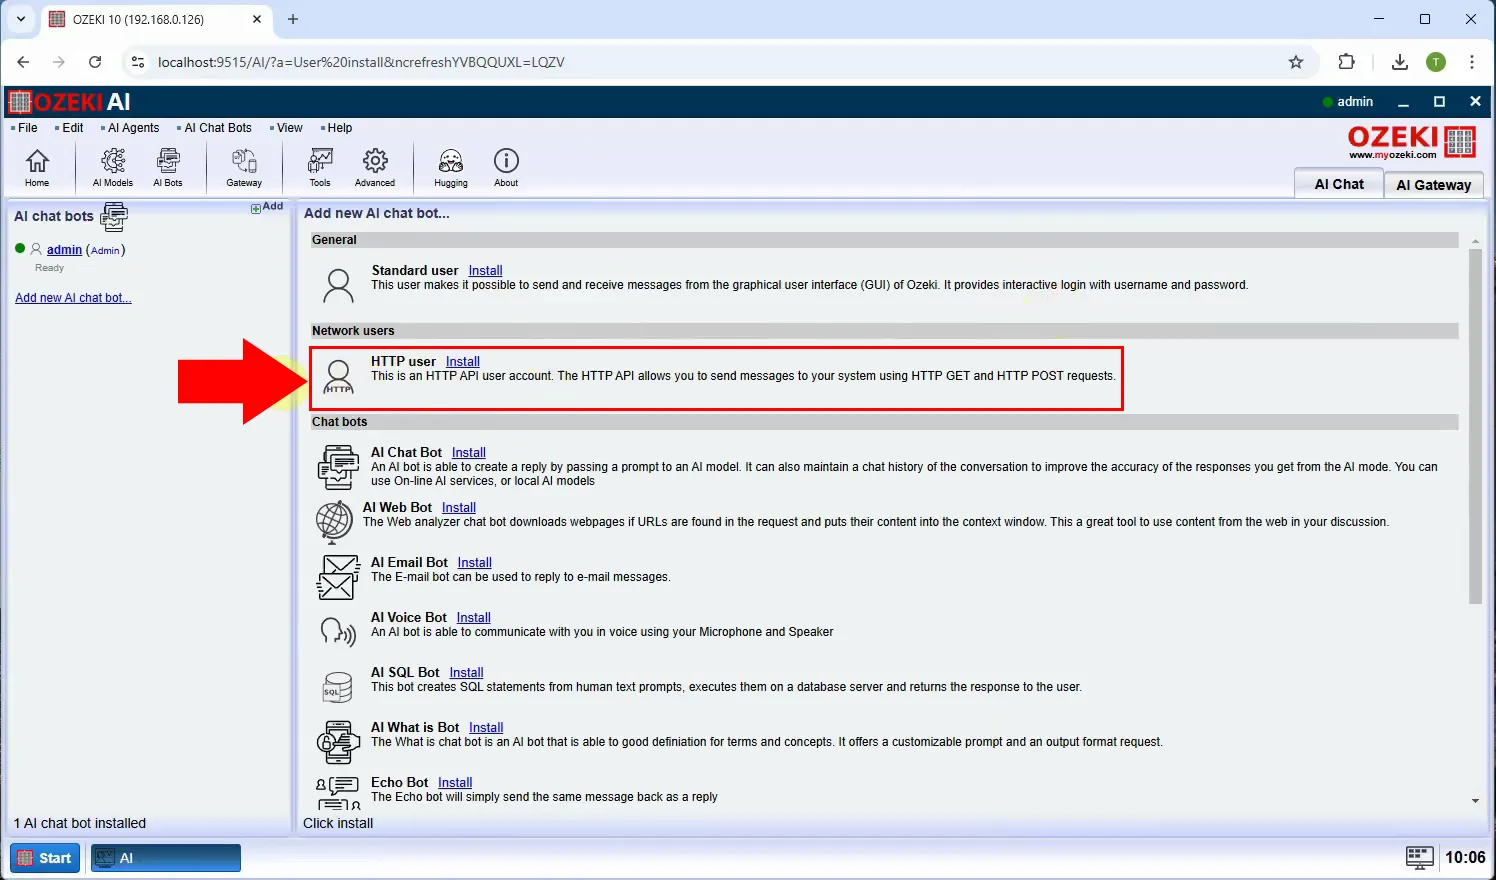
In the "Network Users" section, locate and select the option labeled "HTTP user" and "Install" to proceed with setting up a new HTTP user (Figure 11).
Step 12 - HTTP user details
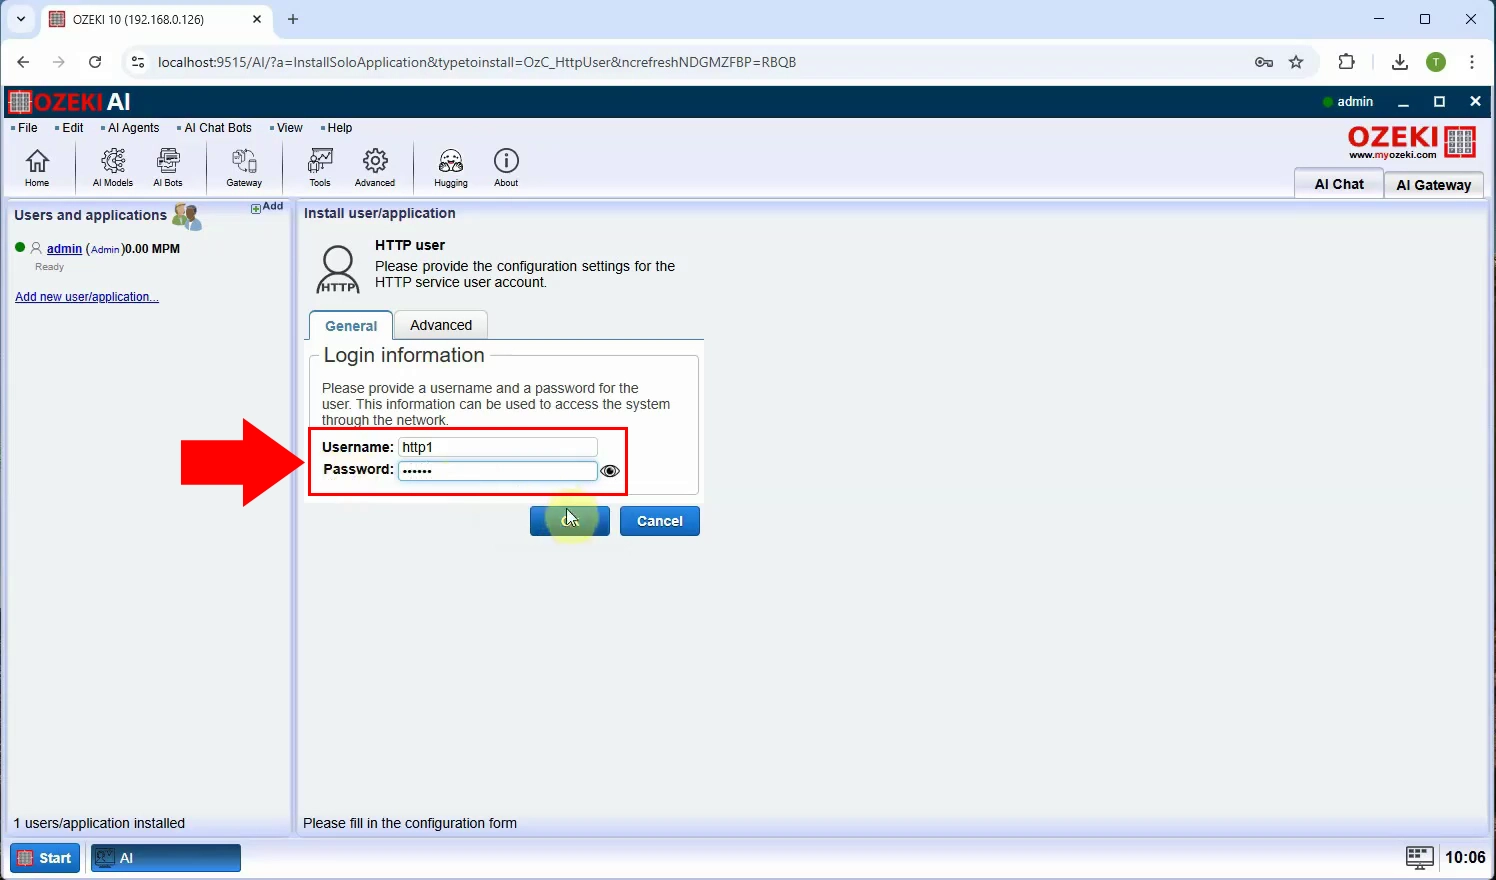
The "Login information" will appear, set the Username and the Password (Figure 12).
Step 13 - Enable logging
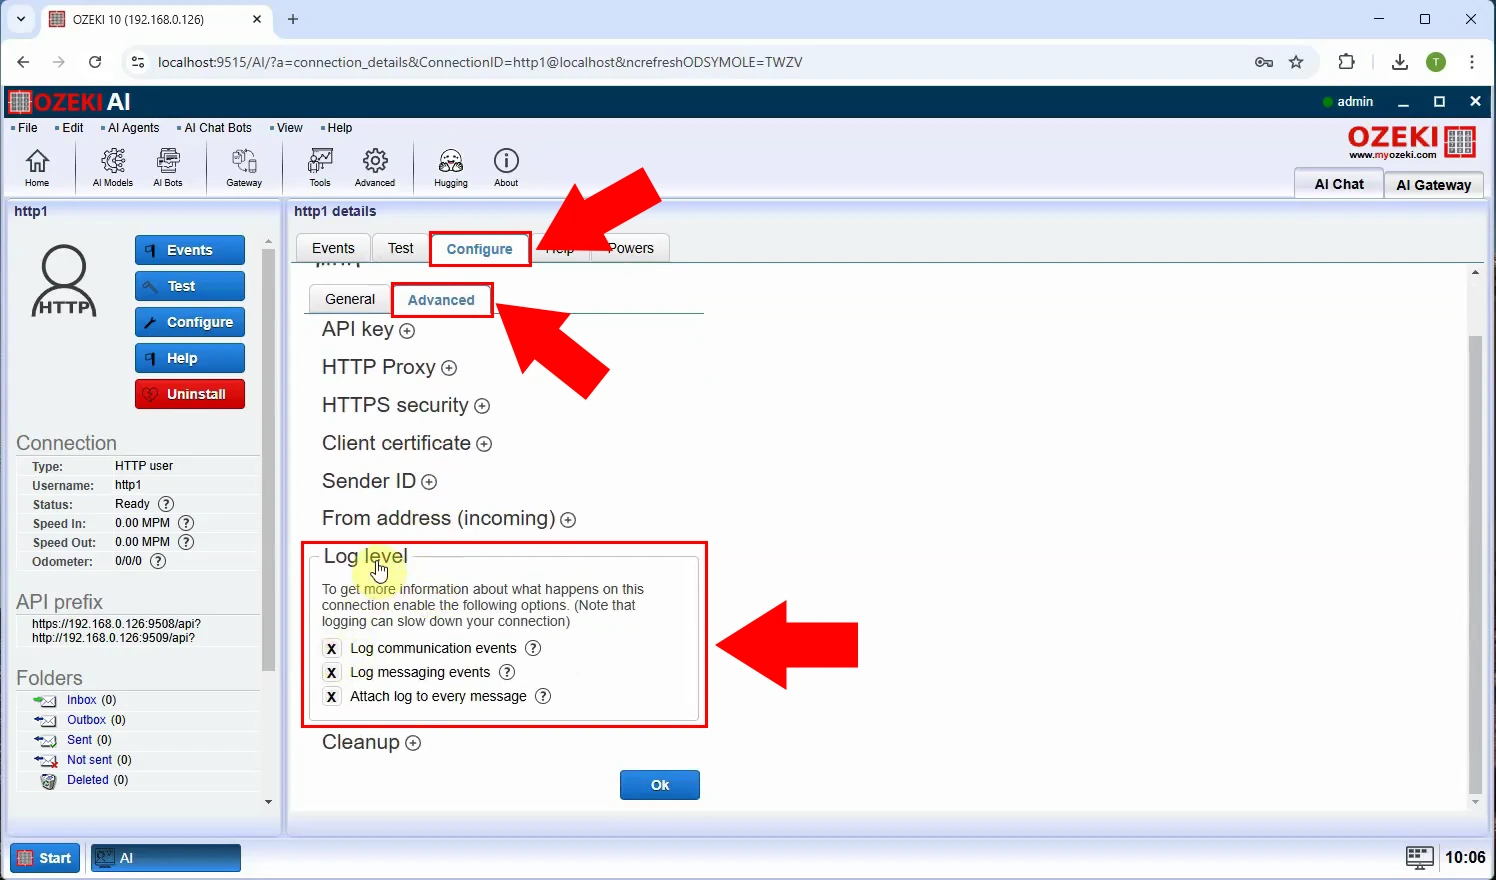
After creating the user, click on the "Configure" tab, then select the "Advanced" tab and open the "Log level" menu and tick the "Log communication events" option (Figure 13).
Step 14 - Generate API key
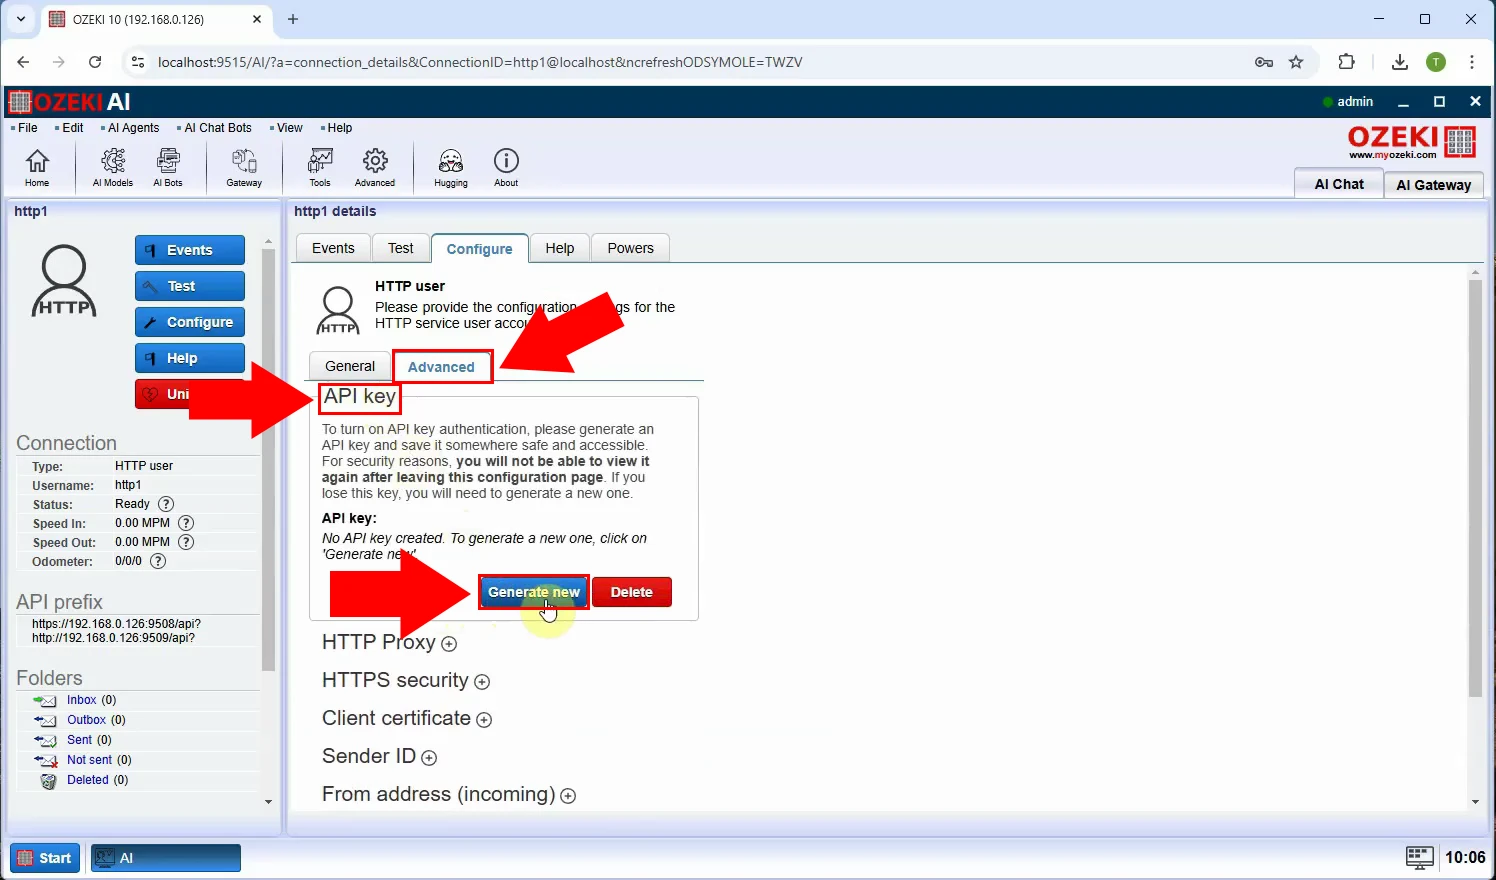
After setting the Log level, set the API key, also under the "Advanced" tab, click on the "API Key" menu and click on the "Generate new" button (Figure 14).
Step 15 - Copy API key
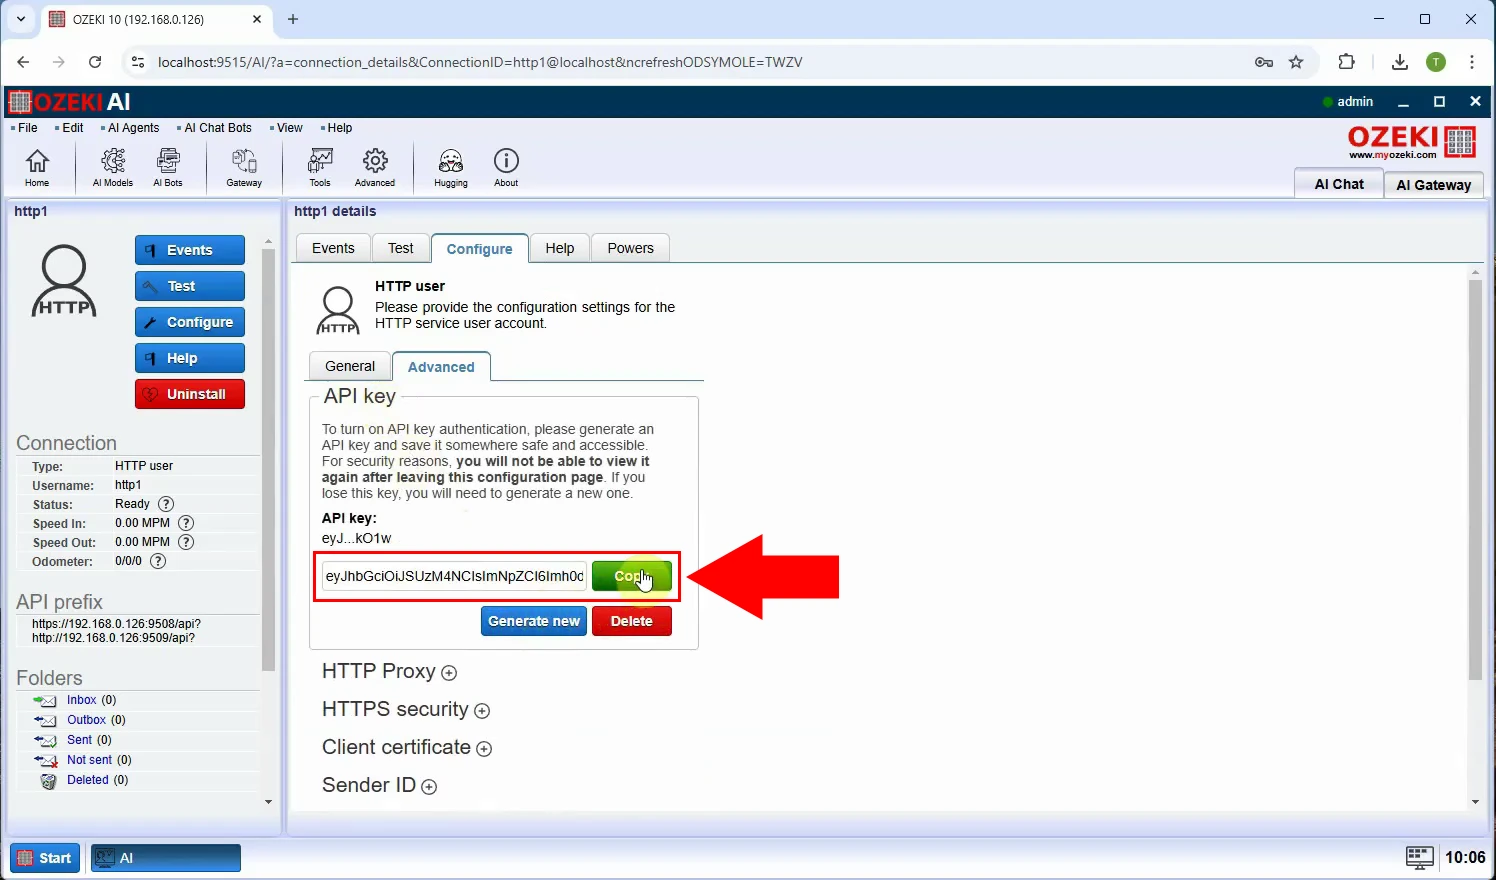
After generation, the generated key will be displayed, click on the green "Copy" button to copy it, then scroll down and click "Ok" (Figure 15).
Test Qwen Coder 7B model with Postman (Video tutorial)
This video will guide you through the process of configuring authorization in Postman and sending a request to the server using Postman. You will learn how to properly set up authentication, ensure secure communication, and execute API calls effectively. Once the request is sent, we will review the response from Postman and analyze the HTTP user communication log to verify that the interaction was successful. By following this tutorial, you will gain a clear understanding of how to authenticate and communicate with the server using Postman.
Step 16 - Configure authorization in Postman
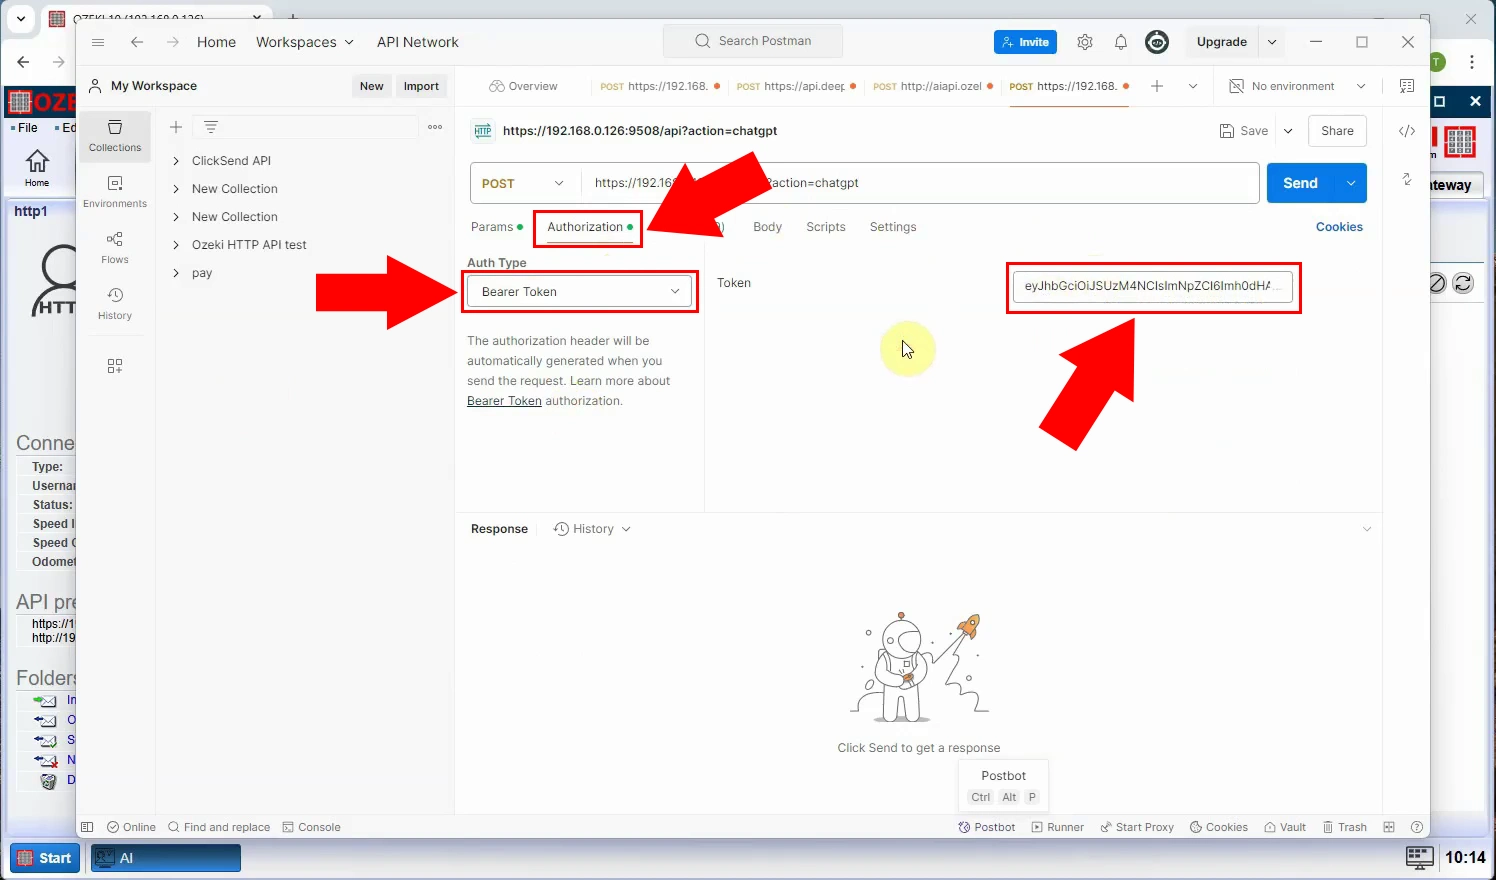
To configure the authorization for Postman, create a new request, the request type should be "POST". Paste the URL, then select the "Authorization" tab. The "Auth Type" should be "Bearer Token". And the token should be the API key you copied before (Figure 16).
Step 17 - Send request in Postman
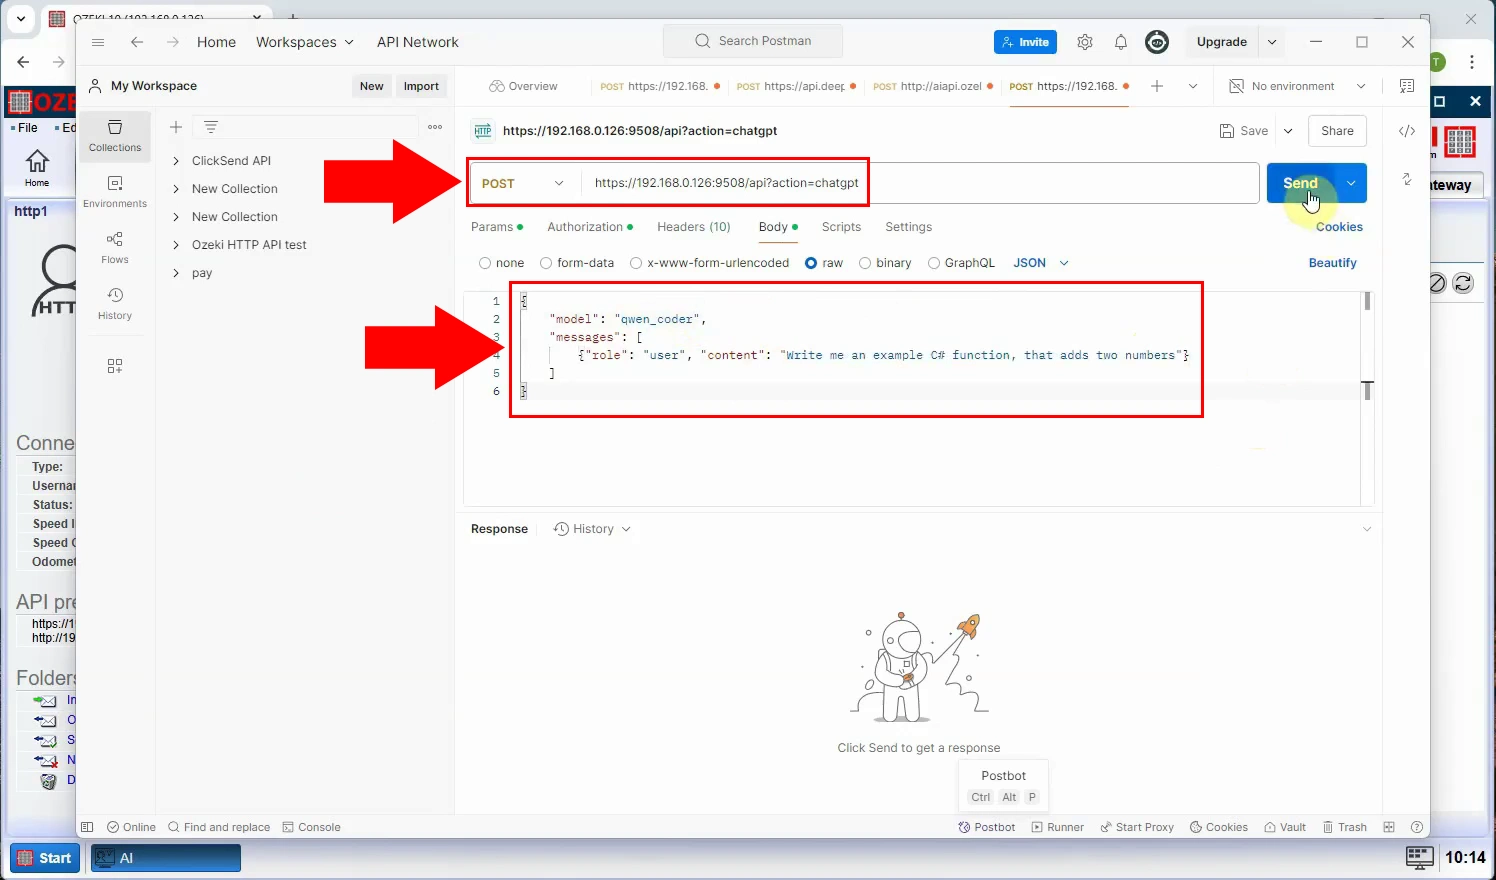
To send a request, select the "Body" tab, then "raw" and the request should be JSON. The following JSON code is sent as a request (Figure 17).
{
	"model": "qwen_coder",
	"messages": [
		{"role": "user", "content": "Write me an example C# function, that adds two numbers"}
	]
}
Step 18 - Response in Postman
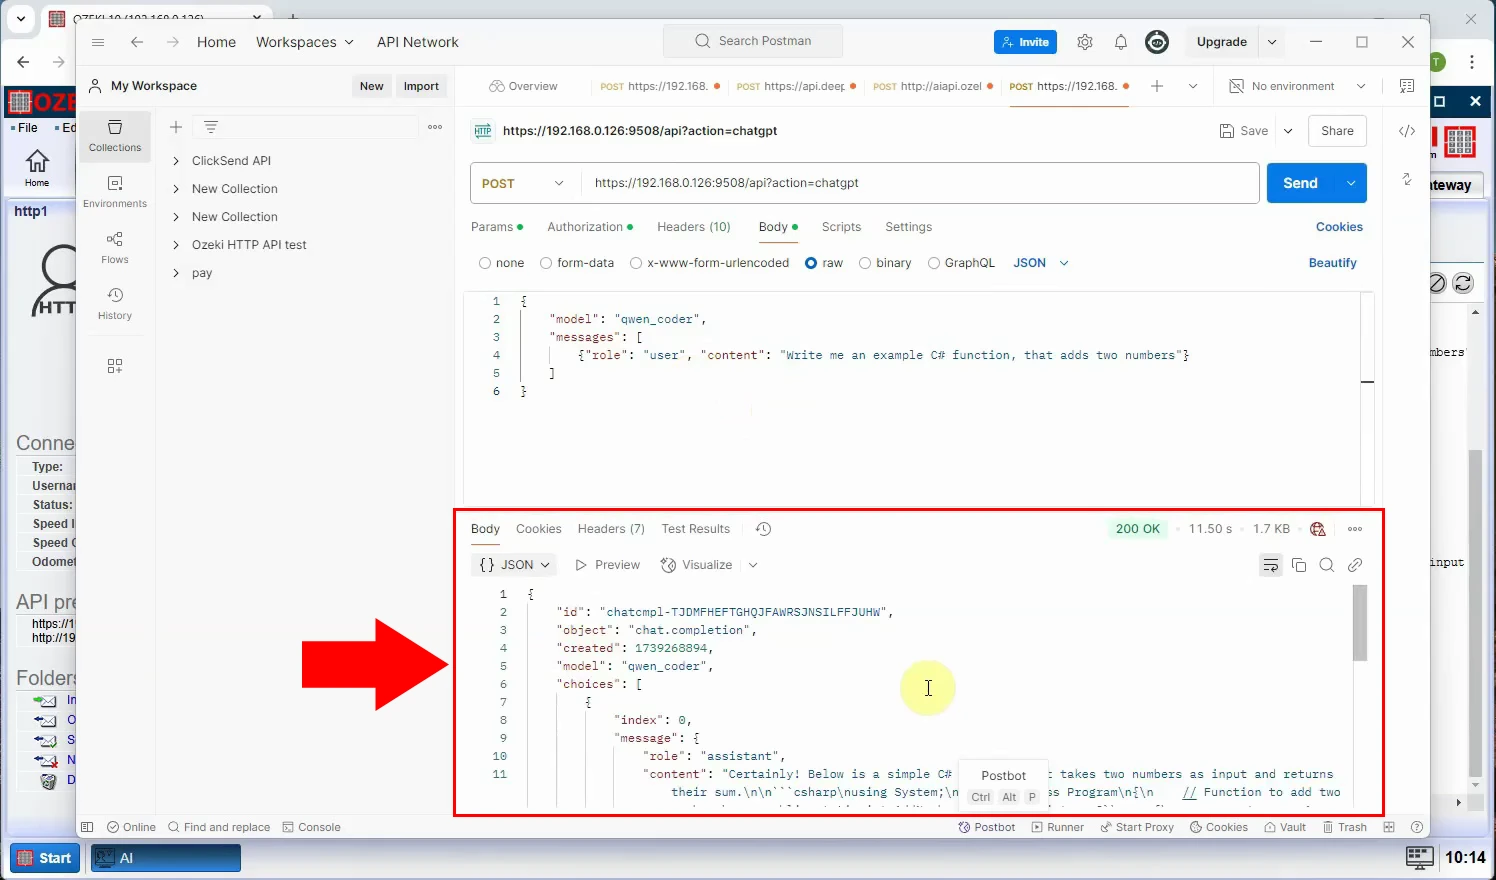
After sending the request, you will see the response from the API (Figure 18).
{
    "id": "chatcmpl-LAKKHDFTWPYROXHMMHPAXNYJCDNWJ",
    "object": "chat.completion",
    "created": 1739274728,
    "model": "qwen_coder",
    "choices": [
        {
            "index": 0,
            "message": {
                "role": "assistant",
                "content": "Here's an example C# function that adds two numbers:\n```\npublic static ...
                "refusal": null
            },
            "logprobs": null,
            "finish_reason": "stop"
        }
    ],
    "usage": {
        "prompt_tokens": 0,
        "completion_tokens": 0,
        "total_tokens": 0,
        "completion_tokens_details": {
            "reasoning_tokens": 0
        }
    },
    "system_fingerprint": "fp_f85bea6784"
}
Step 19 - HTTP user communication log
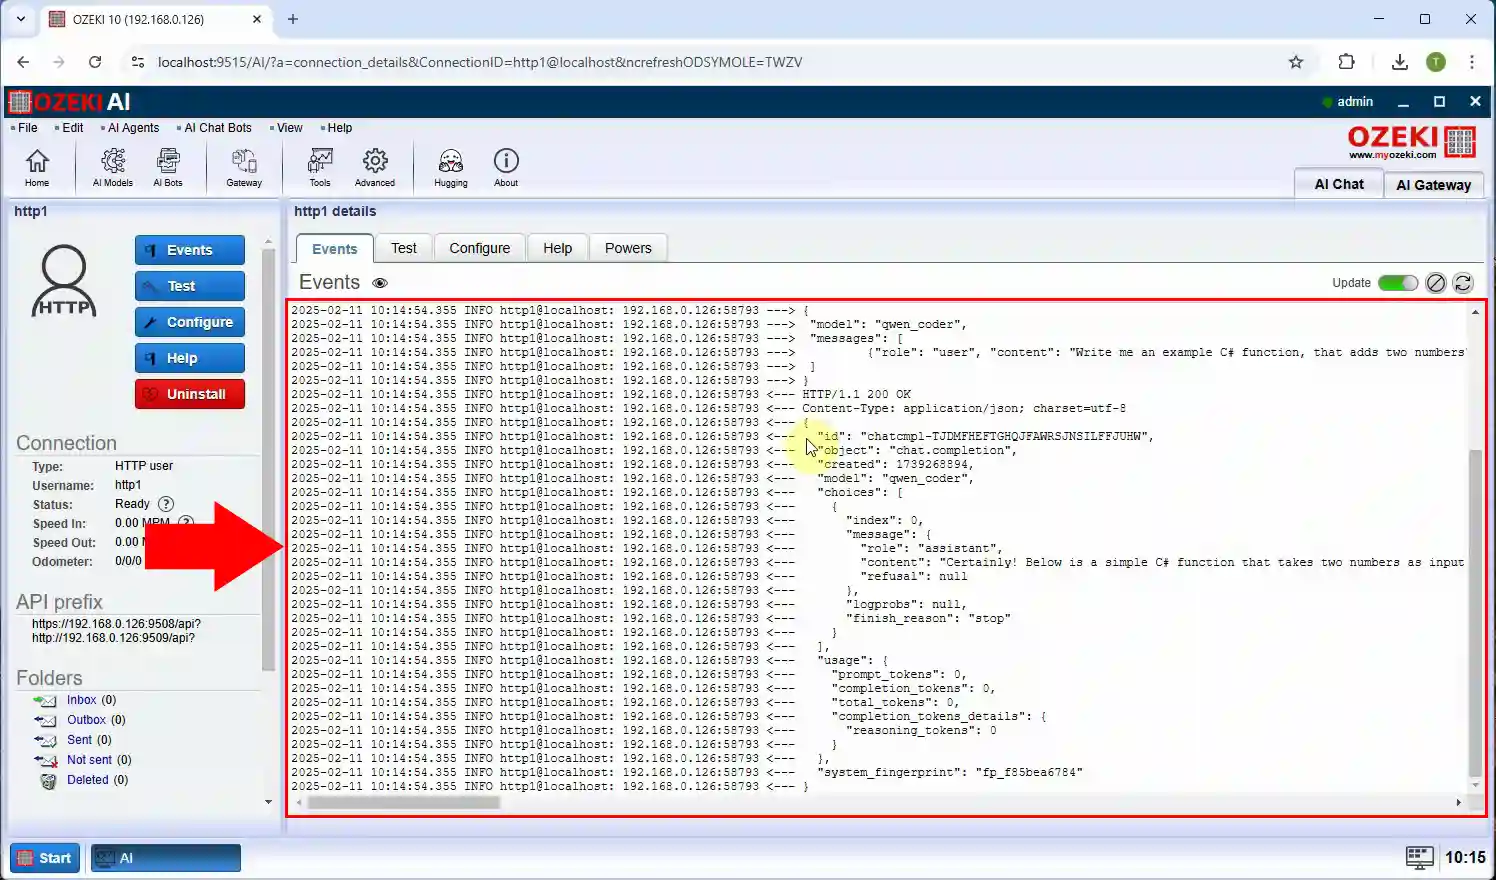
In Ozeki AI Server, you can see the API response under the "Events" tab (Figure 19).
